Sentry02
Active Member
I have been acquiring helmets for a while with the express intent of building out as many of the House Party Protocol helmets from IM3 as I can. I know this isn't anything terribly special since I didn't mold these great buckets, but I am enjoying the build out and painting that I have been doing. I wanted to share a little bit of what I have done so far since I am pretty close to being finished with the first of many helmets.
Mark XXVII - Disco
I decided that I wanted to do something that I had not seen yet as I started doing research, pulling some game files, pulling screen grabs, and using the IM3 reference book. This Iron Patriot helmet frame from The Rocketeer matches several of the other armor models in the list (I wish I had seen the thread already in this forum on the Iron Legion before I did all that research). :facepalm
One of the primary things that stood out to me about this armor is that the book and the game differ from each other, but the movie still I was able to nab of it and the Sideshow bust are very close to each other. I decided not to go with the book in this case as it shows it as too purple in my opinion. The biggest challenge was finding a rattle can that matched the colors I was looking at. I do not have access to custom paints via rattle can that are cost effective right now. I had to do a lot of paint testing to find the colors I wanted, but I was unable to find a direct match. More on that in a moment.
After I sanded the helmet and got it ready to put together (micro drill bits and micro files are my best friends), I had to decide if I wanted a clean helmet or a weathered one. I am quite partial to weathering if at all possible, so I decided that this would be based on what I imagined some of the damage could have looked like with the Extremis targets. My paint layers went like this:
I still have the electronics to complete for the eyes and get the plexiglass frosted up and installed for the eyes. I also need to permanently piece it together and get the airbrushing done to complete the weathering. All in all though, I am happy with it so far. I am attaching some photos of it but my camera can't pick up the purple shimmer unfortunately. You get to take my word for it this time.") My flash makes it look brighter than it is in hand so I have included photos both with and without the flash.
My flash makes it look brighter than it is in hand so I have included photos both with and without the flash.


Stay tuned for more once I get this one finished! I will add new helmets as I get them done for this project.
Mark XXVII - Disco
I decided that I wanted to do something that I had not seen yet as I started doing research, pulling some game files, pulling screen grabs, and using the IM3 reference book. This Iron Patriot helmet frame from The Rocketeer matches several of the other armor models in the list (I wish I had seen the thread already in this forum on the Iron Legion before I did all that research). :facepalm
One of the primary things that stood out to me about this armor is that the book and the game differ from each other, but the movie still I was able to nab of it and the Sideshow bust are very close to each other. I decided not to go with the book in this case as it shows it as too purple in my opinion. The biggest challenge was finding a rattle can that matched the colors I was looking at. I do not have access to custom paints via rattle can that are cost effective right now. I had to do a lot of paint testing to find the colors I wanted, but I was unable to find a direct match. More on that in a moment.
After I sanded the helmet and got it ready to put together (micro drill bits and micro files are my best friends), I had to decide if I wanted a clean helmet or a weathered one. I am quite partial to weathering if at all possible, so I decided that this would be based on what I imagined some of the damage could have looked like with the Extremis targets. My paint layers went like this:
- 2 coats of Dark Grey sandable auto primer from Rustoleum.
- Initial latex masking fluid layer. I made sure I started small, realizing that I would be making the damaged areas larger as I went along.
- 1 coat of Light Grey sandable auto primer from Rustoleum.
- Next latex masking fluid layer adding randomness to the initial layer and starting a few new bits of damage at this paint layer.
- 1 coat of the Titanium Silver Metallic paint from Rustoleum. This has to be my current favorite series of paints. Not only due to the great metallic colors available at the local hardware store, but also because the trigger applies a very even coat of paint and it looks fantastic. You really have to try to mess up with this paint. I used this as a base metal for the damage.
- Next latex masking fluid layer.
- Now that I had the base of the helmet colors completed, I had to find a way to match that color. I don't use only Rustoleum paints, but it worked out that way this time. I initially bought a Gloss Deep Blue, but that wound up being close but way too bright and way too blue. I then bought a Gloss Purple, but that is absolutely the wrong color and too dark. After some testing, I was able to get a pretty close match to the color by using a base coat of the Deep Blue and then misting the Purple onto the helmet pieces (minus the chin and other areas intended to be orange). I misted the Purple at about 18 inches to get a very wide and very light coloration. I was very happy with the result as it created a purple shimmer on the Deep Blue base coat that is caught in the light. I felt that it was fitting since this is the Chameleon Suit after all.
- Final top layer of latex masking fluid was placed to allow some of the metallic paint to show through as desired.
- I painted the lower jaw and the mowhawk/ear caps a Fire Orange from Rustoleum.
- I used an ultra fine tip black sharpie on the detail lines of the lower jaw.
- Once the paint was finished and dried for a few days (lots of humidity this last week), I removed the latex masking fluid and sanded the damage in using 80 and 180 grit sand paper.
- After the damage was sanded in, I used a black wash to get some grime down into the recesses of the helmet and make it look a bit more loved.
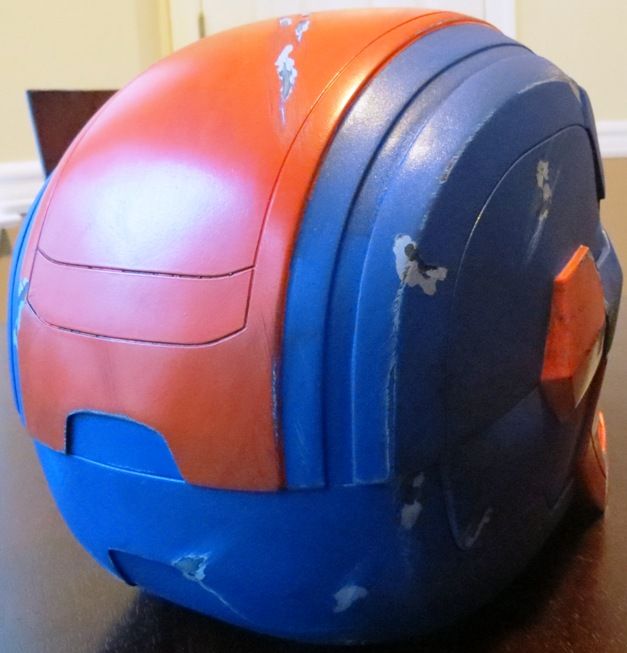
I still have the electronics to complete for the eyes and get the plexiglass frosted up and installed for the eyes. I also need to permanently piece it together and get the airbrushing done to complete the weathering. All in all though, I am happy with it so far. I am attaching some photos of it but my camera can't pick up the purple shimmer unfortunately. You get to take my word for it this time.
My flash makes it look brighter than it is in hand so I have included photos both with and without the flash.


Stay tuned for more once I get this one finished! I will add new helmets as I get them done for this project.


