scharfe
New Member
Hey All,
Im new to joining this forum, I've been fallowing it (mainly iron man related) since this time last year when I just things here for reference to build my first arc reactor for a halloween costume. Ive now made a much more advanced one and figured I would show off the progress so far, any feed back would be great theres still some details I haven't mastered.
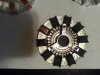
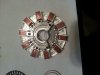
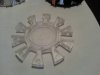
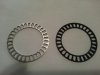
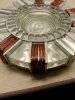
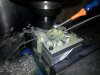
A little about the reactor so far, all parts a 100% custom designed and built, most the parts are made on a cnc from billet aluminum. I have a custom designed board that will drive 11 cree xte leds at .5A each (these arnt your average leds), its extremely bright for running off a 9 volt. I work for a company that specializes in leds, so the design of this was made to run the leds properly using the main base as a heat sink for the leds, my first light has been running for almost a year as a desk light, so im trying to make this one even more reliable but also more realistic, this one will be 1/2 inch thick so easy to wear under my shirt.
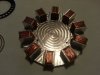
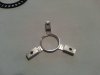
I still haven't mastered the winding of the wires so any suggestions would be great.
Based off the "auction" version

Im new to joining this forum, I've been fallowing it (mainly iron man related) since this time last year when I just things here for reference to build my first arc reactor for a halloween costume. Ive now made a much more advanced one and figured I would show off the progress so far, any feed back would be great theres still some details I haven't mastered.
A little about the reactor so far, all parts a 100% custom designed and built, most the parts are made on a cnc from billet aluminum. I have a custom designed board that will drive 11 cree xte leds at .5A each (these arnt your average leds), its extremely bright for running off a 9 volt. I work for a company that specializes in leds, so the design of this was made to run the leds properly using the main base as a heat sink for the leds, my first light has been running for almost a year as a desk light, so im trying to make this one even more reliable but also more realistic, this one will be 1/2 inch thick so easy to wear under my shirt.
I still haven't mastered the winding of the wires so any suggestions would be great.
Based off the "auction" version
Attachments
-
 painted arc reactor assem.jpg1 MB · Views: 312
 -
 raw arc reactor assem.jpg2 MB · Views: 330
 -
 arc reactor windings.jpg2.3 MB · Views: 313
 -
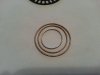 arc reactor rings.jpg2 MB · Views: 389
 -
 raw acrylic cnc finish.jpg1.9 MB · Views: 356
 -
 arc reactor center ring not done.jpg1.9 MB · Views: 328
 -
 arc reator ring.jpg1.9 MB · Views: 385
 -
 arc reactor cnc base plate.jpg2.1 MB · Views: 376
 -
 correct wire size, poor job.jpg838 KB · Views: 359
 -
 arc reactor cnc in progress.jpg2.5 MB · Views: 478
 -
 arc reactor official .jpg311 KB · Views: 631
Last edited:


")


