Improving a 1/2 scale Alien Big Chap kit from Agora

Palantirion

Sr Member
I swear I don't always build Alien stuff, but it seems like that's all I post. Really, I do other stuff. Anyway, disclaimer out of the way....I had to get this kit from Agora because it's 1/2 scale and while I had some "cosmetic differences of opinion" the sculpt looked like it would fit in well with my collection. This is NOT a build guide or review of the kit. This is the review of the kit: It's a mostly well designed kit, mostly.

Disclaimer: The goal of this project was NOT to make the model look perfect. That would have required a ton of seam filling, a full repaint, nail replacement, etc. etc. My goal was to make the kit go from "giant pharmacy toy" to a decent looking quasi-statue.

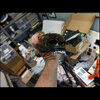
First thing was painting the teeth. They were a dull silver. I used Molotow Chrome and a brush, one nice thick coat and let it self level. Upper teeth done.
25,03-08 (3) painting teeth.jpg


Also I did not care for this clear/black stock paint treatment for the top of the head. At all.
25,03-08 (7) stock head top.jpg


I first toned it slightly with brown ink.
25,03-08 (12) toning.jpg


Then slowly snuck up on darkening some areas to give it a bit more depth and create transitions.
25,03-08 (13) brown shadows.jpg


Then black ink for more dimension and to tie it in with the OEM black areas.
25,03-08 (14) adding black.jpg


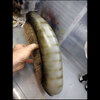
The OEM "color" of the mouth tendons was terrible. Stood out like a sore thumb. This is as much paint as I could remove with files (couldn't risk a harsh remover), and the plastic is dyed.
25,03-10 (1) stock tendons.jpg


Like the head I airbrushed brown and black inks to give it a uniform tone and then to bring out depth. The black was done darker at the edges to help transition the tendons to the mouth.
25,03-11 (1) brown ink.jpg


Tendons with head.
25,03-11 (5) with head.jpg


Also painted the teeth of the inner jaw.
25,03-14 (2) installing teeth.jpg


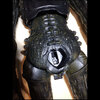
The head halves, mostly built.
25,03-16 (2) head assembly.jpg
 

Attachments

  • 25,03-14 (1) installing teeth.jpg
    25,03-14 (1) installing teeth.jpg
    134.1 KB · Views: 11
Now let's do something about those nails....
25,04-02 (2) chroming nails.jpg


Gross, right?

After sanding the seam lines smooth I painted them Chrome like I did the teeth. Yes, I know the real nails were clear (Lee Press-On I think), but I can't turn these plastic ones clear. And chrome and some drybrushing should give them appropriate depth and also tie them stylistically to the changed I made to the head.
25,04-06 (1) drybrushing nails.jpg


Like the body of a DeLorean I sanded the black paint unidirectionally to add a little texture.
25,04-06 (2) drybrushing nails.jpg


Then stained them with the brown ink and one of my scrungy brushes.
25,04-06 (5) drybrushing nails.jpg


Glossed them with a little Liquitex High Gloss Varnish (the toes are rubber so I wanted a flexible clearcoat). To be honest they don't look that great up close.
25,04-06 (8) drybrushing nails.jpg


But at viewing distance I think they look pretty good. Note: This pin was before I cleaned up the overpaint around the cuticles.
25,04-06 (11) drybrushing nails.jpg


Little piggies.
25,04-06 (12) drybrushing nails.jpg
 
Time passes. LOTS of time. And I got him built. Mostly.
25,06-06, assembled (1).jpg


And this is with the supplied dome. We're gonna circle back to that, because....yuck!
25,06-06, assembled (2).jpg


Fun fact. I wanted to clamp the head top on the secure lower portion (still needed it loose to check on internals), but didn't want to risk tape pulling off my paint. So I wrapped this blue tape around it sticky side out, then did anther loop over that using the sticky to snug up the fit. Made a pretty good, and safe, clamp.
25,06-07 (1) tape clamp for head.jpg


Now to fix the tail. There are two REALLY stupid design flaws with this kit. One is that the tail has NO physical connection. And second: The base's stand is supposed to support the ENTIRE heavy xeno by just touching the tail in one spot. I don't know what they were thinking. Instructions say to simple epoxy the tail into it's socket....Ok, so now it's 4' tall and 2' deep and 2' wide with a huge lever arm on a non-reinforced connection supporting 8lbs.

So I did some surgery on the end of the tail and his, um, rectum, and decided to try pins and a magnet. The former to support load and the latter keep it from sliding perpendicular to load. This is half of the tail base, drilled (sloppily) and pinned.
25,06-07 (5) cutting and gluing tail pins.jpg


Then Apoxie shoved all over it with excess and clamping the two tail halves together.
25,06-08 (1) tail Apoxie.jpg

25,06-08 (4) tail Apoxie.jpg


I used this clamp to keep the pins aligned parallel to each other while the Apoxie cured.
25,06-08 (5) tail Apoxie.jpg
 

Attachments

  • 25,06-08 (6) tail Apoxie.jpg
    25,06-08 (6) tail Apoxie.jpg
    147.1 KB · Views: 8
This is his butt. It's a little butt. And within this little butt there isn't much depth for pins.
25,06-08 (6) tail Apoxie.jpg


So I had to trim one. But it's enough to keep the tail indexed and the big one is overkill for load.
25,06-08 (7) tail Apoxie.jpg


So I filled his butt with Apoxie, inserted the tail and used this piece of foam to hold it overnight at the right angle while the Apoxie cured.
25,06-08 (9) tail Apoxie.jpg


Removed the tail, cleaned up the Apoxie, and drilled a recess for a magnet (also added one to the tail).
25,06-09 (1) magnet for tail.jpg


And it worked! He's leaning back on his dorsal growths but that tail is completely unsupported besides the connection I made.
25,06-09 (2) magnet for tail.jpg
 
Now about that other problem. The tail should NOT be responsible for all this weight. And the supplied post is very strong and the plastic end pretty much wanted to be a crotch grabber, which makes SO much more sense for a figure like this. However the keyed hole for this post was at 1 corner of the base. Long story short: I had an idea and clocked the post 45 degrees and then drilled these two holes to give me some wiggle room for height.
25,06-09 (3) holes to rotate stand.jpg


Then I drilled two holes for someone else's foot pegs. I used ProPoxy20 for the structure of these peg holes, because the figure is really heavy.
25,06-09 (8) holes and reinforcement for Sonico.jpg

25,06-09 (9) holes and reinforcement for Sonico.jpg


Then bulked the areas out with Apoxie for more compressive support.
25,06-09 (11) holes and reinforcement for Sonico.jpg


Pegs in place.
25,06-09 (10) holes and reinforcement for Sonico.jpg


Is this NSFW? She's in primer, don't know. Point being that the only other 1/2 scale figure I have is this Super Sonico cast resin piece that was grenaded during shipping by a crap seller. She was my first ever serious repair job (much of her was shattered), and I never got around to finishing her paint. And she takes up a lot of space, and so does this xeno...one thing led to another and sometime in the future she's going to be cosplaying as Ripley.
25,06-10 (4) test mounting with Sonico.jpg

25,06-10 (5) test mounting with Sonico.jpg


But she's heavy, and her right heel fell in a gap in the base so I had to quickly make a support. A popsicle stick, black paint and drybrushed to match the base.
25,06-10 (12) Sonico heel support block.jpg

25,06-10 (13) Sonico heel support block.jpg

25,06-10 (14) Sonico heel support block.jpg
 
Moving him to my office, sans dome. Needed to get him out of my little studio. Imagine trying to move him if his tail wasn't detachable!
25,06-10 (17) moving to 624.jpg


Set up where I think he'll live.
25,06-10 (20) moving to 624.jpg


Circling back to the supplied dome....Blech!
25,06-10 (16) stock dome.jpg


First thing was to sand the crap out of that sharp lower edge, rounding it along the entire perimeter of the dome.
25,06-10, dome edge profiled (1).jpg


Then I sanded the black paint off and then sanded the whole dome to p800. I had originally hoped to sand it clear but it is cast in a translucent white so clear isn't an option. But I have to make it look better than that original crap.
25,06-11, painting dome (1).jpg


Yes, you guessed it: Brown and black inks. Because consistency is its own form of correctness. Airbrushed some freehand stripes, inspired a little by the Romulus xeno.
25,06-11, painting dome (3).jpg


I varied their angle, making it more severe toward the back.
25,06-11, painting dome (4).jpg


Then I did freehand squiggles with the airbrush, multiple light passes, to add visual texture to the open areas. I feathered the intensity toward the rear, knowing that it would end up being almost completely black.
25,06-11, painting dome (5).jpg


Then I grabbed an old portable HVAC air filter, because it had weird randomly-shaped holes in it, and used that as a freehand mask to add more specific texture.
25,06-11, painting dome (8).jpg


Switching to black ink I slightly darkened the center and ends of each stripe, then used the air filter mask to lightly add overlapping organic textures.
25,06-11, painting dome (12).jpg

25,06-11, painting dome (13).jpg


Then I took went to clear it with what I used on my Green Queen project: Upol...
 

Attachments

  • 25,06-11, painting dome (12).jpg
    25,06-11, painting dome (12).jpg
    107 KB · Views: 5
AND THIS HAPPENED!!! I wasn't paying attention and grabbed Upol high build primer instead of clear. I was not happy.
25,06-12, dome primer disaster (1).jpg


Turned out brake cleaner removes urethane primer really well. And inks.
25,06-12, dome primer disaster (2).jpg


So I fixed it. Wasn't pleased with this event, but was at least relieved that I was able to repair it without a complete repaint.
25,06-12, dome primer disaster (4).jpg


Then I cleared it...with CLEARCOAT.
25,06-12, dome cleared (1).jpg

25,06-12, dome cleared (3).jpg


And here are some pics (sorry they are dark) of him all finished and happy in his new home....but still awaiting his prey.
25,06-13, finished (1).jpg

25,06-13, finished (5).jpg

25,06-13, finished (6).jpg
 
Back
Top