protonpack
Active Member
I love it!
beautiful work so far!On second thought, what fun is an update sans visual aide?
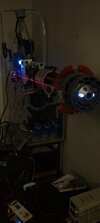
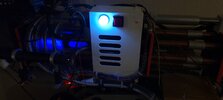
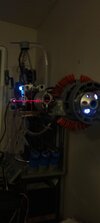
After a few hours of soldering burns, the electronics (driven here by a test app I wrote, not final) are working as intended:
View attachment 1500442
Sharp eyed viewers will note that, yes, I broke off the laser reflector arm by accident!
Thank you!!!beautiful work so far!


Hey, I just had a great idea, what if later in the Szalinski Family's life, Wayne converted the shrink ray into a minigun shrink ray with the Viewfinder as a visor?Thanks Emma! I agree, the red wire compliments the capacitors nicely!
Since you asked Ethan:
- first, I need to create brackets for the coils - they were held in place via friction for those pics! The ones that attach to the "heat sink" will need unique ones versus the rear coils and may take some experimentation to get the angles right. Hope to have this done soon.
- the rear tank and it's components need to be finished. I was working on it when my 3d printer went haywire in 2021, and never finished the domed top - it also needs to be properly sealed with caulk so less fog machine-generated fog escapes. The rear tank has a 12v waterproof fan combined with a funnel which was mean to distribute fog throughout the machine to see the laser. I only tried it once and the fog systems efficacy was...questionable.
- next, all the electronics need to be fixed; i have new devices meant to aid in this endeavor i have yet to implement. I'm probably going to replace that camcorder with a model that actually outputs a video signal - what a novel concept!
- finally, I realized recently that the document I'd posted earlier in this thread is only as good as its word and lacks actual working proof. Also, I really hate the way the foam "lift arms" came out; they're really lopsided and imprecise, and low quality even for a "rough draft" such as this, which has turned out cool enough to warrant an upgrade of sorts. Lastly, a friend of mine moved back to my city and has a shop equipped to create these kinds of things plus a lot of experience as well. Therefore the final phase will be to create a working non-fake foam version of the scissor lift arms (and tilt motor, which might be impossible). This should help identify issues before embarking on the real deal replica project.
May I have a copy of that file, please?Hi folks,
Thanks to Disney+, i recently rewatched Honey, I Shrunk the Kids and i deffinitly felt in love with the machine. So mush that i quickly wished to have a full size replica in my home. But du to the size of the props and the size of my appartement, it will have to wait for the moment. But i still wished to work on some parts. I thinks the most iconic part of it is the nozzle. and like some of you saids in this topics, it is likely a machined piece of aluminium made for the movie.
So my idea was to make a replica of the nozzle and part of the emitter, until i could build the whole machine. I think i'll 3D print the nizzle so i've made a 3D model on Fusion360. It's a prototype, not the final piece as i only used one picture to mostly match it. View attachment 1381432View attachment 1381433
I made this to give me an idea of the overall shape. Now i'm gonna try to find some measurement to make it to the corect size. All advices are welcome.