So I’ve been holding out from a while here but have intent to start posting my creations. Two years ago I started going full steam ahead with turning our house into a full on Haunted Mansion. Each Halloween we open the doors to the public for tours. Last year was around 450 people and growing each time. Some of my favorite props my roommate and I made I’ll post here if people are interested. Working on adding more before October this year

You have great attention to detail! I am impressed. Really a nice job!
 
You have great attention to detail! I am impressed. Really a nice job!

Thank you! Hope to add on two more additional rooms. Both the 2nd floor endless corridor and the coffin and conservatory in the kitchen/dinning area. Still need gargoyles for above the stairs and a few other smaller props and misc items to fill in, but still more to come. Will be adding a bit of phantom manor as well with converting the guest bedroom into the brides suite remaking this scenery
 

Attachments

  • D41D4BAC-044C-4493-BDA6-0DDA6C9240FA.jpeg
    D41D4BAC-044C-4493-BDA6-0DDA6C9240FA.jpeg
    117.5 KB · Views: 248
  • 3A9280C6-8FAD-4F86-9A2A-4554BD2E3B9F.jpeg
    3A9280C6-8FAD-4F86-9A2A-4554BD2E3B9F.jpeg
    1.3 MB · Views: 313
Any tips from any of the guys who have carved their own plaques? I Have made the frame part and am ready to begin carving the lettering. I am thinking of making the skull/demon/leaves out of clay
 
Wow, this was an extensive and long thread to unpack *wipes sweat off forehead* but I got through all 45 pages.

I’d like some advice on a HM related project idea. I want to make replicas of the Disneyland changing portraits. As far as I’m aware, the effect is achieved via a front scrim and a bright flashing light behind. Are there any commercially available scrim fabrics that I could have the portraits printed onto? Also are there any high def images of the changing portraits online? The ones I’m gravitating toward are Master Gracy, Medusa, and The Flying Dutchman.
 
Not too difficult to do. Here's ingredients:
16x20 shadow box frame from Hobby Lobby (or wherever)
16x20 regular photo print of the secondary image (lightning or whatever)
16x20 perforated window vinyl print of primary image
LED strip lights (the stuff that's basically thin roll of white LEDs with adhesive on back)
"Perfect Storm 2.0" to make lights flicker to sound of thunder

1. stick the perforated image on outside of glass (facing out)
2. use double sided tape to tape the secondary image behind glass (do your best to line them up)
3. tape the LEDs as far away from the glass as possible
4. plug in LEDs to Perfect Storm, play some thunder effects
5. done


Awesome! Just a few more questions...
-Will most print shops have that vinyl material already or should I order some online and take it to them?
-Do you have any high res copies of the different paintings?
-Just curious what the loud clicking sound is in your video?

Thanks for your help, Jacob!
 
Awesome! Just a few more questions...
-Will most print shops have that vinyl material already or should I order some online and take it to them?
-Do you have any high res copies of the different paintings?
-Just curious what the loud clicking sound is in your video?

Thanks for your help, Jacob!
1. order from signs.com
2. no, sorry
3. i had them plugged in to a power strip (don't do that lol) it was clicking (probably about to catch fire). use a splitter box for multiple scrims
 
1. order from signs.com
2. no, sorry
3. i had them plugged in to a power strip (don't do that lol) it was clicking (probably about to catch fire). use a splitter box for multiple scrims
Duly noted about the power strip, lol. Where did you find the pictures to make your prints?
 
I found the best images I could. I had to reduce the noise and try to upscale them on Photoshop as best I could on most of them (I'm sure others could do a better job since I'm not experienced with Photoshop at all). I also had to do a perspective shift on the dark Medusa, becuase the highest resolution photo I could find was captured at an angle to the painting. But I think it lines up pretty well with the other Medusa. The worst two photos are the dark Flying Dutchman and the skeletal Master Gracey. I couldn't find any better photos of them. The two Flying Dutchman also don't line up exactly, so I'm either going to have to find a better version of the dark painting or try to size them and line them up correctly during assembly.

If any of you can do a better job on the photos or have any other suggestions or leads, I'd appreciate the help.
 

Attachments

  • Master Gracey.jpg
    Master Gracey.jpg
    5.1 MB · Views: 227
  • Master Gracey Skeleton.jpg
    Master Gracey Skeleton.jpg
    1.6 MB · Views: 252
  • Medusa Light.jpg
    Medusa Light.jpg
    6.1 MB · Views: 185
  • Medusa Dark.jpg
    Medusa Dark.jpg
    1.6 MB · Views: 327
  • Flying Dutchman Light.jpg
    Flying Dutchman Light.jpg
    5.1 MB · Views: 258
  • Flying Dutchman Dark.jpg
    Flying Dutchman Dark.jpg
    2.6 MB · Views: 234
I found the best images I could. I had to reduce the noise and try to upscale them on Photoshop as best I could on most of them (I'm sure others could do a better job since I'm not experienced with Photoshop at all). I also had to do a perspective shift on the dark Medusa, becuase the highest resolution photo I could find was captured at an angle to the painting. But I think it lines up pretty well with the other Medusa. The worst two photos are the dark Flying Dutchman and the skeletal Master Gracey. I couldn't find any better photos of them. The two Flying Dutchman also don't line up exactly, so I'm either going to have to find a better version of the dark painting or try to size them and line them up correctly during assembly.

If any of you can do a better job on the photos or have any other suggestions or leads, I'd appreciate the help.
Photoshop upscaling sucks. Try Topaz Gigapixel.
It uses Artificial Intelligence.

They offer a free trial with no need to buy. Use the free trial to upscale the photos and let it expire.
I used the trial and fell in love with it so I bought it.

 
Alright, couple hours later and I have them done. The only one that still needs some work is Skeleton Gracey. I tried my hand at some blending and retouching, but got a little too intimidated to try and refine the teeth. I think I'll do that when I get some more practice...or I might have someone more skilled than me do that. :lol: 
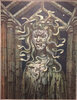
But the Medusa, regular Gracey, and both Flying Dutchmen look better and I think I'm almost ready to get these printed.

Thanks for the help, Moviefreak! That program worked a lot better than what I was doing before.
 

Attachments

  • Master Gracey.jpg
    Master Gracey.jpg
    529.4 KB · Views: 290
  • Master Gracey Skeleton.jpg
    Master Gracey Skeleton.jpg
    416.2 KB · Views: 230
  • Medusa.jpg
    Medusa.jpg
    965.5 KB · Views: 210
  • Medusa Dark.jpg
    Medusa Dark.jpg
    1.6 MB · Views: 203
  • Flying Dutchman Light.jpg
    Flying Dutchman Light.jpg
    1 MB · Views: 200
  • Flying Dutchman Dark.jpg
    Flying Dutchman Dark.jpg
    477.7 KB · Views: 252
Not too difficult to do. Here's ingredients:
16x20 shadow box frame from Hobby Lobby (or wherever)
16x20 regular photo print of the secondary image (lightning or whatever)
16x20 perforated window vinyl print of primary image
LED strip lights (the stuff that's basically thin roll of white LEDs with adhesive on back)
"Perfect Storm 2.0" to make lights flicker to sound of thunder

1. stick the perforated image on outside of glass (facing out)
2. use double sided tape to tape the secondary image behind glass (do your best to line them up)
3. tape the LEDs as far away from the glass as possible
4. plug in LEDs to Perfect Storm, play some thunder effects
5. done


So you just stuck the scrim image to the outside of the glass and the secondary image to the inside of the glass with the lights behind? When I've seen people do this before, the lights were placed around the edge in the space between the scrim and the secondary image, but your way seems easier if I'm reading it correctly. Did you use anything to diffuse the lights or just stick them in?
 
anybody nab one the Madame Leota animatronics from partycity? I grabbed one and decided it really needs a new paint job so I'm going to disassemble and give her a bit of much needed love.
 

Your message may be considered spam for the following reasons:

If you wish to reply despite these issues, check the box below before replying.
Be aware that malicious compliance may result in more severe penalties.
Back
Top