Hasbro Legacy Millennium Falcon Conversion

I've been slowly working on my own Hasbro but I haven't done enough to warrant an update. It's been mostly confined to sorting out the armour plating for the turret tops.
I ended up photocopying and enlarging by 187.5% the Fine Molds Falcon turret tops as a reference for my own new tops. The good thing is all my measurements were spot on. My plan is to cut the plating off the photocopies and use them for the Hasbro. Unfortunately, xmas has come upon us and I haven't had time to keep going with it and it has stalled until the new year so I hope I can update you all will photos in the new year.

All the best until then.
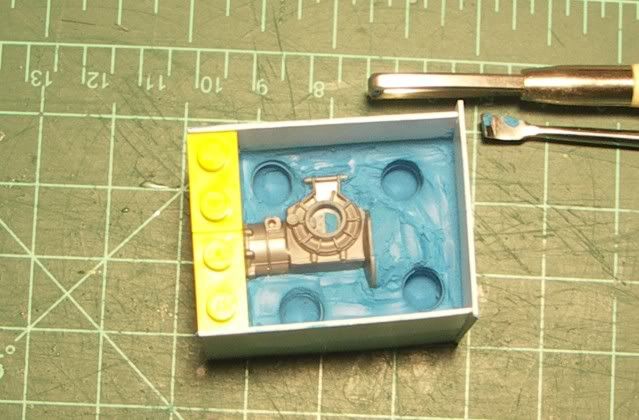
 
CJ I had the same flexible thing going on too, lol.

Turrets looking great. Keep up to good work.

JP hope to see your updates soon too.

Ozzy
 
Thanks, fellas! :) Scratchy, good info, thanks! Even with the wavy cut the mold halves still slip out of position sometimes. I'll surely try the vaseline next time.

001Cuttingaluminum.jpg


002More.jpg


Tried counting the teeth from the Forbidden Plastic photo.
003Countedteethmaybe12.jpg


004Gear-likepart.jpg


Initially, I thought maybe I could get a tank part but I couldn't find one the right size. I knew I shouldn't have given away my 1/144 tank kits. There's probably something there that I could use.

005Lookedforpartcouldntfindany.jpg


007Cannonon-1.jpg
 
Those parts towards the rear of the gun barrels look like gears to me (photo from Forbidden Plastic)
005Gears.jpg


Scrounged for some old parts. Don't remember where this came from - maybe from some cassette player. I think that old walkman I threw out would have had something in there that looks the part.
001Cassettetapepart.jpg


002Midpart.jpg


Into the cauldron these go.
003Readyforpouringrubber.jpg


004Anothersuspense-filledstep-1.jpg
 
Nice one CJ, The turret guns are comming along nicely.

I found the same thing for the AMT. The cogs from a small wind up car. I have been going through my Sons old toy box to see what else I can find that may be usefull on the Falcon, LOL. Shoosh dont tell him.

PS: That tube cutter looks handy.

Ozzy
 
Thanks 3D builder and Ozzy! Right, Ozzy, our sons' toy bins can be a treasure chest. Just this morning I was examining a Lego axle - very ingenious - he knew what I had in mind and swiped it out of my hand. Oh, that tube cutter I bought at the hobby shop for an arm and a leg can be bought for a song at the hardware plumbing section, I found out too late.

That mold I was making - I was too excited I pried out the part too early and ruined the mold in the process. The rubber hadn't completely dried around the part - I should've waited. Anyway, I thought I might as well combine some parts like that finer-toothed gear in the back and make a new mold.

Couldn't find anything useful from the scrap bin - no choice but to make one.
01Gearforback.jpg


Looks good enough.
02Goodenough.jpg


I'm gonna wait the 24 hours patiently this time after pouring the rubber.
03Taketwo.jpg
 
Last edited:
Looking Lego'tastic CJ:lol gonna upload some pictures of my Falkon next weekend, it has been too long, keep up the good work and all the best wishes for 2012 mate.
 
Looks "canon" to me mate!

The mould compound I have been playing with sets in 30 min, and the casting compound within an hour. The only problem is that you have to be very fast pouring after mixing it. You have about 5/6 min to pour either of them in. Hence many of my failures! bubbles, etc.

Its all experience buddy, we are learning as we go.

Ozzy
 
Thanks, Sqbiedoo - do post photos of your progress we miss that Falcon already. Ozzy, thanks - yeah, there's always something to learn everyday. I'm taking it in baby steps. Got a few useful tips from Scratchy, too - like dusting the mold with the baby powder to get the resin to flow into the tiny corners. I still have to try the syringe technique.

013done.jpg
 
Tek2graphics, thanks!

That 1/20 Tyrell piece looks the part for a half-scale 5-footer. The big prop used the 1/12 Formula 1 part repetitively I thought I might as well give it a try and just mod it a bit.

000Trannyparts.jpg


001trannypart.jpg


005Mold.jpg
 
Last edited:
Thats a handy kit part crackerjazz, used a number of times around the Falcon. I am still struggling with mine at 1.48th scale, I am on my 5th attempt to get it looking right.

I am sure you could have scratched it if you had needed to, and will have no problem with scratching any future parts. Your skills are becomming outstanding. I look forward to seeing more on the turret guns.

Ozzy
 
Hi Ozzy, thanks! Wanted to get back to the turret guns but the swivel mounts have got me stumped. They seem to have a C-cross section in one photo but round in another and I couldn't find anything clearer.

This photo I don't know who to give credit to. But the overhead one is the one from Chronicles which Rodmart wrote turret measurements onto.

001SwivelmountshapehasCcross-section.jpg


002Swivelmounthasroundcrosssection-1.jpg
 
Last edited:
No one Id'ed the part yet??

I gave away the AMT one, what does that one look like? Is it simular? I will have a look at my files and see if there are any pic in there that can be of help.

Ozzy
 
Still under the impression I can convert my Hasbro BMF into a near Studio Scale 32in replica I took to it today with my motor tool and started lowering the sides of the hull.

Lots of cutting later and I managed to get the sides to a height I thought was right, only to find out it wasn't and I had to do more. It's a awkward process because of the locating pins and inner walls but I'm getting there slowly.

Once I've sorted the sides out I'll post some photos of the original and modified heights.
 
I've hit a problem that I've long suspected I would have trouble with concerning the mandibles.

The mandibles on the 32in Falcon, I'm so told, are built around 1in diameter tubes used for the mounting points at the front, with the height of the sidewalls around the hull matching the mandibles.

Unfortunately with the BMF it seems it is not possible to have 1in sidewalls as this makes the gap to insert the mandibles, which are seperate pieces, lower.

I now have three options:
lower the mandible height to suit (lowering as much as 6mm); or
increase the sidewall height to fit the mandibles with 1in walls; or
cut the areas on the upper and lower hulls back further to allow 1in high mandibles to match the sidewalls.

To quote Dr Smith "Oh the pain of it all!"

The Hasbro BMF is full of compromises so I may need to compromise myself and taking the easy route and increase the waist sidewall height.

I'll think about which is going to give me the best results and go from there.
 
Back
Top