Thanks guys. Glad you like them. I know that Id been promissing these for a while. Thanks for hanging in there with me, and thanks to everyone who was a pain in the butt and kept pushing me to tweek the design over and over. I think it was worth it :lol
-
Welcome to the Project Runs Forum!
This forum is intended for interest gauging and active runs. Due to the transient nature of this forum, please keep all research and ongoing discussion in one of our main forums so your information is not lost.
Only Premium Members can start a new run.
You are using an out of date browser. It may not display this or other websites correctly.
You should upgrade or use an alternative browser.
You should upgrade or use an alternative browser.
Limited Run Han ESB Hoth Blaster Flash Supressor RUN CLOSED PRODUCTION BEGUN
- Thread starter Anakin Starkiller
- Start date
I actually tested the rattle can dusting that mortifactor was talking about. It worked. I went a little heavier than they did but from a few feet away it just looks matte-gray. mines more of a gunmetal now, but it still has that reflective sheen. Also, fine tipped Sharpie worked for my knurling and I made sure to be haphazard about it ")
newmagrathea
Sr Member
Pics or it didn't happen.
I actually tested the rattle can dusting that mortifactor was talking about. It worked. I went a little heavier than they did but from a few feet away it just looks matte-gray. mines more of a gunmetal now, but it still has that reflective sheen. Also, fine tipped Sharpie worked for my knurling and I made sure to be haphazard about it
It's really hard to photograph...I used Rust-Oleum high heat on the FH and the gun. The dust from the high heat was very fine so I had to be sloppy to get the dots I wanted. Find mist all over this thing, and some satin clear coat to seal it
Attachments


How much of the barrel should be cut off? and what are you guys using ( or gonna use) for the drawn lines on the FH?
How much of the barrel should be cut off? and what are you guys using ( or gonna use) for the drawn lines on the FH?
From what was reported, only a cm or two. I personally just left my barrel intact and situated it a cm past the barrel tip. The original MGC barrels aren't hollow anyway, so he could have seen the original tip, hard to tell
Edit: I also used a fine tip Sharpie


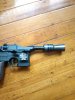
My humble attempt. Its a bit darck so I'll most likely re-do it in the morning.

Nice job! It really gives that weird dark/grey look of the original. in some spots on mine there were places where the dusting scraped off and places where the black paint collected on the rim of the cylinder and cone, and I think I see those on the original.My humble attempt. Its a bit darck so I'll most likely re-do it in the morning.
View attachment 731458
I especially like your drawn on lines too. this isn't precision work, its pretty haphazard :lol
Thanks! Its definitely a specific degree of crappiness on this flash hider. Really easy to over do it. lol
Here are todays results. I've re-done it about 5 times now. every time I lear a little bit about the application and although its not yet where I want it to be, I feel its definitely getting closer.

Here are todays results. I've re-done it about 5 times now. every time I lear a little bit about the application and although its not yet where I want it to be, I feel its definitely getting closer.
Nice job! It really gives that weird dark/grey look of the original. in some spots on mine there were places where the dusting scraped off and places where the black paint collected on the rim of the cylinder and cone, and I think I see those on the original.
I especially like your drawn on lines too. this isn't precision work, its pretty haphazard :lol
Tried taking pics with a better camera. It has a reflection like the prop from direct light but still pulls off that "matte" trick I think... I also decided to go solid color inside the cone and the rear of the FH, I seem to remember the report said the inside of the cone was darkened black
Attachments


Hey, anyone got a tip for adding those penmarker knurls?
I used a fine tip sharpie and started on the gun end. I did two or three back and forth marks for each line and made sure to be parallel to the reflection on the cylinder from a light above me, so they were all parallel.
this being said, when it came to length I was haphazard about it, leaving a bit of a space for row 2, and then when the time came for row 3, I ran out of room - squishing the middle and cone side knurls together like on the original.
Received mine as well. Great job. Thank you for the run!
Received mine--thank you for including me in on this run!
Similar threads
- Replies
- 16
- Views
- 1,434
- Replies
- 421
- Views
- 40,710