HALO Battle Rifle - With build pics!

ImpactBlue

New Member
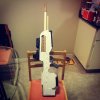
Hi everyone! I thought I`d post up my battle rifle build. A race to Edmonton Comic and Entertainment Expo. I found the template on 405th and scaled everything in Illustrator CS6. The overall length is 36.5" (even though it says 35" but no one complains when you have a longer barrel...heh..heh..) from scrap pieces of foam from an abandoned project.

The template
IMG_20140918_103357nopm.jpg

Using foam for this one
IMG_20140919_213026nopm.jpg

I wanted the thickness to be 1.5" so 3 full pieces were cut. (Those are my foam Spartan forearms I made last year in the background :))
IMG_20140920_093152nopm.jpg

I don't have a pic of the middle section but what I had done is cut out the sections where the barrel and I'm going to assume is the gas piston (bottom dowel) so it can sit securely in place. I dremeled channels on the inside of the "outer" sections so everything can sit flush and secure. The nice thing with having the dowels go the full length of the rifle is it is now rigid.
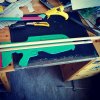
IMG_20140921_121913.jpg

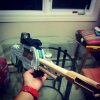
Some dremel details, the pistol grip is incredibly comfortable to hold especially with my small asian hands.
IMG_20140921_170356nopm.jpg

Everything was glued together, so far everything is nice and solid, very little wobble however I did forget to add support in the pistol grip so it kind of feels a bit floppy, oops, still relatively solid, just not as firm as the rest of the rifle.
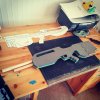
IMG_20140921_172640.jpg

I added craft foam as a "skin" to cover up the puzzle piece at the back of the rifle. I'll be using cardboard and craft foam for the details and dremelling it to round off the edges. The flash hider will be made out of cardboard as well. I have an optics riser I'll be gluing on top of the rail to attach optics to, plastidip, paint and done. Hopefully I can get this finished off in a couple of days.

Thanks for looking!
 
That's looking great so far, mate!

Using the dowels as interior supports was clever. I'll probably end up using that idea in the future :lol
 
That's looking great so far, mate!

Using the dowels as interior supports was clever. I'll probably end up using that idea in the future :lol

Thanks a lot! Initially I was going to dremel some slots for pencils but I figured that a real rifle's barrel is part of the structural support so might as well apply it to this one.

Here's some more updates, I'm 85% complete, was up until 3:30 am......

Tada!!! Craft foam and cardboard for details. I used Gorrila Tape to slightly round off the edges for the hand guard. I have a "relatively" inexpensive HK416 from Cabelas that I pulled the rail off of to mount the optics at the top. The flash suppressor is cardboard glued on. It's on their pretty good too.

IMG_20140923_021507.jpg

Here's another view of it, I'm missing just two minor detail pieces at the front of the rifle just above the handguard section and at the butt of the rifle. I'm going to plasti-dip it this afternoon and hopefully have this thing completed by tomorrow.

IMG_20140923_021833.jpg

For random trivia the accessories on the rifle is a replica Eotech 551 red/green dot sight and a dummy AN/PEQ-15, it's just a tacticool plastic box, it serves absolutely no purpose at all, just looks cool. According to the specs of the BR55HB SR from the Halo Wikia it says it's equipped with an ACOG style optic, but this is my rifle, there are many like it but this one is mine ;)
 
Plasti-dipped and painted it last night. I had to glue some pieces back on because it was lifting and reinforced the edges especially so it won't lift again. The rail went on slightly mis alighned but you only notice it if you're actually aiming down the sight, it's not bad and a quick fix was just re-align the red dot so it appears straight. Quick and dirty fix to optically fool you that it's straight haha. Other than that it's pretty much finished!

The "raised" bits or the details I used acrylic paint and did a wet on wet painting technique I do when I'm painting illustrations to add a slight black wash effect.

IMG_20140923_220045nopm.jpg

If you're a left handed shooter you won't notice as much that it's not completely in line, but I'm right handed...oh well

IMG_20140923_220513nopm.jpg

Things I intend to do different next time.

1) NOT PROCRASTINATE.....It was more or less a last minute thing. I'd like to spend more time especially shaping it and making sure everything is nice, smooth and precise. Especially with the details. It's not too bad when you look at it from about an arm and half length away but when you're up close you can really see the imperfections.

2) A bit more tools. I only really had what I had to work with which were a heat gun, dremmel, sanding block and my large and small utility knife. I suppose those are pretty much all you need however I would like one of those heated knife things for a cleaner cut on the foam and a power sander so I can shape out larger areas instead of using my dremmel. Luxury items I suppose but this is my first full completed project so still lots of learning to do.

3) Workspace. Working in my apartment sucked, I'm going to see if I can find a proper workspace where I'm not knocking things off the desk, making noise with the dremmel (the walls are quite thin, it's an old building)

4) Materials. I'd like to experiment with different materials, I picked up one of those foam blocks you get a craft store so we'll see what I come up with that. Also other materials to add more crisp and precise details.

I hope you enjoyed perusing through my fairly quick build. I learnt quite a bit on this and surprisingly I ran into very little issues. The really nice thing was in total I think I spent less than $40 including the plasti-dip to build this so yay for being cheap! I welcome tips and feedback!

Stay tuned for my next one that I promise will be more awesome. If anyone's headed to the Edmonton Comic and Entertainment Expo this weekend come stop by and say hello! My friend and I will be in cosplay in the artist alley at my table, just look for the 6 foot Harley Quinn roll up banner :)

Thanks everyone!
 
Last edited:
Back
Top