Stunning collection of artifacts from Greg Jein:


Last edited:
Merkin.And is that a tribble or Kirk's toupée?
Isn't that Red 1?
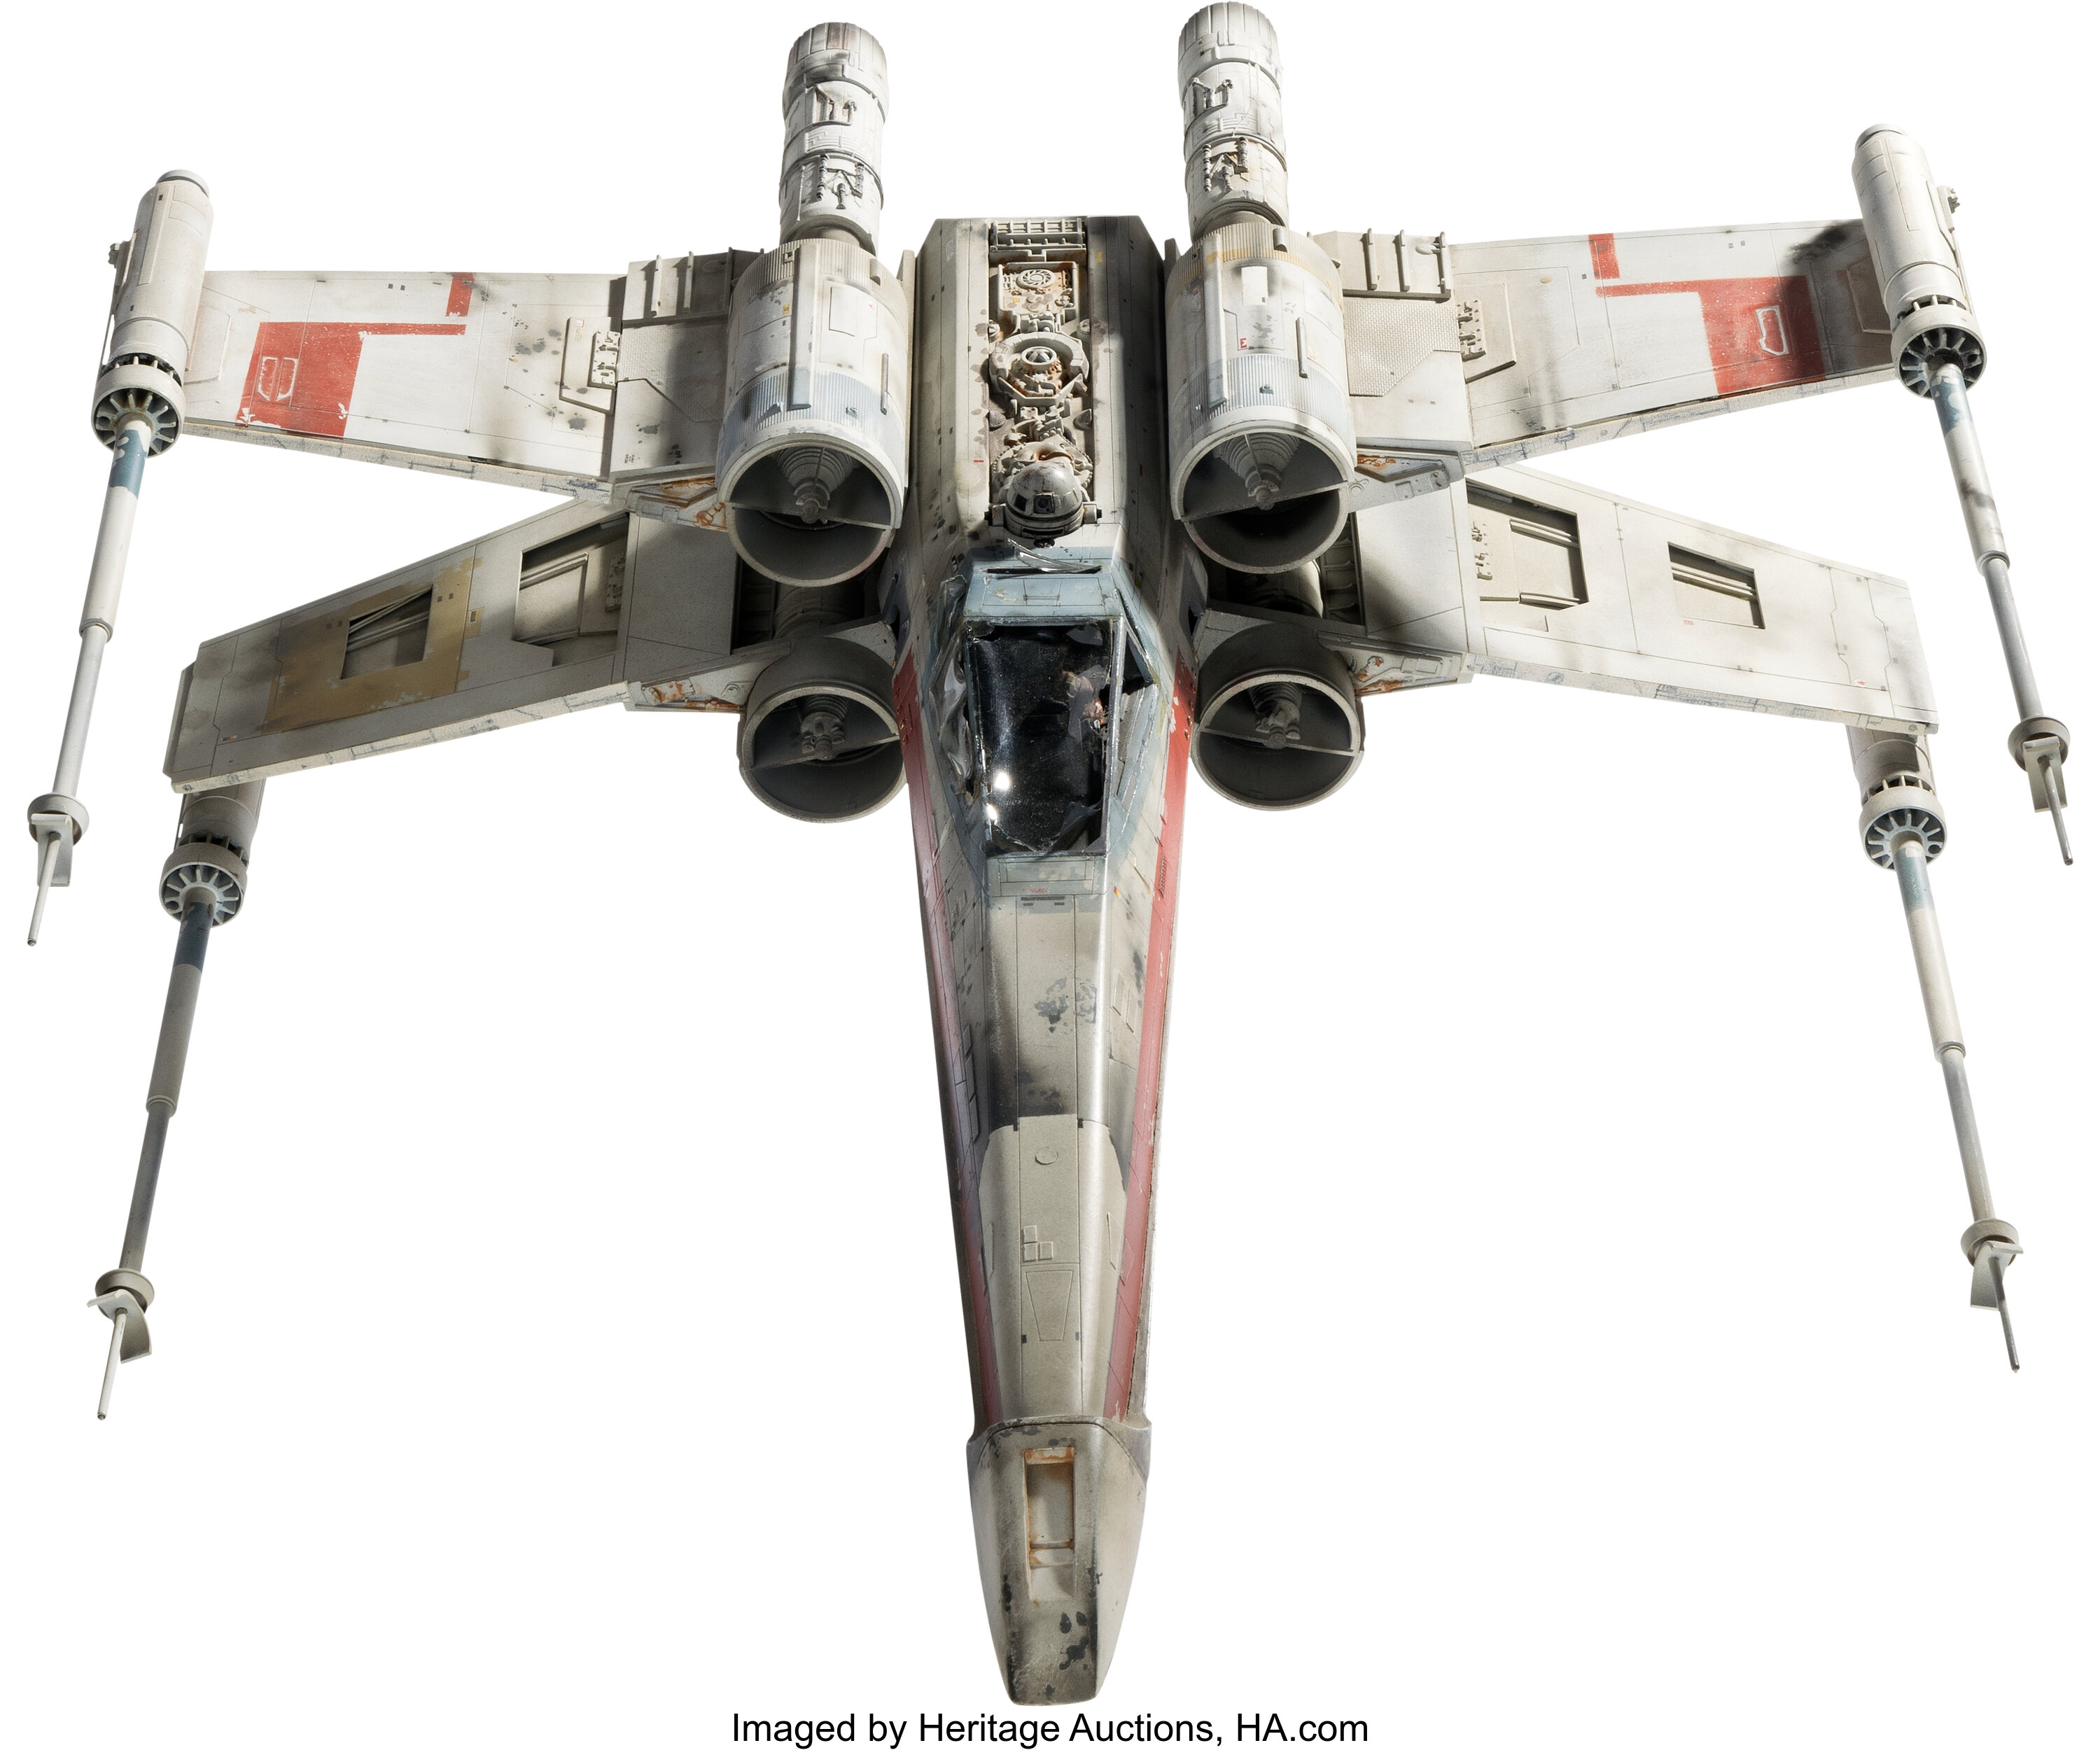
I think you're right - I'll amend the title - here's the auction description:Isn't that Red 1?
Screen Matched Hero "Red Leader" (Red One) X-wing Starfighter Filming Miniature with Articulating Servo-Controlled Wings and Lights from Star Wars: Episode IV- A New Hope (TCF, 1977). Built by the team at Industrial Light & Magic which won the Academy Award for Best Visual Effects for Star Wars, this 1:24 scale filming miniature is one of only four hero filming miniatures created with servo-controlled wings that spread open into "Attack Position". Constructed of resin, vacuum-formed styrene, acrylic, and metal components over an aluminum internal armature, expertly painted and finished as a battle-distressed spacecraft, replete with service wear, blast marks and heat-scorching around exhaust nozzles. The top two wings are each painted with a single red stripe, identifying this as "Red Leader" (Red One). The cockpit features a miniature pilot, and a dome of an R2 unit is installed behind the canopy. The miniature has internal wiring to power the lights within the main body of each of the four wing-mounted laser cannons with fiber optics to illuminate each laser tip. Metal heatsinks are installed in each laser cannon to dissipate excessive heat generated from the lights. In addition, halogen lights are mounted in each of the two Proton Torpedo tubes mounted on the sides of the fuselage, and halogen bulbs are installed in each of the four engine exhaust nozzles. Special metal heat shields with integral cooling ducts are built into the model to pump cool air through the system to prevent overheating. Metal mounting hinges are installed on each of the four wings enabling wing articulation, and metal gears are visible in three open panels behind the cockpit (top, port and starboard) to spread the wings into "Attack Position". Gears are driven by two internal electric servo motors (electronics untested). The miniature features four metal threaded mounting sockets: top, bottom, front and rear (front socket is accessed by removing the nose section; rear socket is concealed with removable panel).
The basic design of the X-wing and TIE Fighters came from George Lucas himself. He felt the need to create distinct shapes so that the audience could immediately tell whether a ship was a "good guy" or "a bad guy." The X-wing featured a slender fuselage with thin wings that could split open to form and 'X' and the TIE fighter's fuselage was a ball shape to which were attached large vertically oriented "wings". These two basic shapes were distinct from any angle and once it was established who was who, the audience would be able to follow the space battle instinctually. Starting with a small sketch on a yellow notepad, he enlisted model concept artist Collin Cantwell to construct a physical model that would help communicate to the other artists what the X-wing would look like. Working in parallel with Cantwell was concept artist Ralph McQuarrie. As Cantwell would refine his models, McQuarrie would incorporate those revisions into his paintings. While Cantwell and McQuarrie had a head start on the design work, the artists at Industrial Light and Magic would soon be brought into the design discussion for storyboards and construction of the actual filming models.
The visual effects shots of the space battle at the end of Star Wars required the construction of two types of X-wing miniatures - HERO models, which would be seen in closeups, and PYRO models which could be blown up. While the PYRO models were made in quantity, only four HERO models were made for the film.
The HERO models were featured in scenes where the wings would be seen closed (the Rebel fleet approaching the Death Star), the iconic shot of the wings opening ("Lock S-foils to attack position"), as well as the majority of the space battle shots and the shots during the trench run.
Due to these requirements, the HERO models needed to have a robust armature that allowed mounting to a motion control model pylon from multiple points as dictated by the shot, motors that could control the wing opening mechanism, lighting for the engines, proton torpedo tubes, and laser cannons, and a cooling system to prevent the lights from melting parts of the model, as well as electrical connectors on the outside of the model to power everything.
The PYRO models needed to be seen for only a few fleeting frames before erupting into a fireball. Their construction was far simpler, with no armature or lighting, and with wings fixed in an open position. They were made using a special lightweight foam material which gave the impression of the ship breaking into pieces when the pyro charge was detonated.
Each HERO model had a detailed paint job, with bold stripes, different colored panels, and a plethora of small details and decals that one would expect to see on an actual aircraft. A good many of those little details would never read on film but were there, nonetheless. The PYRO models had a less detailed paint job. In fact, some PYRO models were cobbled together from surviving parts from previous takes with a quick coat of paint and markings before being blown up for a second time. This makes the HERO models all the more bespoke.
Red Leader (Red One) has a distinct weathering pattern on the nose and starboard side of the fuselage that creates a "clean" panel on the top of the forward fuselage, a darker gray underside, a yellow-ish panel on the port side of the lower fuselage, as well as a yellow-ish panel on the inside of the starboard wing.
Interestingly, this model played the part of Red Leader, Red Two (Wedge), and Red Five (Luke Skywalker):
-It was likely in the shot where the four X-wing's lock S-foils into attack position (this shot was replaced in the Special Edition of the film with CGI).
-When Red Leader says he's going to try and draw their fire, we see four X-wings beginning to roll and dive. Three of those X-wings (and likely the fourth) are Red Leader. The Dykstraflex allowed for the easy offset of the ships to create a formation of X-wings using a single model.
-Early on in the space battle, Wedge strafes the surface and shots of this X-wing bookends his closeup.
-It flies overhead after Luke pulls out of his strafing run and reports that he "got a little cooked" but is still OK.
-When Luke is trying to evade a pursuing TIE fighter, it is this ship, not Red Five, that was filmed (Red Five was filmed for the shot where the TIE Fighter's laser bolt hits Luke's engine, but not the earlier, evading shot).
-It can be seen full frame, flying in formation with Red Five during Red Leader's trench run (the presence of the Red Five miniature in this shot is a continuity error as Luke was ordered to stay out of range and get ready for his own attack run).
-After Luke, Wedge, and Biggs have completed their dive into the trench, it can be seen in a shot where the camera tilts up as Red One and Red Two zoom down the trench, away from camera (this is another continuity error since Red Leader was destroyed moments earlier).
At some point, and for reasons unknown, two additional red stripes made of tape and red ink were added to the lower wings. The white tape added to the leading edge of the wing was done out of concern that the wing would be visible against the bluescreen and not disappear during the optical process. Exhibiting age and production use, including a warped clear acetate canopy (side windows are missing), missing rectangular panel on the lower front fuselage and missing three small panels/hatch covers that conceal the lower and side armature mount points. This model has not been on public display and has not been exposed to UV daylight. As such, this miniature is in its original condition as it was filmed on the blue screen stage at ILM in 1977. Without question, this Hero X-wing miniature represents the pinnacle of Star Wars artifacts to ever reach the market.

Would you do so?I wish he had sold a lot of this stuff while he was alive so he could've spent some very comfortable years.
Do you know it was done recently? Seems like they could have been lost any time in the last 50 odd years.I wonder why whoever is selling the props from the Jein collection drilled out the other two hubs in the Communicator instead of leaving it original? And why not just put the rhinestones in at that point? I do understand gluing the parts together to make it an assembled prop to sell was probably necessary (looks like they might have used a bit too much JB Weld when gluing on the mic plate
).
Starfleet Communicator from Star Trek: The Original Series (Paramount TV, 1966-1969).
Auction Photo:
View attachment 1737973
Pre-Auction Photo:
View attachment 1737975
I wonder why whoever is selling the props from the Jein collection drilled out the other two hubs in the Communicator instead of leaving it original? And why not just put the rhinestones in at that point? I do understand gluing the parts together to make it an assembled prop to sell was probably necessary (looks like they might have used a bit too much JB Weld when gluing on the mic plate
).
Starfleet Communicator from Star Trek: The Original Series (Paramount TV, 1966-1969).
Auction Photo:
View attachment 1737973
Pre-Auction Photo:
View attachment 1737975

