Harmonopolis
New Member
Alright, I have a huge post with lots of pictures and updates. I finally got a sewing machine for Christmas so I have been able to make progress this month! I have completed the top of the outfit! YAY! I have also purchased a few more items for use with details.
So last time I updated I was making the stencils, using a white shirt I had drawn on and then cut the stencils out of brown craft paper. After the first round of stencils, I used some scrap fabric I had to create a mock top to try out. After several attempts I finally got something that fit well and needed little adjusting. I then used those stencils and cut out the scrap fabric. Then I cut out the fabric for the actual top. (This was terrifying, because I only got enough fabric for one attempt, and the store I purchased it at went out of business....so it was a scary step and took lots of commitment, but it worked out)


After the pieces were all cut out I began pinning.........and pinning. Many pins and pokes later. I had the top all pinned together and I began sewing.


I sewed everything together, without the mesh so that I could make adjustments. It needed a few tucks to make it tighter at the waist and some adjustments in the breast area to make it lay flatter. I had large gaps by my arm pits that showed significant skin. I was able to do a little "V" shape with pins and sewed it into place making the fit flat and tight to my chest. Perfect!
Next came the mesh.....Similar process, lots of pins and pokes, sewing and then adjustments. I had to make the mesh tighter to pull the top together in the center better, but it was a quick and easy fix.


Next I began to add the cross straps in the center and on the side. I started by pinning them on the outside, (I had lots of material) and then turned the top inside out and pinned the pieces on the inside and sewed them on.
This is a difficult step because of all the pins and having to gently tug/glide the material threw the sewing machine. Worth it, but lots of sticks.

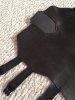
Here is the completed top. It fits very well, no gaps when I bend in the sides near the breasts or the middle, and since I can't wear a bra with this outfit I'm glad it fits so well.


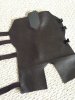
And here is it with the pants I purchased and made small adjustments to, the boots I will be wearing and the belt. I am loving where it is going. The top and bottom are not attached to one another, just simply tucked in. (Excuse my husbands bright computer screen in the background) I will be adding a 16inch zipper to the back of the top to make it easier to get on and off. Currently I just pull it over my head, but once I'm painted green I don't want to smudge it so I'm adding the zipper.

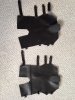
I have extra fabric left from the top, which is a dark blue mesh and since the pants are black I plan on making all of the detail straps in the same fabric as the top to tie the two pieces together. I purchased two types of ribbon and several buckles to use when making the details, like thigh straps and the wrist covers. One ribbon looks like black burlap and the other just normal ribbon, not shiny. I got two different sizes of the buckles too.


I was researching and looking into options for the shiny snake skin detail on the original costume and found some blue glitter glue that I thought I could make work. I tried it on fabric and it looked really good. However once it dried and I stretched the material (like if I was wearing it) the glue flaked right off. I think I'm going to have to make a snake skin stencil and find some metallic blue fabric paint that I can use to add the detail I want to the top and pants.
Here is the paint although. Looked good, wish it would of worked.

Finally, I am beginning the work on the collar. I purchased foam sheeting to use for the collar and will attach it to each other at the back of my neck with velcro or a buckle. I may need to add velcro to the top and buckle to keep it from rotating, that will be something that I may have to try depending on the outcome. I purchased black foam for the collar itself and white foam for the metallic details. I have metallic silver paint that I will be using to paint those, then I will use a sealer on the paint to make sure it doesn't crack. I also made a stencil out of brown craft paper. I put the top on and then traced when I needed the collar to lie. It won't be completely perfect, but I'm not going for a complete replica.

I still need to purchase a wig and some additional eye shadows and body paint accessories to make sure I have everything ready to go for a trial run. I will be doing a trial painting and costume just to make sure of the time frame it will take me and if I need my husbands assistance (He's dressing as Starlord for C2E2 this year).
I am also going to look into creating Gamora's sword. I am saving it for last, because if I don't get it finished or if it turns out badly, she is still recognizable without it.
Can't wait to see how everything will turn out!
So last time I updated I was making the stencils, using a white shirt I had drawn on and then cut the stencils out of brown craft paper. After the first round of stencils, I used some scrap fabric I had to create a mock top to try out. After several attempts I finally got something that fit well and needed little adjusting. I then used those stencils and cut out the scrap fabric. Then I cut out the fabric for the actual top. (This was terrifying, because I only got enough fabric for one attempt, and the store I purchased it at went out of business....so it was a scary step and took lots of commitment, but it worked out)
After the pieces were all cut out I began pinning.........and pinning. Many pins and pokes later. I had the top all pinned together and I began sewing.
I sewed everything together, without the mesh so that I could make adjustments. It needed a few tucks to make it tighter at the waist and some adjustments in the breast area to make it lay flatter. I had large gaps by my arm pits that showed significant skin. I was able to do a little "V" shape with pins and sewed it into place making the fit flat and tight to my chest. Perfect!
Next came the mesh.....Similar process, lots of pins and pokes, sewing and then adjustments. I had to make the mesh tighter to pull the top together in the center better, but it was a quick and easy fix.
Next I began to add the cross straps in the center and on the side. I started by pinning them on the outside, (I had lots of material) and then turned the top inside out and pinned the pieces on the inside and sewed them on.
This is a difficult step because of all the pins and having to gently tug/glide the material threw the sewing machine. Worth it, but lots of sticks.
Here is the completed top. It fits very well, no gaps when I bend in the sides near the breasts or the middle, and since I can't wear a bra with this outfit I'm glad it fits so well.
And here is it with the pants I purchased and made small adjustments to, the boots I will be wearing and the belt. I am loving where it is going. The top and bottom are not attached to one another, just simply tucked in. (Excuse my husbands bright computer screen in the background) I will be adding a 16inch zipper to the back of the top to make it easier to get on and off. Currently I just pull it over my head, but once I'm painted green I don't want to smudge it so I'm adding the zipper.
I have extra fabric left from the top, which is a dark blue mesh and since the pants are black I plan on making all of the detail straps in the same fabric as the top to tie the two pieces together. I purchased two types of ribbon and several buckles to use when making the details, like thigh straps and the wrist covers. One ribbon looks like black burlap and the other just normal ribbon, not shiny. I got two different sizes of the buckles too.
I was researching and looking into options for the shiny snake skin detail on the original costume and found some blue glitter glue that I thought I could make work. I tried it on fabric and it looked really good. However once it dried and I stretched the material (like if I was wearing it) the glue flaked right off. I think I'm going to have to make a snake skin stencil and find some metallic blue fabric paint that I can use to add the detail I want to the top and pants.
Here is the paint although. Looked good, wish it would of worked.
Finally, I am beginning the work on the collar. I purchased foam sheeting to use for the collar and will attach it to each other at the back of my neck with velcro or a buckle. I may need to add velcro to the top and buckle to keep it from rotating, that will be something that I may have to try depending on the outcome. I purchased black foam for the collar itself and white foam for the metallic details. I have metallic silver paint that I will be using to paint those, then I will use a sealer on the paint to make sure it doesn't crack. I also made a stencil out of brown craft paper. I put the top on and then traced when I needed the collar to lie. It won't be completely perfect, but I'm not going for a complete replica.
I still need to purchase a wig and some additional eye shadows and body paint accessories to make sure I have everything ready to go for a trial run. I will be doing a trial painting and costume just to make sure of the time frame it will take me and if I need my husbands assistance (He's dressing as Starlord for C2E2 this year).
I am also going to look into creating Gamora's sword. I am saving it for last, because if I don't get it finished or if it turns out badly, she is still recognizable without it.
Can't wait to see how everything will turn out!


")