Smithsonian
New Member
So many years ago, I had the idea to start making replica helmets to display in my movie room. As much as I would like to buy an already made piece, there is more enjoyment in looking for authentic items used, making replicas, and attempting to be as close to the real thing as possible.
When I first watched Full Metal Jacket, I was just a kid in elementary school. My older sister insisted that we watch it and it became a movie that I would never forget. People will often go back and try to do their best impression of different lines in the movie, but I liked the idea of making something more tangible to show my appreciation for the movie.
One of the images we all latch onto is the helmet worn by Pvt. Joker. It is definitely a recognizable helmet and one that seemed fairly easy to replicate.


The first thing I did was to determine what type of helmet was used during Vietnam. Any Google search will point to the M1 (Post WW2) helmet. If you look on eBay, shopgoodwill.com, or on any military surplus website, you're bound to find a helmet within a reasonable price. I believe I purchased mine for about $25 (it was a basic drab green shell with the liner). Once I got the helmet, it pretty much sat in a box in my basement until I was able to acquire some of the other items needed to make my Joker helmet.


The next item I acquired was the helmet cover or the fabric that is on the outside of the helmet. The M1 Helmet Camo used is often referred to as the Mitchell Camo. You can find these helmet covers most anywhere on the internet. I happened to get mine from a military surplus website when they were having a sale (think about sales during 4th of July, Memorial Day, Veterans Day, etc.). I got that in the mail, threw it in the box with the helmet where they both sat for a few years.


After going back to the movie, I would write down the items I saw on the helmet and spend a good amount of time trying to identify what I saw. One thing was the black band that went around the helmet. This surprisingly was a little more difficult to identify because when you try to Google "black band on military helmet" it doesn't quite narrow down what it's actually called. Then I remembered seeing very specific items on different military websites, so I searched there to try to find the name. Then, I happened to find a website selling "rubber helmet bands" and that worked for me! You can find these bands ranging from $3-20. Honestly, I think I paid $4 for mine which I thought was a good deal. Other items included (what I later found out) toilet paper rations & "bug juice". We'll get back to these last two items.
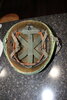
Since there was a pandemic going on, I decided that now was the best time to work on my various projects. I took the helmet cover and stretched it over the helmet, then inserted the liner to hold it in place. Then, using still images from the movie, I used chalk to write "RTD 07-12-68", the bullseye, and "BORN TO KILL" on the helmet. If I didn't like the placement, I just used a wet paper towel to wipe away the chalk and start over. I did this several times and realized that the letters did not need to be as big as I was drawing them. Once I was satisfied with the placement, I used a Sharpie marker to fill in the letters, numbers, and lines in the bullseye. After I was finished, I wiped away any excess chalk lines. Then I used some 180 grit sandpaper to weather the helmet cover and soften the material. It could still use some weathering, but for now it will do.


I spent a bit of time on the internet trying to determine if the bottle on Joker's helmet was the gun oil used by soldiers or insect repellent. This required a little more research. I watched scenes from the movie and noticed that some soldiers carried a clear bottle with a flat black cap, a clear bottle with a black pointy nozzle, or both. The bottle with the pointy nozzle is more than likely the gun oil. Other websites, including a Vietnam War reenactors website had images of various bottles found scattered across the countryside in Vietnam. Two different bottles of "bug juice" or insect repellent were used. One had a printed label and the other had the words printed directly onto the bottle. I also found where someone that was offering tips on how to replicate one of these bottles by using "Sawyer Jungle Juice 100", which I found on the REI.com website. All I need to do is print out the label and attach it to the bottle of Jungle Juice. This is where I feel that it's okay to steer away from authenticity and embrace the ability to create a pretty close replica. I mean, it's not like I'm creating an exact replica of Joker's helmet. For a while, I thought I needed to find the peace button pin to attach, but I realized that he never actually wore it on his helmet, but on his uniform. So, I didn't feel the need to get the peace button. I know that the peace button was attached to the helmet and was on display at the Stanley Kubrick exhibit a few years ago, but I went with what I saw in the movie.

You may notice that in this scene, the bottle disappears from his helmet. Other scenes show the different bottles on soldiers' helmets. This YouTube video shows the different bottles:
Full Metal Jacket (Best ASMR in FMJ!)
This is probably my favorite part of the build, mainly because my wife laughed at my persistence for an accurate representation while also spending nearly no money. Instead of paying for toilet paper that came out of an MRE, I decided to make my own "MRE TP". First I took a few squares of toilet paper off of the roll in my bathroom. That step was the easiest. Then, I got on Microsoft Word and typed up the text that was commonly printed on MRE TP rations; "LIGHTHOUSE S.F. CA". I used the Calibri (Body) font, centered the text, with double spacing. I tried to add enough space between the repeated text so that it didn't line up, but was staggered. I then printed it onto brown packing paper. The paper needed to be taped to a normal sheet of paper and fed through because it would often jam up if I didn't help it through. The results were pretty spot on to actual Vietnam-era TP from MRE's. I wrapped up my wad of unused Charmin with a section of the replica TP wrapping, glued it down, and cut the edges to replicate what I had seen from the TP rations I had seen. I folded it over and tucked it under the rubber band.


I'm pleased with what I have. It didn't take a lot of time to create, but it did require some research. That's the fun part of it. Trying to replicate something while also digging into the details. I hope this helps you with your attempt at making your own Joker helmet.


When I first watched Full Metal Jacket, I was just a kid in elementary school. My older sister insisted that we watch it and it became a movie that I would never forget. People will often go back and try to do their best impression of different lines in the movie, but I liked the idea of making something more tangible to show my appreciation for the movie.
One of the images we all latch onto is the helmet worn by Pvt. Joker. It is definitely a recognizable helmet and one that seemed fairly easy to replicate.
The first thing I did was to determine what type of helmet was used during Vietnam. Any Google search will point to the M1 (Post WW2) helmet. If you look on eBay, shopgoodwill.com, or on any military surplus website, you're bound to find a helmet within a reasonable price. I believe I purchased mine for about $25 (it was a basic drab green shell with the liner). Once I got the helmet, it pretty much sat in a box in my basement until I was able to acquire some of the other items needed to make my Joker helmet.
The next item I acquired was the helmet cover or the fabric that is on the outside of the helmet. The M1 Helmet Camo used is often referred to as the Mitchell Camo. You can find these helmet covers most anywhere on the internet. I happened to get mine from a military surplus website when they were having a sale (think about sales during 4th of July, Memorial Day, Veterans Day, etc.). I got that in the mail, threw it in the box with the helmet where they both sat for a few years.
After going back to the movie, I would write down the items I saw on the helmet and spend a good amount of time trying to identify what I saw. One thing was the black band that went around the helmet. This surprisingly was a little more difficult to identify because when you try to Google "black band on military helmet" it doesn't quite narrow down what it's actually called. Then I remembered seeing very specific items on different military websites, so I searched there to try to find the name. Then, I happened to find a website selling "rubber helmet bands" and that worked for me! You can find these bands ranging from $3-20. Honestly, I think I paid $4 for mine which I thought was a good deal. Other items included (what I later found out) toilet paper rations & "bug juice". We'll get back to these last two items.
Since there was a pandemic going on, I decided that now was the best time to work on my various projects. I took the helmet cover and stretched it over the helmet, then inserted the liner to hold it in place. Then, using still images from the movie, I used chalk to write "RTD 07-12-68", the bullseye, and "BORN TO KILL" on the helmet. If I didn't like the placement, I just used a wet paper towel to wipe away the chalk and start over. I did this several times and realized that the letters did not need to be as big as I was drawing them. Once I was satisfied with the placement, I used a Sharpie marker to fill in the letters, numbers, and lines in the bullseye. After I was finished, I wiped away any excess chalk lines. Then I used some 180 grit sandpaper to weather the helmet cover and soften the material. It could still use some weathering, but for now it will do.
I spent a bit of time on the internet trying to determine if the bottle on Joker's helmet was the gun oil used by soldiers or insect repellent. This required a little more research. I watched scenes from the movie and noticed that some soldiers carried a clear bottle with a flat black cap, a clear bottle with a black pointy nozzle, or both. The bottle with the pointy nozzle is more than likely the gun oil. Other websites, including a Vietnam War reenactors website had images of various bottles found scattered across the countryside in Vietnam. Two different bottles of "bug juice" or insect repellent were used. One had a printed label and the other had the words printed directly onto the bottle. I also found where someone that was offering tips on how to replicate one of these bottles by using "Sawyer Jungle Juice 100", which I found on the REI.com website. All I need to do is print out the label and attach it to the bottle of Jungle Juice. This is where I feel that it's okay to steer away from authenticity and embrace the ability to create a pretty close replica. I mean, it's not like I'm creating an exact replica of Joker's helmet. For a while, I thought I needed to find the peace button pin to attach, but I realized that he never actually wore it on his helmet, but on his uniform. So, I didn't feel the need to get the peace button. I know that the peace button was attached to the helmet and was on display at the Stanley Kubrick exhibit a few years ago, but I went with what I saw in the movie.
You may notice that in this scene, the bottle disappears from his helmet. Other scenes show the different bottles on soldiers' helmets. This YouTube video shows the different bottles:
This is probably my favorite part of the build, mainly because my wife laughed at my persistence for an accurate representation while also spending nearly no money. Instead of paying for toilet paper that came out of an MRE, I decided to make my own "MRE TP". First I took a few squares of toilet paper off of the roll in my bathroom. That step was the easiest. Then, I got on Microsoft Word and typed up the text that was commonly printed on MRE TP rations; "LIGHTHOUSE S.F. CA". I used the Calibri (Body) font, centered the text, with double spacing. I tried to add enough space between the repeated text so that it didn't line up, but was staggered. I then printed it onto brown packing paper. The paper needed to be taped to a normal sheet of paper and fed through because it would often jam up if I didn't help it through. The results were pretty spot on to actual Vietnam-era TP from MRE's. I wrapped up my wad of unused Charmin with a section of the replica TP wrapping, glued it down, and cut the edges to replicate what I had seen from the TP rations I had seen. I folded it over and tucked it under the rubber band.
I'm pleased with what I have. It didn't take a lot of time to create, but it did require some research. That's the fun part of it. Trying to replicate something while also digging into the details. I hope this helps you with your attempt at making your own Joker helmet.
Attachments

Last edited: