Fullmetalsam
Active Member
I was inspired by Fetts.Sobriquet thread on how to put together an Ironman suit using a plastic trashcan. I thought I could share my knowledge as well on a prop I haven't seen built very often. I also figured I could use this new thread to introduce myself since I'm new to the forums.
I've been in costuming and prop-making for just about 5 years and I've got a thing for armor. I've built up my skills over time and I've been trying different techniques and material, but I always come back to the same thing: foam (in all its readily available format: craft foam sheets, camping mat, etc.). Most of the time, I don't have a lot of budget for my projects (when I started it was because I didn't have much budget and now it's because I have too many projects ), so foam is a pretty cheap material that I've learned to use to do some pretty decent props and costume (well I find them decent). The project I am most proud of now, is the Space Marine Chaplain in Terminator Armor I've completed last year.
Anyhow - on with the tutorial:
I built this pipboy because I wanted to put together a Fallout vault-dweller costume so I'd have something "confortable" to wear on convention sundays. I wasn't able to get my hands on the pipboy clock from Amazon (live in Canada and didn't want to pay the prices I've seen on eBay for this) so I decided to try my luck with my foam sheets and here is what the finished product look like:


***What you need***
- 2mm foamies
- 6mm foamies
- hot glue
- exacto knife
- studs (I used regular screws for this)
- Paint
***Templates***
These templates were drawn for using an iPod touch as the screen and they are scaled to my big meaty arm - so most people will have to scale it down a bit. Also, when printing, make sure you select "None" under scaling method... because when I test printed them the first time, I saw that the second page was scaled down a tiny bit (just to fit my printer margin). I rescaned my template including more piece, so I've added a page 3 to the template document. You'll see that some pieces are duplicated - it's because I thought the template #4 was better seen on page2 (instead of page3), so left page2 in there.
Just for reference - my pipboy is about 9.5" long with the "screen-part" being about 8"x 6".
I didn't include a template for the "bracer" ... as it will be different for everyone. However, you can easily google how to draw a truncated cone shape (which is what you'll need for this part of the pipboy)
***Building the Base***
Essientially, it's about stacking the foam sheets in the right order (gluing them one on top of the other).
You can see the templates have been numbered and this is how they should be stacked:
*Top*
Template #2 - 6mm
Template #1 - 2mm
Template #1 - 2mm
Template #3 - 6mm
Template #3 with small piece - 2mm
Template #3 with small piece - 2mm
Template #3 - 6mm
Template #3 - 6mm
Template #4 - 6mm (4 layer of template are needed at the bottom)
*Bottom*
Now to explain why it's stacked this way.
1.the Template #2 is the raised plate of the pipboy.
2.there are 2 template #1 stacked under template #2, this is to be able to make this part of the pipboy (see picture)
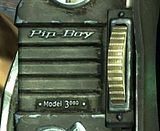
So, on the first layer of Template #1, you have to remove the part here and here.
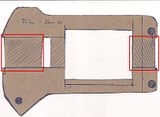
On the second layer of Template #1, you have to cut small lines out, so you get the recess "grill"
3. If you want to add a speaker for sound (since I was using an iPod touch and not an iPhone, I added a speaker), then remember to cut the space needed in layer 4 (template #3). I had to install mine and test it before finishing the foam block, because I couldn't get it in there after.
4. The small piece I'm referring to for layer 5 and 6 (Template #3) is this one:
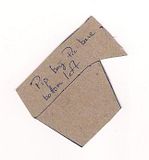
So you can make this part:
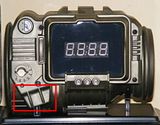
5. For the last 4 layers, there only purpose is to build thickess on the back side so it reaches your arm when you attach it to your "bracer". To get a good fit, you,ll have to "carve" a curve into these layers. Also, I'm saying you need 4, but it's only a minimum, I could have added more and the pipboy would look a bit better from this angle.
***Finishing the sides***
OK - so we've got a foam block, it's time to clean it up a bit. What I did to get a "cleaner" side is that I used the exacto knife to cut excess foam from all the layers. Once this is done, you take 2mm craft foam and you apply it to all the side of the pipboy. As a general rule, I always cut my craft foam piece a little bigger than what I needed and cut them to size once they were glued to the side. This way I could get clean edges (well they are not clean clean - but it's easier to make it look clean that way).
***Adding details to the screen section***
Now to add that raised "screen protector" you see on the side of the pipboy, I used a strip of 6mm foam that I glued on the raised plate. It's not glued to the inside of the screen hole, it's really glued on the plate. After this is glued on, I used a strip of 2mm foam that I glued to the 6mm foam strip to make it look nicer. Make sure the joint between the start and end of those strip is at the bottom center of that screen hole. This part of the strip will be hidden under the plate where you find the 3 button-lights.

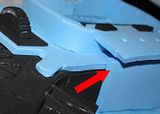
Hehe... so don't follow what you really see on the picture - on the picture, you see the seam at the top of the screen, but you're better off hiding it under the faceplate
For the plates with the button-lights, you need 2 strip of 6mm foam. The first should be 2.5" x 1.5" (plate1) and the second should be 2.5" x 1.75"(plate2). Plate1 goes on the side of the pipboy and should be touching the bracer as well as providing support for the plate with the lights (so it should come up a little bit over the raised plate of the pipboy). You'll have to cut the bottom of the plate1 at a taper to make it fit perfectly on the bracer. When plate1 is glued on, plate2 is glued on top of the plate1 (the bottom of plate2 should not be aligned with plate1, you should have a bit sticking out) and on top of the screen protector (same thing here, the plate should stick out a bit over the screen). Cut the arrows out of 2mm foam and you're set.
The lights I used on my pipboy are regular 5mm LED with metal LED holders. I cut 3 holes in plate2 and glued the LED holder there. The LED are inserted from inside the pipboy because they are wired to a switch and a battery pack.
***Adding details to the left section***
So now on to the missing details.
You need to add the 2 tapered walls on the bottom left part that is sticking out (done with scraps of 2mm foam).

Use the templates for the other details and glue them where they need to be placed. I haven't included a "screen" for the top detail (it should be the radiation meter if I'm not mistaken)... but it could be easily done by using clear plastic and sticking a white led right underneath. This is something I plan to do in my next version

For the knob on the bottom dial - in my original version (the one pictured in this tutorial) I freehanded the thing in foam, however in my other version I'm using a wood flower pot used for modelling. I hot glue a screw in the center of the pot and that's how I attached it to the pipboy so it would still move.
For the round knob just beside the screen, you just need to cut a circle of 1.25" diameter out of 6mm foam. What I did to make it cleaner was to sandwhich it between 2 scraps of 2mm foam, glue a strip of 2mm foam around it and cut groove into that strip. Once this is done - it should fit right in.

***Studs and Painting***
So, if you've done the bracer, then you should be nearly done.
Only thing left would be painting and screwing the stud on. The screws I used for the stud are 0.5" long and the foam is strong enough so they get a good grip. So no need to hot glue them on, they shouldn't fall off even if they are only screwed on.
As for painting, I always use the same process and it makes up a very durable paintjob.
1. Apply 2 coats of Flexbond (latex/glue from Rosco)
2. Paint using Krylon brand spraypaint
3. Apply 1 coat of flexbond over paint
4. Apply 1 coat of matte finish (gloss finish (or paint for that matter) doesn't work with foam... it will all crack for sure)
And you're done.
Thanks for reading.
I've been in costuming and prop-making for just about 5 years and I've got a thing for armor. I've built up my skills over time and I've been trying different techniques and material, but I always come back to the same thing: foam (in all its readily available format: craft foam sheets, camping mat, etc.). Most of the time, I don't have a lot of budget for my projects (when I started it was because I didn't have much budget and now it's because I have too many projects
Anyhow - on with the tutorial:
I built this pipboy because I wanted to put together a Fallout vault-dweller costume so I'd have something "confortable" to wear on convention sundays. I wasn't able to get my hands on the pipboy clock from Amazon (live in Canada and didn't want to pay the prices I've seen on eBay for this) so I decided to try my luck with my foam sheets and here is what the finished product look like:


***What you need***
- 2mm foamies
- 6mm foamies
- hot glue
- exacto knife
- studs (I used regular screws for this)
- Paint
***Templates***
These templates were drawn for using an iPod touch as the screen and they are scaled to my big meaty arm - so most people will have to scale it down a bit. Also, when printing, make sure you select "None" under scaling method... because when I test printed them the first time, I saw that the second page was scaled down a tiny bit (just to fit my printer margin). I rescaned my template including more piece, so I've added a page 3 to the template document. You'll see that some pieces are duplicated - it's because I thought the template #4 was better seen on page2 (instead of page3), so left page2 in there.
Just for reference - my pipboy is about 9.5" long with the "screen-part" being about 8"x 6".
I didn't include a template for the "bracer" ... as it will be different for everyone. However, you can easily google how to draw a truncated cone shape (which is what you'll need for this part of the pipboy)
***Building the Base***
Essientially, it's about stacking the foam sheets in the right order (gluing them one on top of the other).
You can see the templates have been numbered and this is how they should be stacked:
*Top*
Template #2 - 6mm
Template #1 - 2mm
Template #1 - 2mm
Template #3 - 6mm
Template #3 with small piece - 2mm
Template #3 with small piece - 2mm
Template #3 - 6mm
Template #3 - 6mm
Template #4 - 6mm (4 layer of template are needed at the bottom)
*Bottom*
Now to explain why it's stacked this way.
1.the Template #2 is the raised plate of the pipboy.
2.there are 2 template #1 stacked under template #2, this is to be able to make this part of the pipboy (see picture)

So, on the first layer of Template #1, you have to remove the part here and here.

On the second layer of Template #1, you have to cut small lines out, so you get the recess "grill"
3. If you want to add a speaker for sound (since I was using an iPod touch and not an iPhone, I added a speaker), then remember to cut the space needed in layer 4 (template #3). I had to install mine and test it before finishing the foam block, because I couldn't get it in there after.
4. The small piece I'm referring to for layer 5 and 6 (Template #3) is this one:

So you can make this part:

5. For the last 4 layers, there only purpose is to build thickess on the back side so it reaches your arm when you attach it to your "bracer". To get a good fit, you,ll have to "carve" a curve into these layers. Also, I'm saying you need 4, but it's only a minimum, I could have added more and the pipboy would look a bit better from this angle.
***Finishing the sides***
OK - so we've got a foam block, it's time to clean it up a bit. What I did to get a "cleaner" side is that I used the exacto knife to cut excess foam from all the layers. Once this is done, you take 2mm craft foam and you apply it to all the side of the pipboy. As a general rule, I always cut my craft foam piece a little bigger than what I needed and cut them to size once they were glued to the side. This way I could get clean edges (well they are not clean clean - but it's easier to make it look clean that way).
***Adding details to the screen section***
Now to add that raised "screen protector" you see on the side of the pipboy, I used a strip of 6mm foam that I glued on the raised plate. It's not glued to the inside of the screen hole, it's really glued on the plate. After this is glued on, I used a strip of 2mm foam that I glued to the 6mm foam strip to make it look nicer. Make sure the joint between the start and end of those strip is at the bottom center of that screen hole. This part of the strip will be hidden under the plate where you find the 3 button-lights.

Hehe... so don't follow what you really see on the picture - on the picture, you see the seam at the top of the screen, but you're better off hiding it under the faceplate
For the plates with the button-lights, you need 2 strip of 6mm foam. The first should be 2.5" x 1.5" (plate1) and the second should be 2.5" x 1.75"(plate2). Plate1 goes on the side of the pipboy and should be touching the bracer as well as providing support for the plate with the lights (so it should come up a little bit over the raised plate of the pipboy). You'll have to cut the bottom of the plate1 at a taper to make it fit perfectly on the bracer. When plate1 is glued on, plate2 is glued on top of the plate1 (the bottom of plate2 should not be aligned with plate1, you should have a bit sticking out) and on top of the screen protector (same thing here, the plate should stick out a bit over the screen). Cut the arrows out of 2mm foam and you're set.

The lights I used on my pipboy are regular 5mm LED with metal LED holders. I cut 3 holes in plate2 and glued the LED holder there. The LED are inserted from inside the pipboy because they are wired to a switch and a battery pack.
***Adding details to the left section***
So now on to the missing details.
You need to add the 2 tapered walls on the bottom left part that is sticking out (done with scraps of 2mm foam).

Use the templates for the other details and glue them where they need to be placed. I haven't included a "screen" for the top detail (it should be the radiation meter if I'm not mistaken)... but it could be easily done by using clear plastic and sticking a white led right underneath. This is something I plan to do in my next version

For the knob on the bottom dial - in my original version (the one pictured in this tutorial) I freehanded the thing in foam, however in my other version I'm using a wood flower pot used for modelling. I hot glue a screw in the center of the pot and that's how I attached it to the pipboy so it would still move.
For the round knob just beside the screen, you just need to cut a circle of 1.25" diameter out of 6mm foam. What I did to make it cleaner was to sandwhich it between 2 scraps of 2mm foam, glue a strip of 2mm foam around it and cut groove into that strip. Once this is done - it should fit right in.

***Studs and Painting***
So, if you've done the bracer, then you should be nearly done.
Only thing left would be painting and screwing the stud on. The screws I used for the stud are 0.5" long and the foam is strong enough so they get a good grip. So no need to hot glue them on, they shouldn't fall off even if they are only screwed on.
As for painting, I always use the same process and it makes up a very durable paintjob.
1. Apply 2 coats of Flexbond (latex/glue from Rosco)
2. Paint using Krylon brand spraypaint
3. Apply 1 coat of flexbond over paint
4. Apply 1 coat of matte finish (gloss finish (or paint for that matter) doesn't work with foam... it will all crack for sure)
And you're done.
Thanks for reading.
Last edited:
