Flux Capacitor build. Now finished!

Thanks for the likes guys.....was a struggle but the box is painted and latches are in place...just need the plexi and all good
 
Hi all....so I'm still having trouble with my lights and I'm looking for some help here...I'm using fairy lights that I purchased from Amazon. The have a remote which the main reason I bought them....they work well..except for the remote part that is. Works great outside the capacitor enclosure. Not inside...the remote signal is too weak. I've tried changing batteries in the lights and the remote..I have switched light sets and same deal. I have rewired the circuit board so that it is hidden in the elbow at the top but still no go. The electronic board is mounted behind the elbow at the top but I don't like it. My whole reason for using these lights was the remote. My last resort is to take the sensor off the board and relocate it outside the box . It's small and may not be seen too easily. There is a push button switch on the board that I could use if I drill a small hole under the box . It wouldn't be seen. Any thoughts or ideas?
 
Looked up those kind of lights. It says on Amazon "It's better to align the remote at the signal receiver in the battery box to control the lights. The longest distance to control is 66ft/20m without any obstacle.". Are they infared like a TV remote, or RF like an Xbox? It makes a huge difference.
 
Here's my progress so far.

Took the remote sensor off the board and placed it above the pvc pipe sprayed silver.
 

Attachments

  • VID_20210317_205718.mp4
    82.3 MB
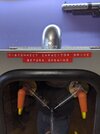
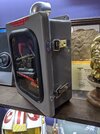
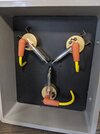
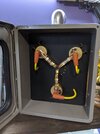
Flux Capacitor is now FINISHED! A really big thanks to Valor for the Torr relay parts and backboard. Also thanks for answering all my annoying questions! Lol
Surprisingly , the simpler stiff on here was the most challenging. Not entirely movie accurate but I like it! Someday I hope to educate myself with Arduino and make a better light sequence. I solved my remote issue by removing the remote sensor and placing it on top of the pvc elbow at the top of the box. Getting the plexiglass on the gasket was a lesson in patience that's for sure. Again thank you Valor for your help and advice.
 

Attachments

  • IMG_20210320_175248.jpg
    IMG_20210320_175248.jpg
    1.5 MB · Views: 165
  • IMG_20210320_175259.jpg
    IMG_20210320_175259.jpg
    1.5 MB · Views: 150
  • IMG_20210320_175307.jpg
    IMG_20210320_175307.jpg
    2.2 MB · Views: 130
  • IMG_20210320_175307.jpg
    IMG_20210320_175307.jpg
    2.2 MB · Views: 124
  • IMG_20210320_175345.jpg
    IMG_20210320_175345.jpg
    1.7 MB · Views: 135
  • IMG_20210320_175414.jpg
    IMG_20210320_175414.jpg
    1.7 MB · Views: 135
  • IMG_20210320_175646.jpg
    IMG_20210320_175646.jpg
    1.6 MB · Views: 159
propmainiac, any chance I could purchase some labels from you? If you have any any material left. I'm also working on a Valor kit piece with his parts.
 
Valor, I believe those are already mounted on the guts-kit you sold me. Just finished soldering the lil black wires. Just need door and window labels/stickers and I think I'm done.
 

Your message may be considered spam for the following reasons:

If you wish to reply despite these issues, check the box below before replying.
Be aware that malicious compliance may result in more severe penalties.
Back
Top