First Avenger belt and holster rig [COMPLETED 07MAY2012]

Not a whole lot to update. Started dying the pieces but the pictures make them look orange so I didn't bother posting them. I ended up tooling the US stamp onto the holster but was dissappointed with how it came out. I screwed up on the oval outline but I didn't have enough leather left over to redo it. I sent the buyer a picture of it but he isn't worried about it, but it bothers the hello out of me. My reputation is on the line with this project you know? I dont want to sell someone something they aren't happy with.
 
Hey guys got a quick update for you all. Finished the holster and leg rig.

IMAG0034.jpg


My wifes grandpa showed me a cool way to apply the dye to give it a nice weathered look. Easy and effective I think.

Thoughts?
 
Re: First Avenger belt and holster rig [NEW PICS 28APR2012]

Stitching and build look fantastic, but is that dyed already?
 
Re: First Avenger belt and holster rig [NEW PICS 28APR2012]

for the buckle, i'd say machine some aluminum pieces with the left handed piece having extensions on the rear end to keep the two sides lined up and just make inlays for some rare earth magnets. the small cube style rare earth magnets can hold up to 8 lbs of force per magnet so four or five would be sufficient, that being ten all together for one on each piece of buckle.
 
Stitching and build look fantastic, but is that dyed already?

Yes but that's only the initial coating. Using the British tan as a base coat it will show through the second darker layer of medium brown and will appear weathered.

The dying has to be the hardest part of this build. Having no idea what color they used in the movie its been a roller coaster ride trying to figure out how much to use/water down/etc.


for the buckle, i'd say machine some aluminum pieces with the left handed piece having extensions on the rear end to keep the two sides lined up and just make inlays for some rare earth magnets. the small cube style rare earth magnets can hold up to 8 lbs of force per magnet so four or five would be sufficient, that being ten all together for one on each piece of buckle.

The buyer is purchasing the buckle from another source. I'm no longer making it for this. Good info for those trying though. Thanks.
 
Re: First Avenger belt and holster rig [NEW PICS 28APR2012]

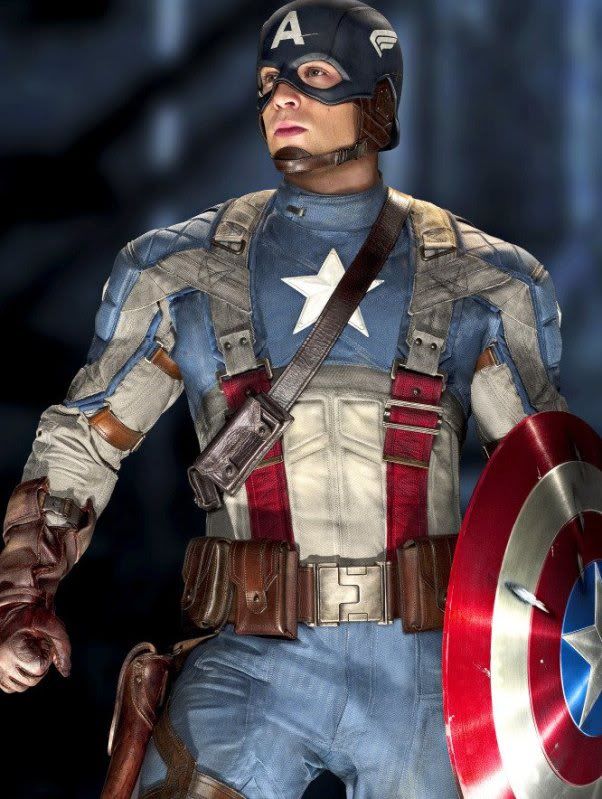
In regards to the question about the dye, this is the color I'm going for. It's one of the only pictures out there that show the color and not washed out by any light. NuRFs pictures are excellent, but with the camera flash it makes the pouches super bright and the ones not in the flash almost black. Hard to figure out what the color is so I'm just doing the color from the screen caps I find.

captainamericacostume.jpg
 
Re: First Avenger belt and holster rig [NEW PICS 28APR2012]

It is 100% British tan looks very close to the last picture you posted (belt). I may be a little washed out in that picture but not much.
 
Weathered look I was talking about. Thoughts?

(My phone camera is making the pictures come out orange. Not sure why but the dye is more brown than it appears in these pictures.)

IMAG0041-1.jpg
 
Holster finished finally. Belt just needs the L hook added. Finishing up on the pouches now. Buyer is happy with the weathered look and so am I :)

IMAG0056-1.jpg
 
Re: First Avenger belt and holster rig [NEW PICS 29APR2012]

Ahh there ya go that looks pretty near exact. Great job and very nice stitch work. :thumbsup
 
Yeah i have to use natural light for my photos to not come out orange Haha. I must say the stitches came out great for the equipment I have at my disposal.
 
Re: First Avenger belt and holster rig [NEW PICS 29APR2012]

Hello Sandman, Just found this thread and this great work. For the stiching what type of sewing machine are you using? I have a sewing machine that was given to me which was used in factory for making womens clothing. Im curouus if this would be strong enought to sew through the leather.
 
Hey there! I used just my wifes normal sewing machine. Nothing heavy duty. For the non-stress point stitches I used it on the slowest setting and for double pieces or stress points I rotated the needle by hand to avoid breaking needles. Time consuming but I got double and even triple stitches in the same holes about 95% of the time.

I also glued the high-stress parts with leather cement. Hope this helps.
 
Re: First Avenger belt and holster rig [NEW PICS 29APR2012]

Thanks for the tip of turning the wheel by hand. Also I was thinking can the decorate stitching be done machine, but when it comes to joining 2 or 3 parts together, then going to the sewing awl? Would this approach make the final look "uglier" or messier? Not sure if you had experimented with this already. Thanks again awesome work!

Oh and what weight or thickness is that leather you used?
 
I used 6-7 ounce leather for this. A little thick for the pouches I think in hindsight. Maybe go with 4-5 ounce for those but 6-7 was great for everything else.

As far as doing the thicker parts by hand awl, it can be done for sure but i chose not to because I didn't think the holes would be as aligned and even as the ones done by machine. That's why I did them all by machine and after gluing the pieces together I went back and hand cranked the needle into the same stitch holes. Easier on the machine bc its then only piercing through 1 piece verses 2 and it kept the holes evenly spaced and sized. Unless you have an awl the same thickness as a sewing needle (you might, I didn't) then I don't think those holes will come out as "clean" as you were asking.
I would test it on some scrap leather to be sure though.
 
Completed the load bearing hook on the back of the belt.

Started with a normal L hook screw and cut I and bent it down to size:
IMAG0062.jpg


Cut the back piece to sew it on with:
IMAG0063.jpg


Slid it into position:
IMAG0064.jpg


Finally, superglued the hook in place and sewed the back piece to it. Had to hand sew it due to the size of the foot on my sewing machine. Came out ok:
IMAG0065.jpg
 
Finally done! After trial and error, Time and suffering (more time than suffering lol) I've completed this commission.

IMAG0068-1.jpg


Some things I would have done differently:

-Used an actual leather sewing machine
-Used 4-5 ounce leather for the pouches instead of 6-7
-Organized the build more instead of doing whatever I felt like at the time.

For a first time commission I think it went well. After my deployment ill invest in more tools and a sewing machine and do some more projects that I personally like. I like TFA but I'm not a super fan so i think that had a lot to do with the time it took me to finish.

Last project for 9 months. It was fun guys!
 
Back
Top