Fine Molds Y-wing fighter build in progress

knievel

Active Member
So i'm a newbie here. Picked up an hold hobby during X-mas holidays, since I had some models laying around on the attic.
Working at the kitchen table was never a good choice, so I decided to finally create my own spot at the attic.
And while I was at it, bought the airbrush I always wanted, but never had.

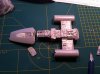
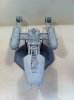
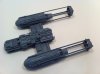
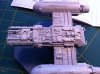
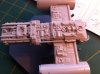
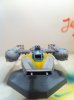
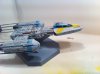
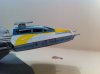
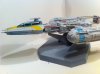
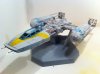
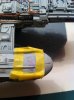
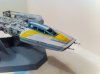
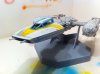
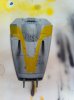
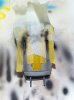
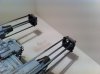
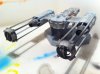
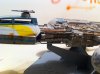
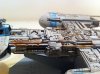
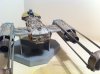
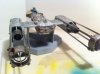
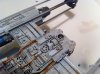
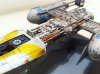
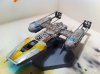
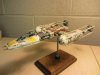
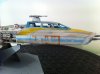
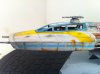
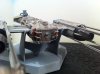
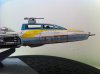
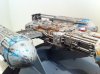
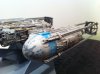
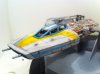
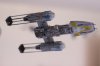
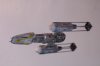
One of the kit was this Fine Molds Y-wing fighter. Great kit with a lot of detail! I never dared to start on it , afraid as I was to mess it up.
But with the right gear in the house, I decided to give it a go.
I searched the internet for forums like these to get ideas on how to paint, what materials to use and learn the technics.
Build is going pretty well I think, but I'm happy to hear advise on how to continue.
I''l go and try to upload photo's of the build. Comments are welcome.
 
Last edited:
Re: Y-wing fighter build in progress

First stage: the build.
This was a fun kit to build since the details are so delicate and thin. A lot of tubes to be fitted.
After that work was done, I gave it a dark grey prime coat.
Since I'm going for a really used and aged look, I masked some panels off with latex, to keep the prime color on some places.
Now it was time for my 1st airbrush action!
aplied layer by layer untill I was satisfied with the overall color.
Compaired to my old Y-wing fighter (I believe it's MPC) The difference in size and detail is obvious. Not to mention the paintjob ;-)
 

Attachments

  • Star wars 026.JPG
    Star wars 026.JPG
    1.6 MB · Views: 136
  • Star wars 043.JPG
    Star wars 043.JPG
    1.8 MB · Views: 184
  • Star wars 042.JPG
    Star wars 042.JPG
    1.9 MB · Views: 147
  • Star wars 040.JPG
    Star wars 040.JPG
    1.7 MB · Views: 121
  • Star wars 037.JPG
    Star wars 037.JPG
    1.6 MB · Views: 146
  • Star wars 036.JPG
    Star wars 036.JPG
    1.7 MB · Views: 134
  • Star wars 029.JPG
    Star wars 029.JPG
    1.5 MB · Views: 143
Last edited:
Re: Y-wing fighter build in progress

Yesterday evening it was time to go crazy.
I took some fine sandpaper and sanded of some of the white paint to reveal a bit of the primer underneath.
Reason: I was looking at photo's of wheatered cars and noticed of the paint comes of because it's sandblasted.
I started thinking of the story why these planes are so beatup and dirty as it is.Obviously the planes represent to be in service for many many years.
During that time it received some poorly done paintjobs for a particular party (what with the yellow and the intermediate blue), necessary repairs were made with no budget, but rusty pipes are not replaced if still functional
So what would happen if this plane was used at low altitude an a sandy planet like say Tatooine? It would strip of the paint, revealing prime coats, or even bear metal to rust.

I wasn't sure if I wanted to use the decals or paint everything. Finally decided to do both.

I masked of the cockpit (which I still isn't glued to the body to make work easier) for the yellow striping.
Forgot to make photo's of that proces.
The yellow was an unforgiven color, since the dark primer panels keep shining through. But then again I thought: wouldn't it be the same on a real paintjob?


I painted the canopy blue (had to mix colors, since I didn't have intermediate blue). Masked it on top to paint the (gold 2) racing stripe and gave it a quick dry brush and sandpaper action.

Wanted to use the gold leader side stripes from the kit, since it had some nice chipping and fade, but in the end decided not to make a mix and keep it pure.
Used Valejo decal fix (1st time for that, worked ok). Chipped of parts of the decal afterwords again to make it aged.

Masked of the engine nacelles with tape and latex for their blue paint.
I wanted to airbrush these, but it seemed easier just to take a brush. Paint ran under some of the masking tape, so I have some cleanup to do there.

Worked on the rusty pipes. Searched a lot for reference photo's these week. Old pipes, rusty cars. I was even looking at the wheatering and rust on lorries when I was driving. It's getting there. Still needs a yellow-orange shine on areas where rustparticles washed away.

I wanted some rust on the cockpit panels too. Experimented with placing a tiny drop of paint and quickly pulling it down with the tip of my finger.

I thinking of adding some greenish mosses the same way to represent it has been left on, let's say Endor or Dagobah, for years.
 

Attachments

  • Star wars 072.JPG
    Star wars 072.JPG
    1.5 MB · Views: 134
  • Star wars 071.JPG
    Star wars 071.JPG
    1.8 MB · Views: 133
  • Star wars 070.JPG
    Star wars 070.JPG
    2 MB · Views: 126
  • Star wars 069.JPG
    Star wars 069.JPG
    1.7 MB · Views: 126
  • Star wars 068.JPG
    Star wars 068.JPG
    1.7 MB · Views: 145
  • Star wars 067.JPG
    Star wars 067.JPG
    1.5 MB · Views: 137
  • Star wars 065.JPG
    Star wars 065.JPG
    1.7 MB · Views: 134
  • Star wars 064.JPG
    Star wars 064.JPG
    1.7 MB · Views: 152
Last edited:
Used the rest of the black paint to give the thrust deflectors a burnt look.
 

Attachments

  • star wars 003.JPG
    star wars 003.JPG
    1.8 MB · Views: 111
  • star wars 005.JPG
    star wars 005.JPG
    1.6 MB · Views: 119
Added some yellow ruststains around the rust, then airbrushed with satin varnish.

Mixed some brown and black washes with some water and used plenty so it would find its way in a natural way. I like how you can see on the cockpit where the water is taking the filth to create a stain.
 

Attachments

  • star wars 012.JPG
    star wars 012.JPG
    1.7 MB · Views: 119
  • star wars 011.JPG
    star wars 011.JPG
    1.8 MB · Views: 126
  • star wars 010.JPG
    star wars 010.JPG
    1.7 MB · Views: 118
  • star wars 009.JPG
    star wars 009.JPG
    1.6 MB · Views: 111
  • star wars 008.JPG
    star wars 008.JPG
    1.9 MB · Views: 124
  • star wars 007.JPG
    star wars 007.JPG
    1.7 MB · Views: 128
  • star wars 006.JPG
    star wars 006.JPG
    1.7 MB · Views: 128
looking awesome!

I'm also a beginner and I'll tell you the two biggest mistakes I do.

1.I overdo the weathering
2. I refer to other peoples' build for inspiration instead of the actual studio models
 
Thanks astroboy!

Know what you mean. Don't want to do much wheatering after this. Think the amount of rust is okay and the wash came out ok too. Glad I mixed brown and black washes. Just black wouldnt be right.
don't like the builds where there's to much or to heavy airbrush strokes going on. Did a lot of test runs on the black for the torpedo outlets before I had a go at it. I was really afraid that would go wrong. It's so easy to overdo that color.

As for reference: i'm holding on to the studio color sceme, (FM delivered great references for gold leader, gold 2 and 3). The wheatering on it will always be a matter of interpretation: Logicaly the rusty panels and tubes don't make sence, as you wouldnt use iron on a plane. But I like the look of it. So maybe it was used when no other material was available ;-)
I speak from experience. Because my y-wing looks like something that the rebels retired and then was later sold for parts.

As far as airbrushing goes, I almost feel that at this scale it's better to brush on pigments (or ground up chalk pastels)

I'm not that good at airbrushing so I reserve it for even coats and masked off areas.
 

Attachments

  • uploadfromtaptalk1422668235687.jpg
    uploadfromtaptalk1422668235687.jpg
    46.7 KB · Views: 164
That turned out nice. The weathering looks really good and I love how you have the paint worn off the ends of the engines.
 
I speak from experience. Because my y-wing looks like something that the rebels retired and then was later sold for parts.
Found the thread on your Y-wing yesterday after your comment. I saw it was a bit overdone. It's always hard to quit at the right moment. Think mine's nearly done.
X-wing 1/72 I did during X-mas didn't come out right at the end (wrong color that I had to drybrush on. Reason to go buy an airbrush for this project). Still got the 1/48 to do it better next time.
Also need to strip the paint off my Slave 1. Started on that build 3 years ago, but after used the wrong base paint on the body it never got assembled.
Enough to do in the future as you can see!
 
Just watching the end of ANH for reference. Impossible actually, since most of it is blurred.

But 2 things occured to me:
When gold leader says "Red leader, this is Gold leader" (1.46.09), you can actually see gold leader's plane next to him through the window (using the FM reference sheet for the paintjob). He's taken the wrong plane on lift off ;-)
In another shot Red 5 is flying next to ... Red 5! (1:52:06) Same plane, same decals and panelling. Not to mention that the studio scale version of Luke red 5 is completely different (the red stripes are continues on this one).

Funny how details start to show up when you've been working on them so closely!
 
Last edited:
last update:
wheatering washes came out nice. Only had to do some blastmarks with the airbrush, but was so consumed on my slave 1 build that I completely forgot about it.
So when I had a little black in the brush left on that project it was time for the finishing touches.
 

Attachments

  • IMG_3650.JPG
    IMG_3650.JPG
    739 KB · Views: 109
  • IMG_3648.JPG
    IMG_3648.JPG
    1.5 MB · Views: 138
  • IMG_3647.JPG
    IMG_3647.JPG
    685 KB · Views: 105
  • IMG_3642.JPG
    IMG_3642.JPG
    1.5 MB · Views: 111
  • IMG_3641.JPG
    IMG_3641.JPG
    1.6 MB · Views: 122
  • IMG_3637.JPG
    IMG_3637.JPG
    1.7 MB · Views: 108
  • IMG_3636.JPG
    IMG_3636.JPG
    1.8 MB · Views: 111
  • IMG_3634.JPG
    IMG_3634.JPG
    1.6 MB · Views: 109
  • IMG_3633.JPG
    IMG_3633.JPG
    1.6 MB · Views: 135
Hanging it on the ceiling of my sons bedroom, adding to the scenery.
 

Attachments

  • IMG_0938.JPG
    IMG_0938.JPG
    5.1 MB · Views: 104
  • IMG_0940.JPG
    IMG_0940.JPG
    2.8 MB · Views: 106
Last edited:
last update:
wheatering washes came out nice. Only had to do some blastmarks with the airbrush, but was so consumed on my slave 1 build that I completely forgot about it.
So when I had a little black in the brush left on that project it was time for the finishing touches.

Love the rust on the head by the cockpit. Great stuff!

SB
 
Thx Steven and Moonlight! It was a great little build that thaught me a lot and got me back on track for my slave I project.
 
This thread is more than 8 years old.

Your message may be considered spam for the following reasons:

  1. This thread hasn't been active in some time. A new post in this thread might not contribute constructively to this discussion after so long.
If you wish to reply despite these issues, check the box below before replying.
Be aware that malicious compliance may result in more severe penalties.
Back
Top