Fine Molds 1/72 MF build with death star tiles

senormodeler

Active Member
Hey all,
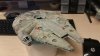
I haven't posted much here before but I'd figure I'd start with this. I'm about halfway through a FM Falcon build, but what I'm really excited about is the base. I bought eight death start tiles from Minifig here on this site and I'm using them as a base for the falcon. The tiles are really well done. I only wish I could have ordered more and lined my bathroom with them. :)

467C5396-C012-4016-B4FD-18A7A4CF4099_zpsbu7dzbum.jpg


I drilled a hole in the bottom turret and epoxied a nut inside to attach to the gooseneck.
B028216E-0EEA-4021-BDD5-789C4323253D_zpsdnfesf2g.jpg


Drilled a hole in the base and dry fit it all together.
1FEE3149-CFC5-4B31-B050-DE89206BDF78_zpskpqbm8wh.jpg


DAD55E9F-0009-4599-9F89-AFE9FFB38AFC_zpssap7ubfd.jpg


26A0D19A-C0A7-46D1-8B98-576D5B15E9C4_zpszd83wzrg.jpg


BF94C6F7-48B9-4D1C-8B0E-EE83FF6F3492_zpsjragnf7s.jpg


Also did a little work on the engine grill. Tried to make it look like it's seen a lot of heat.
07C8219E-F613-42EF-AB77-17B4D335DE75_zpseycogdnz.jpg
 
Somehow I missed these posts. Thanks, tek and haystack. The radar dish is from shapeways. I'm not sure who the designer was but I found it and gave it a go.


Sent from my iPhone using Tapatalk
 
I'm finishing up the build of the falcon and I've hit a snag. I'm missing piece number E33. It's a part that goes on the sidewalk on the port forward section. I wonder if anyone on this forum has that piece and would be willing to make a duplicate for me. I'd pay. Luckily it's a piece that doesn't keep me from moving forward. Mic anyone's interested, please let me know. Thanks!
 
I finally got some primer on this guy. Used Tamiya fine light grey.


DB544ABA-2041-4A3B-88CF-46B88D5291CC_zpswhlirpuq.jpg


Then pre-shaded with german grey.


4A9C3F8E-1FF0-4899-9A63-21B009F48B2F_zpsntgju0dy.jpg


Added the PE grills.


26B3BC21-94FF-42A0-B38A-9401891086A9_zpsrac2h1qc.jpg


6F1221CE-0931-41A1-9E4D-7F24E69463B7_zpsiucdpu3n.jpg


Then started base coating it with a mixture of flat white, gloss white, with a pinch of nuetral grey and brown.


7869232B-F2AE-4AF8-AC65-5C38A788CE9B_zpsawmzggpi.jpg


Thanks for looking.
 
I applied the base coat to the falcon this week. Tried to keep the pre-shade effect very subtle.
E9B7C788-E1F5-47B5-8259-0674B691A0D1_zpswbjwtcww.jpg

D9963D22-ADD5-4425-B1DE-894039C5CE71_zpsokv9uiyc.jpg

Masked off all the red panels on the upper side. Sponged on some Humbrol masking liquid for the paint chips. Applied a custom mix of muted red tamiya paint.
7CB8EB49-C509-42DB-853A-63B607C6B83B_zpst61lcx69.jpg

image.jpg1_zps2lpatmsg.jpg

image.jpg3_zpsad6nmuu3.jpg

image.jpg2_zpsahvdffk9.jpg

I think the red panels came out a little too dark, so I'm going to give them a light sanding with fine grit sandpaper to beat them back a little. Then I'll sponge on a few nuetral gray paint chips.
Still have the bottom panels to do and then I'll attach the cockpit and start the weathering.
Comments welcome. Thanks for looking!
 
Last edited by a moderator:
Awesome work so far, the base is great and the paint work is coming along really well, making me itching to start on mine, (but the 172 and 148 x-wings first for practice). Keep posting :)
 
This week I found some time to work on the Falcon and to begin my favorite part of the process... weathering. I started applying the first filter over the base color... Abteilung German Ochre. The base coat needed to be warmed up a little and the german ochre does the job.
But before applying the filter I went in with a gundam marker and put all the little hash marks that appear all over the ship. Here you can see the hash marks and also the filter. The left side of the image has the first layer of the filter and the right side doesn't.
59F97C03-43B0-4C06-A83A-34B2860F518D_zpssv169aig.jpg

I also did the bulk of the painting of the death star tiles. I gave each one a slight different shade of grey. I still may go back and add different tonalites as well as do some weathering on them.
E2FAAC16-27CB-4C8E-BCCB-3981242F1015_zpsauvydq8c.jpg

1A3C17C2-1565-4DB1-9587-482A6A85F2E0_zpsan9rl96b.jpg

3BC84D9A-CFB0-449E-932B-AEA22661E12F_zpsbylpstzs.jpg

And here's the falcon with a couple more layers of filtering with german ochre. Warming it up inch by inch.
B599398E-A151-417A-8D47-AD789819C606_zpspejbtbuh.jpg

Thanks for looking. Comments welcome.
 
Last edited by a moderator:
This is a really nice build. You are showing a lot of restraint and that's nice. Very methodical. I can't wait to see it finished.

Are you hand painting all of the grey tiles? Looks nice. Reminds me of fitchenfoo's build (one of the best paints out there)
 
Thanks astro. Yeah, I'm hand painting everything with oils and trying hard not to overdo it. I'm glad you mentioned fichtenfoo because his paint job is my inspiration. I think his is one of the best I've seen. And his tutorial videos on the subject are extremely informative. Learning a lot.
 
Thanks astro. Yeah, I'm hand painting everything with oils and trying hard not to overdo it. I'm glad you mentioned fichtenfoo because his paint job is my inspiration. I think his is one of the best I've seen. And his tutorial videos on the subject are extremely informative. Learning a lot.

To me, there are two that stand out. Fitchenfoo and Mersejohn. But they both have very different approaches.
 
Thanks John.
Astro, those are my go to references.

It's funny. I feel as if you have to pick one path for the falcon. I tried to do a combination of both on my 1/144 and so far it's looking like too much. Mind you, that's partly because the scale is much smaller
 

Attachments

  • 20150315_140957.jpg
    20150315_140957.jpg
    4.6 MB · Views: 183

Your message may be considered spam for the following reasons:

If you wish to reply despite these issues, check the box below before replying.
Be aware that malicious compliance may result in more severe penalties.
Back
Top