You are using an out of date browser. It may not display this or other websites correctly.
You should upgrade or use an alternative browser.
You should upgrade or use an alternative browser.
FemShep N7 Armor, Valkyrie Rifle, + Omniblade (Mass Effect 3)
- Thread starter Freya Willia
- Start date
Rysjin7717
Well-Known Member
Ditto. 
Sent from my SGH-T989 using Xparent Skyblue Tapatalk 2
Sent from my SGH-T989 using Xparent Skyblue Tapatalk 2
Astrokid248
Well-Known Member
The paint job is looking amazing. That red stripe just makes everything come alive. I know the silver topcoat was just to provide a base for the clear coat, but I think it breaks up the black a bit and gives it a more industrial look, ya know? (And I only use gel polish since I work on gear boxes for robots, and the gel stuff is the only polish that holds up to steel grinding against it.)
Freya, everything is coming together quite nicely. I really love seeing all the different parts together. Great idea on the shoulder bells. I am still looking forward to seeing a vid of your abs... er well the abs on the costume and how they work.
I would love to have the models from ME3. I am pretty good at creating pep files and I could make a killer set (Male/Female) of pep files that I am sure many people here would like to use. Let me know if you are still willing to extract/share them. I can put your username in the files for credit as well.
PS. i can try extract armor models if you want (i PM to you my contacts)
I would love to have the models from ME3. I am pretty good at creating pep files and I could make a killer set (Male/Female) of pep files that I am sure many people here would like to use. Let me know if you are still willing to extract/share them. I can put your username in the files for credit as well.
Freya Willia
Well-Known Member
Freya, everything is coming together quite nicely. I really love seeing all the different parts together. Great idea on the shoulder bells. I am still looking forward to seeing a vid of your abs... er well the abs on the costume and how they work.
Still intend to do that. This month has been rough. I could go on a very very long rant about job searching, and other things that are keeping me awake at night, but I wont.
It's hard to stick to things like my hobby when I have to be aggressively applying my energy elsewhere. Inevitably though I have excess energy that will manifest itself as stress and a bad attitude, so I've been going to the gym and beasting-out. Then I'm too tired to work on my costume afterwards.
I did manage to get to my studio today though. There are a couple of details missing that are slowly getting glued where they should be. I'll post pics later.
Glad most of you seem to have a positive reaction to the new paint. I really did like my previous work. Going back and looking at my photos of it makes me realize that there still needs to be a lot of careful attention paid to this new coat if I want it to have the same depth.
Freya Willia
Well-Known Member
Thank you!
I realized that my belt needs to be longer in the back, after doing another fit test. Since I just put paint on there I was kind of hoping I wouldn't have to do too many more of these - but even with no clearcoat yet, this stuff is holding up quite spectacularly. I have tried the following postures:
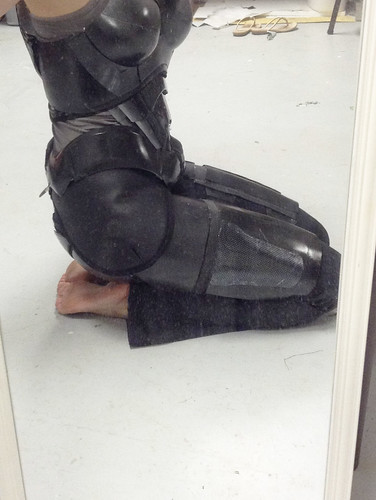
I'm particularly pleased with how the belt-skirt does not move much, but hangs in place while my thigh armor pivots around - this is what I needed to confirm before finally gluing the hip pieces to the upper thigh.
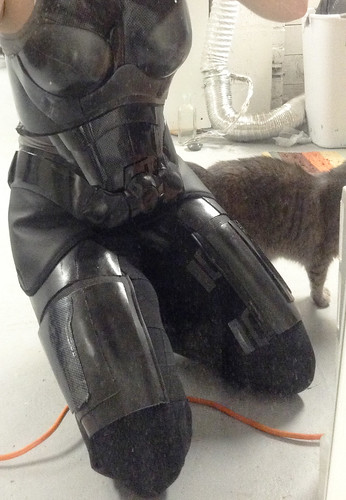
The belt kind of gets in the way of the ab armor side panels, but when I extend back into a normal position they recover somewhat decently. I think this could be improved with a light boning-channel on either side. It would limit some of the side-crunch movement but this ab amor doesn't go far enough across the obliques to make that necessary.
I sat with my full weight on the ass plates + concrete floor. No panty shrapnel! Not even a scuff mark!
I realized that my belt needs to be longer in the back, after doing another fit test. Since I just put paint on there I was kind of hoping I wouldn't have to do too many more of these - but even with no clearcoat yet, this stuff is holding up quite spectacularly. I have tried the following postures:
I'm particularly pleased with how the belt-skirt does not move much, but hangs in place while my thigh armor pivots around - this is what I needed to confirm before finally gluing the hip pieces to the upper thigh.
The belt kind of gets in the way of the ab armor side panels, but when I extend back into a normal position they recover somewhat decently. I think this could be improved with a light boning-channel on either side. It would limit some of the side-crunch movement but this ab amor doesn't go far enough across the obliques to make that necessary.
I sat with my full weight on the ass plates + concrete floor. No panty shrapnel! Not even a scuff mark!
Very impressive range of motion.
Freya Willia
Well-Known Member
I've been waiting to get to this part of the costume for... probably a year now. This weekend will be my 27th birthday and while many people are at SDCC, I've slowed down a little bit on this suit to make a quick costume for our Game of Thrones-themed grill out.
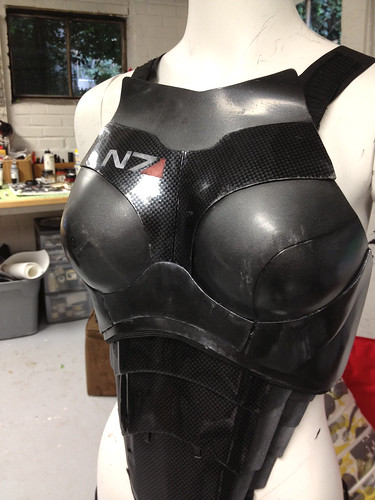
Today, it felt like it was time to ceremoniously put the N7 logo on my armor. Volpin gave me some vinyl stencils he used on the rifle, and it turned out to be just the right length for this application, too.
I started by sanding the carbon fiber vinyl a bit with 300 grit after I applied the stencil. Then I used thin layers of sponge-painted gesso.
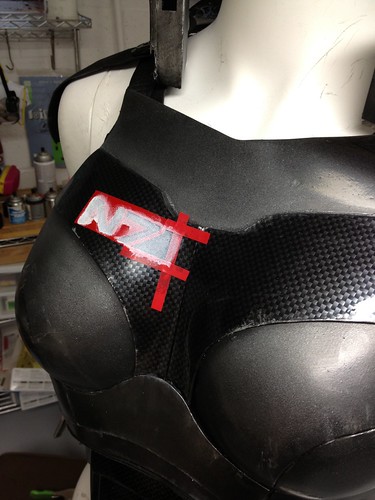
This is not the best angle to showcase the glazing, but after it became opaque enough I darkened some areas and knocked the whites back to a light gray with gel medium and black.
Today, it felt like it was time to ceremoniously put the N7 logo on my armor. Volpin gave me some vinyl stencils he used on the rifle, and it turned out to be just the right length for this application, too.
I started by sanding the carbon fiber vinyl a bit with 300 grit after I applied the stencil. Then I used thin layers of sponge-painted gesso.
This is not the best angle to showcase the glazing, but after it became opaque enough I darkened some areas and knocked the whites back to a light gray with gel medium and black.
mdb
Sr Member
Amzing work Freya Love how much you are sharing as you go as well And your solutions to those details that can niggle at the back of you rmind- like the floating plates etc.
(I'm currently hacking my mannequin apart to be able to use her properly so I feel your pain when going from mannequin to self. I have already filled the torso with foam, next stap is to fill the legs with foam and cut them short Maybe giver her a bit of booty too.)
Love how much you are sharing as you go as well And your solutions to those details that can niggle at the back of you rmind- like the floating plates etc. (I'm currently hacking my mannequin apart to be able to use her properly so I feel your pain when going from mannequin to self. I have already filled the torso with foam, next stap is to fill the legs with foam and cut them short
Maybe giver her a bit of booty too.)Freya Willia
Well-Known Member
Amzing work Freya
(I'm currently hacking my mannequin apart to be able to use her properly so I feel your pain when going from mannequin to self. I have already filled the torso with foam, next stap is to fill the legs with foam and cut them short
I thought about hacking my mannequin up to make the last stretch of this costume easier. But I'd be really worried about getting lazy, not putting her back together in a timely fashion, and just having fiberglass body parts lying around my studio.
I always keep my eye out for more fiberglass store mannequins that I could cut apart, and keep separate for tasks like vac forming and molding. They don't pop up on Craigslist nearly as often as I want in my area.
mdb
Sr Member
yeah, my mannequin was bought about... three years ago for a ridiculously cheap price specifically to be cut apart and it's just getting done now..... So yeah I totally understand not starting to hack until you are sure I'm doing the torso now because I have to- Blood Dragon and Shae Vizla's armour squish the ladies inward and the templates are hilariously badly deformed by the mannequin
Also please post piccies of your Game of Thrones costumes when you have them done!
I'm doing the torso now because I have to- Blood Dragon and Shae Vizla's armour squish the ladies inward and the templates are hilariously badly deformed by the mannequin Also please post piccies of your Game of Thrones costumes when you have them done!
Fly4v
Sr Member
This weekend will be my 27th birthday
:cool Happy Birthday :cheers!
Freya Willia
Well-Known Member
Hey Freya, i been reading your thread multiple times, also lurking from the start of your build.
AMAZING work.
i am making my own costume of Javik.
maybe you could share template you were using for omniblade and more pictures of it?
Thank you. Yes I will be inclined to share my omniblade files - but I will do so when mine is finished. We are waiting on laser cutter maintenance right now.
I also plan on making a video describing how I put it together.
Thank you. Yes I will be inclined to share my omniblade files - but I will do so when mine is finished. We are waiting on laser cutter maintenance right now.
I also plan on making a video describing how I put it together.
Thankyou in advance, i hope that will happen soon, because con im preparing is in early september
Freya Willia
Well-Known Member
Thankyou in advance, i hope that will happen soon, because con im preparing is in early september
I can tell you mine almost certainly wont be done that soon
For a couple of reasons - mostly that I am spending my time looking for full-time employment, and the friend who is cutting my templates on his laser is also preparing for a major convention at the end of August. It's not high on his list of things to get done before then.You see, I had to teach myself Adobe Illustrator in order to produce those templates. For someone better trained in that software it wouldn't take very long, but for me, it took almost a month to learn the key tools and get all of the parts where I had the right curvature. This is why I wont be sharing "my" omniblade files before I get my own replica finished - though of course you're welcome to copy the pictures I already have on flickr, as well as the very good references that are out there and interpret the design that way. It's not as complex as it looks at first.
My costume hobby in general is not for profit or making sales, so, that just means even if a demand is out there, it's kind of secondary.
Right now I'm working on what amounts to as costume "chores." None of these parts are super exciting, but they have to come together, hopefully by the end of the weekend:
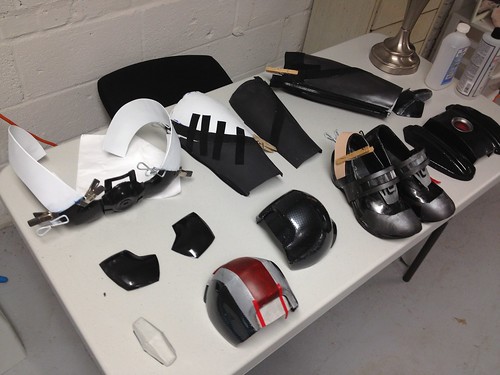
1.) omfg, this stupid belt.
2.) one of the leg pieces had the styrene shatter when I put too much pressure on it in a crouch position. this is the same one the glue messed up earlier, i think it got very thin under the vac-former for some reason. fixing that, making them more flexible.
3.) coming up with a rig for the weapon-mounts/back panels that is temporary, so electronics can be put in and taken out if necessary.
4.) glueing shoes. also need repainting.
5.) painting and putting snaps in the interior of the pauldrons.
6.) sculpted that elbow piece i almost entirely forgot about. needs sanding, molding.
Also please post piccies of your Game of Thrones costumes when you have them done!
I will probably make my own thread for this! It wasn't quite 100% done for the party, and the only pictures that resulted were not *of* me since I was behind the camera.
Similar threads
- Replies
- 7
- Views
- 96
- Replies
- 2
- Views
- 106
- Replies
- 6
- Views
- 427