Fallout 3 T-51b costume

Seeker9817

New Member
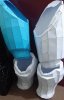
OK for my first full costume i have decided to make the t-51b power armor as seen in fallout 3. I haven't chosen a color scheme yet (the color in the fallout 4 trailer?) but it might be heading towards anchorage with some faded enclave and us army insignia in various spots with some personal additions (my skull logo)

it will be based off of pepakura and reinforced with fiberglass although i will be testing various other resin alternatives before i make the final reinforcements (diluted polyvinyl acetate sealed with gesso) , i will also be trialing some other strengthening techniques to be certain of their strengths and weaknesses. it will also be filled and smoothed to the best of my abilities.

my unfolds will be available to anyone interested (i prefer to separate parts more pedantically, favoring speed and simplicity.)


i have already completed approximately 90% of the suit having started on the 4th of July with PLENTY of breaks, pics to follow very soon as my phone is my only working camera and incidentally also my only functioning internet connection, BRB

-S
 
here are the thighs and shins.
 

Attachments

  • 20150715_231218.jpg
    20150715_231218.jpg
    2.5 MB · Views: 155
  • 20150715_231218.jpg
    20150715_231218.jpg
    642 KB · Views: 158
Last edited:
20150715_224555.jpg20150715_224601.jpg20150715_224631.jpg20150715_224802.jpg20150715_224902.jpg20150715_231302.jpg
i corrected the size on the images as i realize the pictures are horrible. never trust phones.

anyway here are some more photos of the various bits i have bothered to photograph
 
Looking good! I'm interested to see how this build goes because I'm wanting to build a set of Anchorage style T-51b armor myself! Good Luck!
 
Awesome! I'm working on the T-60 myself with EVA foam, so I'm keeping a close watch on all power-armour builds I can find. Good luck mate! I'll be watching.
 
Amazing work!! Do you think you can send me the files? I would love to try to complete this by the time NYCC rolls around, a bit of a stretch goal but it may be possible.
 
20150719_014052.jpg20150719_014109.jpg20150719_014226.jpg
i have since finished the chest, have not attached the rear valve as i want to harden it separately before i attach it, btw the pauldrons need to be redone as they are tiny.

yes i know i am a week late but i was pepping a riot gear helmet and HEV suit parts for my next two projects


also i have been doing some testing while i wait on the resin to arrive on alternative hardening methods and so far one seems to have worked and is somewhat rigid; a cornflour and PVA mix, as most of the other options neither soak nor become part of the working surface this is the only working substitute that (i've found) to work effectively. as there is the worry of the PVA becoming liquid again with sweat etc. the gesso seems to have solved that issue.

But be aware this is not my final hardening technique, it was merely a test. Although if the fiberglass adds to that cornflour strength i will compare it directly to the epoxy when it gets here in a fortnight.
 
Yo nice thinking with the hardening there.

I'm working on a helmet using non toxic alternatives to fiberglass so I can work inside. I simply use slightly diluted PVA glue, and soak strips of paper in it. Then I layer it just like fiberglass. I was skeptical about it's strength at first but with a few more layers and experimenting it's incredibly tough and light.

A few tips, if you use paper instead of fiberglass mat make sure you tear the strips, don't cut them. Makes them fuse together easier. Use brown paper from packaging for the inside for bonus strength. Finally for the final layer, instead of paper get and old T shirt and cut it into strips and use that. It takes a while longer to dry but it feels as tough as fiberglass and as light as the pepakura base.

Most posts will tell you that paper mâché or any similar alternatives are terrible for armour but there are a few diamonds in the rough out there that show how effective it really can be. I hate fiberglass so I'm determined to stick to alternatives.

EDIT: I just remembered, be careful when using flour, corn, or any other similar ingredients, as they can eventually rot, grow mould and ruin a piece over time.
 
yeah the rotting could be an issue but i did see in a few old threads from around that salt can help with the mould/rotting issue, obviously there is always going to be problems in a damp environment but still. Thanks for the build method, will definitely be giving that a go when i build another test piece.

've also been toying with the idea of using burlap (hessian) instead of glass with the resin as there were a couple posts on a paper-sculpting forum hinting at that being a possibility, so ya' neva' kna'.

There was a guy on the 405th who made pretty much a full suit with the fibreglass method, but instead of fibreglass sheet/mat he used sheets of felt. Apparently it worked brilliantly.
 
There was a guy on the 405th who made pretty much a full suit with the fibreglass method, but instead of fibreglass sheet/mat he used sheets of felt. Apparently it worked brilliantly.

felt eh?, i have ordered some weaved glass to test it directly against the cornflour and such so i will get some felt to try that too (i am testing that newspaper/old shirt method
sometime this morning) appreciate the input Turtlespoon :)
 
felt eh?, i have ordered some weaved glass to test it directly against the cornflour and such so i will get some felt to try that too (i am testing that newspaper/old shirt method
sometime this morning) appreciate the input Turtlespoon :)

Not a problem. I'm always looking watching the Power Armour threads to see if I can help out in any way or learn a few tricks to take back to my own build.

A bit more advice would be to use the Foam method for certain parts. I'm looking at the chest-piece and shoulder-pads in particular. The shape for them is remarkably simple and smooth. You could easily obtain that look with a lot of bondo and days of sanding to remove the polygon look, but with foam you can literally heat it and bend it and get a perfect curved surface in seconds instead of days. It's also gonna be lighter and bump-resistant. The only solid piece of my suit is the helmet. Everything else is foam, although some parts are reinforced with compressed cardboard.

I wouldn't always recommend this, but 90% of the T-51b suit is smooth curves, which means you're in for a lot of sanding.

The only other reason I suggest it is that people often use the pepakura pieces as templates for their foam builds. You already have the pepakura pieces built there in front of you. You could strategically take it apart into 2-4 larger flat pieces and use them as a template for your foam pieces, then form and shape the foam pieces and assemble them the same way you would assemble the pepakura pieces you just seperated. Hot glue it up, seal the gaps with caulk, and you can have a finished smooth piece in under a day.

i did consider that and now looking at the cost of resin/paper/glass foam might be the way to go (for the larger parts methinks) , but still i will give the resin a go on my riot gear helmet (elite lel) and have a look at how best to make the most out of the pep i have , i also tried the pepakura template method on a paperboard riot gear helmet and it was largely successful, although i never finished it.

looking at the models now i will agree the pauldrons and other smooth areas are better to do with foam as the polygonal faces will be a right royal pain to sand out, i am glad i have the pep models though as you said templates are the way to go for foamies. thanks again!

yiss i will post my riot build when I've hardened it, i wouldn't start a new thread until i have substantial content to show progress
 
woah sorry for the inactivity folks my main rig copped a thick one and hit the skids, also got a job so I've been hells busy and didn't do any more of the build. moved house too so that took a hit as some parts became damaged, will try to get some parts resin coated by the end of the week.

project aint dead i just suddenly had no free time.

i have probably necro'd my own thread but i thought id give a small update on where things are at. apologies.
 
OKIE DOKE i have begun resin coating the parts i could salvage from after the move, the only part that didn't make it even after i tried to salvage the warping was the chest piece. i am also yet to build the resized pauldrons/ helmet so i will get those knocked over as soon as i get around to it, as it stands i will not be using the paper chest i will instead replace it with a foam build as i am cutting corners to get things rolling again (taking the wiser advice of seasoned builders)

so far the alternative to resin was strong but now i have had a play with epoxy i am sure i can come up with a more refined recipe with my pva/cornflour mix that saturates the paper to emulate resin (oil+salt maybe?) anyway the project trundles along and pics will be in order when i have finished the outer resin coats.

(btw i am still toying with the idea of replacing resin with friendlier substitutes and the experience with epoxy has shown it's strengths and weaknesses, which have given me a slew of new ideas to trial, results to come.)

~S
 
This thread is more than 8 years old.

Your message may be considered spam for the following reasons:

  1. This thread hasn't been active in some time. A new post in this thread might not contribute constructively to this discussion after so long.
If you wish to reply despite these issues, check the box below before replying.
Be aware that malicious compliance may result in more severe penalties.
Back
Top