FALLOUT 3: A3-21's PLASMA RIFLE REPLICA

L05T V1K1N6

New Member
Hey everyone, this my first RPF thread and I'm really excited to share it with you.

A few months back I was commissioned by my friend (who's a total Fallout 3 addict btw) to build this prop for her, and having previously built guns from Halo exclusively, I was pretty excited to try something new I had never done before. Needles to say, this was the perfect project to do so. I had so many ideas and ambitions to bring to the table from the very start, and I immediately loved how most of the weapon could be made with common day-to-day objects. (more or less)

So without any further ramblings I give to you my Fallout 3 Plasma Rifle project!

PlasmaRifle.jpg


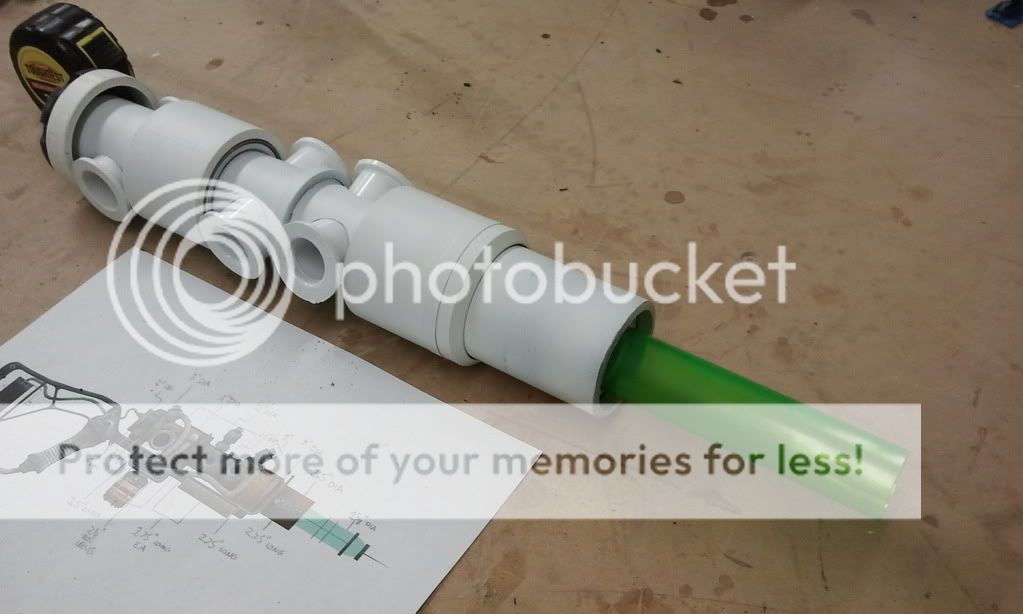
I started off with a length of ABS pipe and drilled holes in carefully measured places for the portholes that would come next.
2012-05-09113715.jpg

2012-05-09113726.jpg

To make the portholes (that's what I'm calling them anyway) I used 6 PVC bushings and cut the inside ends of them off to fit flush with the inside of the ABS.
2012-05-09155329.jpg

2012-05-09113826.jpg

2012-05-09113835.jpg

2012-05-09152859.jpg

All while carefully measuring the dimensions, I made the larger diameter sections from bigger PVC pipes, and secured them in place with thick foam double-sided adhesive tape.
2012-05-09161841.jpg

Once that was done I spayed a layer of white primer on the whole thing just to get a clearer look of it as a complete piece.
2012-05-10163453.jpg

2012-05-10163734.jpg

After that, I started to add fine details to the portholes.
2012-05-17210833.jpg

2012-05-17122219.jpg

Meanwhile, I had constructed a microfusion cell out two PVC end caps, and the basket that would later hold it out of thin-guage steel wire and ABS pipe.
2012-05-23152621.jpg

To make the end cap, I cut the very end off of an ABS cap and carefully drew out and then cut where the bolt holes would go.
2012-05-09201055.jpg

2012-05-09204141.jpg

During the same time, I began to drill holes and add copper 90° fittings for where the hoses on the sides of the gun would later attach.
IMG_20120517_214455.jpg

2012-05-18131126.jpg

After all that was complete, this entire section of the gun was finally finished and ready for some paint.
2012-05-20173551.jpg

2012-05-20173613.jpg

2012-05-20173635.jpg

2012-05-20173743.jpg


Stick around for the next segment of my project!
 
Last edited:
Re: FALLOUT 3 A3-21's PLASMA RIFLE REPLICA

I love PVC/ABS pipe based projects. Easy to find materials that are easy to cut and manipulate.

Awesome work!

Nick
 
Thanks for all the compliments already guys! I really appreciate them. :)

And now on to the frame and stock.

For this section, I returned to my field of expertise: wood working! I made almost all of this section out of 1/4" poplar stock.
2012-05-23150431.jpg

2012-05-25145106.jpg

2012-05-25151828.jpg

2012-05-25145314.jpg

2012-05-24140821.jpg

2012-05-24141032.jpg


For this piece I used 1/8" plywood for the main shape, and cut and layered the details using 1/32" veneer and of course a few screws.
2012-05-31_114432.jpg

2012-05-31_120645.jpg


This piece was made from four layers of 3/4" stock glued end-to-end, with the face cut from a single piece 1/8".
2012-05-31180415.jpg

2012-05-31180449.jpg

2012-05-31180527.jpg


I made the three rods on the right side of the gun out of dowel on my wood lathe.
2012-05-25175826.jpg

2012-05-25175805.jpg


The barrel was constructed from a section of this water gun.
2012-05-07162014.jpg


The rings around the barrel were made from thin slices of a PVC coupling that fit perfectly around the green tube. the rods on either side were cut from thin strips of 1/8" plywood, and the end of the barrel was made from the very end of a Sprite bottle.
2012-05-31183654.jpg

2012-05-31183640.jpg

2012-05-31183737.jpg


Once the barrel was constructed, I inserted a flashlight inside the chamber to test how it would look illuminated.
2012-06-01114854.jpg

2012-06-01174400.jpg

Quite well I must say :)
 
question- are you going for the corroded 200 year old look or brand new?
also- your holes on the circular pieces look really accurate.. did you lay them out by hand or do you have some sort of a mill with a circular table?
 
you make it sound and look so simple to do, im sure its not, it looks great

is that microfusion cell full operational... :behave
 
question- are you going for the corroded 200 year old look or brand new?
also- your holes on the circular pieces look really accurate.. did you lay them out by hand or do you have some sort of a mill with a circular table?

Definitely corroded! :D

I made the "false bolt" holes using a special dremel attachment and I drilled each one by hand. It was actually pretty tricky due to the heat and friction of the drill bit melting the PVC. I found that out the hard way on the first few holes, but once I got the hang of it the rest of them went great!

Thank you for your questions, I really enjoy answering them. :)
 
Thanks for all the compliments already guys! I really appreciate them. :)

And now on to the frame and stock.

Once the barrel was constructed, I inserted a flashlight inside the chamber to test how it would look illuminated.

2012-06-01174400.jpg

Quite well I must say :)

very nice sir! good to see another plasma nut out there.. here's my wip take on the plasma rifle...
The Plasma Rifle by Mike Cameron at Coroflot.com
387126_HKfscS6RbjuJG3GXrkzLxCdQn.jpg
Wow, who wants to send me one?
 
I'm not re what other projects you've worked on, but for weathering inks work really well to wash the recesses.. then wipe the main flat surfaces and repeat till you get that worn patina.. sponges with a little brown paint work wonders\for rust effects.

also.. if you want to age the copper fitting, mix equal parts lemon juice, ammonia.. and i think table salt.. put that and the copper pieces in a bag and leave for a few hours. they'll go all verdigris in a matter o an hour or two.
 
Thanks for all the tips!

And now on to stock and pistol grip.

I started by cutting the pieces that would become the stock from a side-on profile and in multiple pieces that would later be fit together like a puzzle. The reason for this is because the top-down profile of the stock has many different and overlapping widths on both the top and bottom layers, and it would not be possible to accurately recreate if I were to cut it all from one solid piece.
2012-06-02132906.jpg


All pieces cut and test-fit together. Nothing is glued at this stage.
2012-06-03113547.jpg


All pieces shaped and glued together.
2012-06-03143119.jpg


Pistol grip shaped.
IMG_20120603_220522.jpg


Here is a cross-section of the trigger assembly. Pretty simple and straight-forward.
2012-06-04131347.jpg


Trigger system enclosed and married to the main body of the gun.
2012-06-05193856.jpg

IMG_20120605_222407.jpg

2012-06-05173108.jpg


The foregrip was made on the lathe and cut in half.
2012-06-07105442.jpg


Here, the clear (later green) tube and corrugated hose are test-fitted.
2012-06-07105423.jpg

2012-06-07105406.jpg


This is the beginning of the microfusion cell receiver which also cleverly hides the battery pack for the LEDs that will go inside the main chamber.
2012-06-08171127.jpg

2012-06-08173218.jpg

IMG_20120608_222511.jpg


Microfusion cell holder mechanism. (of course it works!)
IMG_20120608_234738.jpg

2012-06-09113407.jpg

2012-06-09113432.jpg


The LEDs.
2012-06-11154526.jpg


Hoses installed.
2012-06-10165307.jpg

2012-06-10164818.jpg

2012-06-10164701.jpg


The frame, now ready for paint.
2012-06-10212053.jpg


And here's a small teaser of the finished product ;)
2012-06-14110304.jpg

2012-06-13114222.jpg

2012-06-13183808.jpg


Hope everyone likes it!
 
This thread is more than 4 years old.

Your message may be considered spam for the following reasons:

  1. This thread hasn't been active in some time. A new post in this thread might not contribute constructively to this discussion after so long.
If you wish to reply despite these issues, check the box below before replying.
Be aware that malicious compliance may result in more severe penalties.
Back
Top