Extreme Budget- Avengers: Diorama

danielseoh

New Member
Inspired by all the great work on this forum, I have decided to attempt a diorama scene in my display cabinet in a bid to create a sense of order for all my Hot Toys- Ironman/ Avengers AOU figures.
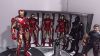
I started off with a foam based hall of armour- with a maximum budget of 8 dollars SGD.
rbioed.jpg


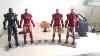
While I will continue to detail the "display case" over the next few weeks, I will also proceed with integrating Thor, Captain America and Dr Bruce Banner into the entire diorama based on the plans attached below
345g8k7.jpg

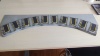
This is an extremely rough sketch- but it provides a rough concept of how everything will be developed over the course of the next few weeks or even months.
The diorama will depict the members in various stages of R & D, as well as the build up of Veronica/ Hulkbuster and the Avengers Tower based on a timeline where the events of Ironman 3 did not take place.

More updates to come, along with more details on the budget hall of armour!
 
Welcome to the RPF, Daniel. So far this is definitely an interesting build. Can't wait to see the end result. :D
 
CB2001 Thanks!
I did not like my first hall of armour design- which could only fit 4 armors, and was designed around a corner, causing one of the ironmen to be hidden due to positioning issues.
Also, the corner design did not work well with weight bearing issues.
2j6agsm.jpg

You can see how MK 7 Stealth is hidden here.

Henceforth, I decided to do a redesign- one with 5 slots for 5 armours, designed to be installed part by part using magnets in order to facilitate the installation of lights in the near future.
x2oqwh.jpg

Similar to the previous HOA, this was made out of cheap foam material layered together and painted with normal spray paints for its base coat
16j4sup.jpg

With the 4 armours- the empty slot in the middle is for mk 43 when Hot Toys releases their mk 46. On top of this, an attempt was made to give the floor boards a more weathered effect using both poster paints and Citadel paints.
35mfvb8.jpg

This is my first time attempting to create a weathered effect on any medium, so I'll be grateful if tips can be given on how I can improve on it further.
That's it for now, I'll be working on the backboards- hopefully more WIP pics!
 

Attachments

  • 2j6agsm.jpg
    2j6agsm.jpg
    201.5 KB · Views: 67
  • 2j6agsm.jpg
    2j6agsm.jpg
    201.5 KB · Views: 69
  • 2j6agsm.jpg
    2j6agsm.jpg
    201.5 KB · Views: 70
  • 2j6agsm.jpg
    2j6agsm.jpg
    201.5 KB · Views: 66
  • x2oqwh.jpg
    x2oqwh.jpg
    281.4 KB · Views: 86
  • x2oqwh.jpg
    x2oqwh.jpg
    281.4 KB · Views: 72
  • 2j6agsm.jpg
    2j6agsm.jpg
    201.5 KB · Views: 69
  • x2oqwh.jpg
    x2oqwh.jpg
    281.4 KB · Views: 69
  • x2oqwh.jpg
    x2oqwh.jpg
    281.4 KB · Views: 67
  • x2oqwh.jpg
    x2oqwh.jpg
    281.4 KB · Views: 66
  • 16j4sup.jpg
    16j4sup.jpg
    410.4 KB · Views: 74
  • 16j4sup.jpg
    16j4sup.jpg
    410.4 KB · Views: 78
  • 16j4sup.jpg
    16j4sup.jpg
    410.4 KB · Views: 64
  • 16j4sup.jpg
    16j4sup.jpg
    410.4 KB · Views: 77
  • 16j4sup.jpg
    16j4sup.jpg
    410.4 KB · Views: 70
  • 35mfvb8.jpg
    35mfvb8.jpg
    413.3 KB · Views: 66
  • 35mfvb8.jpg
    35mfvb8.jpg
    413.3 KB · Views: 63
  • 35mfvb8.jpg
    35mfvb8.jpg
    413.3 KB · Views: 62
  • 35mfvb8.jpg
    35mfvb8.jpg
    413.3 KB · Views: 60
  • 35mfvb8.jpg
    35mfvb8.jpg
    413.3 KB · Views: 64
Last edited by a moderator:
@ Master Blaster, thanks for the tip- it'll come in handy in awhile.

Before detailing further, I had to decide on the overall form and structure of the entire HOA. Therefore, I worked on a rudimentary light system with a simple backdrop that has yet to be detailed. Please pardon me for the Photo qualities- will get better in due time!
As you can see, I've cut up a piece of foam with the exact same shape as the base and stuck some LED strips beneath for lights.

These LED came in strips and had to be cut up and account for the angular structure. My first soldering experience did not end well, I must add, with burn marks everywhere.
Next, I decided that I had to make a cover in order to hide the burn marks and crude wiring. I Dremel-ed 5 holes using the engraving tool and added magnets to them. (Got them at 16 for 4 dollars SGD- super strong)

I tried super-gluing them to foam, but the foam dissolved. To prevent the magnets from coming loose, and to weaken the strength of the magnets for easy removal, I stuck a layer of foam over it.

I repeated both steps for the top and cover- and it worked quite well, for now.


To complete the entire set-up, I cut a piece of white foam and scored the edges to allow greater flexibility. This served as my backdrop while I ensured that the structure was sound. I added some "rails" to my base piece to facilitate the installation of the back.

With the backdrop in place:

I installed the top- no weight loading issues or loose parts- the rails on the top and the base seemed to be holding up quite well.

I tried my wiring and the lights- thank goodness it worked. The loose wires at the side are to be connected to magnets, which will then allow me to add more lights to the entire diorama.


These are the updates as of now- I'll be thankful for any advice, tips or any other comments! Thanks!
 
Back
Top