Mister Chef
New Member
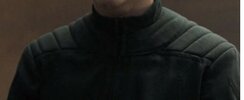
Does anyone know where templates for the atreides working uniform can be found or where I can acquire a uniform used in the movie?
Can you post a pic of what uniform you mean?
AFAIK the only templates available so far are the still suit foam/rubber pieces.
I believe Zurplo is working on the soft undersuits.
I offer the tunics on my Etsy shop.
Thanks, please let me know if anything regarding them comes up!Not sure anyone is currently making those parts of the wardrobe. But good luck with the search!
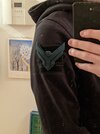
From what I can tell, the bird on the right arm is also the mirrored version, although I don't currently have a way to take 4k screenshots. Maybe someone with the BluRay version might be able to help out.Thanks for pointing out the eagles facing direction. I hadn’t noticed that while watching. I wonder if they have done the common thing with those where ‘heads’ face forward. It’s commonly done with insignia on shoulders , face toward the enemy.
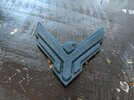
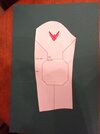
Glad someone else is working on this, I'm planning to make Paul's Caladan outfit and the trench coats he and Leto wear have the same sigil on their sleeves. I've experimented with cutting the shapes out of vinyl and gluing them on, but from what I can tell the coats are made of some kind of waxed cotton (feel free to correct me if anyone else knows better), and the fabric glue doesn't hold very well. I'm not sure what else to try. Stitching would leave visible threads, and velcro would make the sigil stick out too much from the surface of the coat.I am not currently looking to make the full costume, I am however interested in the Atreides sigil on the shoulder of the jacket.View attachment 1522368
I've made a 3d printed mold to cast it in rubber, which I've made available HERE, however it is mirrored because i used this image as a template and for some reason the bird looks the other way on the costume.
View attachment 1522369
The mold is for a "unified" version of the sigil as I'm making it as a single patch, but I'll be uploading the mold for the seperate pieces early next year, when I'm back home. I'll also add the correctly mirrored version then.
I've been having some trouble with the casting because the silicone I'm using doesn't play nice with the resin from the 3d printer. I also have some concerns about the durability of the silicone, as well as a way to properly attach it to velcro/the jacket. Would casting it in a flexible urethane be better?
I've tought about laying a piece of cloth, cut to the same shape, onto the uncured silicone so that it bonds to the sigil on one side and gives the glue a good surface to bond to on the other side. That would at least help it stick to the silicone which generally doesnt really stick to anything.Glad someone else is working on this, I'm planning to make Paul's Caladan outfit and the trench coats he and Leto wear have the same sigil on their sleeves. I've experimented with cutting the shapes out of vinyl and gluing them on, but from what I can tell the coats are made of some kind of waxed cotton (feel free to correct me if anyone else knows better), and the fabric glue doesn't hold very well. I'm not sure what else to try. Stitching would leave visible threads, and velcro would make the sigil stick out too much from the surface of the coat.
I did think about trying super glue of some kind, but of course that'd be pretty risky in case of spillage, and I have no idea whether it'd fair much better against the wax coating. Sanding or wearing down the fabric seems worth trying, although it'll be tricky to get it in just the right spots. I'll have to experiment with different tools.I've tought about laying a piece of cloth, cut to the same shape, onto the uncured silicone so that it bonds to the sigil on one side and gives the glue a good surface to bond to on the other side. That would at least help it stick to the silicone which generally doesnt really stick to anything.
For fabrics I've had good luck with CA glue although i think its not really made for that so take this with a grain of salt. It tends to harden very stiff so it might not be ideal for a flexible part.
Alternatively you could rough up the area to be glued with some sandpaper to give the glue more surface area?
I am not sure it would work for this application but I have seem people 3D print thin, low-heat plastic appliques and then use an iron from the backside to press them into the fabric. The filament melts and bonds to the fabric. Some also 3D print directly onto fabric.
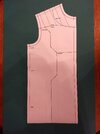
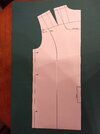
Exactly the kind of feedback and insight I need. Since I did not add the collar in my first muslin I will give that new attention. Thank you.The one thing I would comment on is that every garment jacket I have ever taken apart or made, especially military ones the collar has never been a simple rectangle. They always curve, otherwise they do not sit correctly round the neck. I've made historical jackets and coats, reproductions of victorian era military uniforms etc as well as other costumes like imperial officer jackets and they all do it.