Doctor Who: Time Agent's Vortex Manipulator *SPOILER*

The back would be pretty easy to make out of a sheet of thin styrene or whatever else you've got handy.
 
Not as pretty as yours (and wow, yours is nice) but Here is mine, made primarily out of spare parts


40598_462422925873_504445873_6809384_3306490_n.jpg


40480_462422965873_504445873_6809386_2480065_n.jpg
 
so shapeways can now polish the metal for you for an extra 2 dollars, or you can sand/polish it yourself. i've seen some polished ones and they come out really nice.

just saying
 
I may well get one of the metal ones from Shapeways at some point, but right now I want to be sure I can get the wristband done first. It's a bit of a chicken/egg situation.
 
If they polish up the stainless steel, that sounds like a pretty good option. It won't be brittle like a cold cast piece, either. I guess I'll place my order tonight.
 
i think for the standard stainless steel option, they dont polish... they polish for antique bronze or gold. but if you get the regular stainless steel and polish it yourself, that'd be best. If we want, i can scale up the part like 1% so that way the amount you sand off in polishing will bring it back to normal size. it might not even make a difference though.
 
Can't you just plug up the holes to whatever depth you need with clay?

That's what I did with mine (it's in silicone right now)

I'm making a copy for when I inevitably screw it up (I'm fitting a 2nd gen iPod nano in under the larger directional button)

But plugging it up, or as I did, fill the whole thing, is the way to go.

Then, remove the clay, and make the 2nd part of the mold.
 
yea i'll adjust the settings. since the way the button is designed, with just grooves around the arcs, its so small of a detail that it might not come out.

there is another issue with the round button. since its so flat, shapeways doesnt want to print it. so to trick the system, i just mirrored the button so there were two, and have them attached back to back so its taller. so you get two buttons, attached. that doubles the material and isn't significant for the plastic, but for metal that will add to the cost. i'm gonna redo the button to try and fix these issues, if you want. i'm not sure how to fix the first issue though. to fix this second issue i'd need to make the button thicker than it is supposed to be, or something like that to add to the height. its 1.1 mm thick right now i think, and it'd need to be 2mm for shapeways to print it
 
Any news on the leather work? I got my shapeways pieces and they are gorgeous.

Also, anyone given more thought to electronics for this? The LED wouldn't be hard, but what about a soundboard for the button sounds?
 
I actually decided to hold off ordering the pieces until somebody else could attest to the quality of the stainless versions. Which kind did you get?
 
I didn't get the stainless, I chickened out thinking it'd be a lot of work to polish. But if it helps the cause I could get it. Hell, I think I will just because I can...
 
Okay, I ordered the stainless. The one I have is the plastic. I will use that as an experimental piece to see how I can get electronics to fit.
 
hey sorry for neglecting you guys! i've been so busy with my inception totems and stuff. they sold like crazy and its been a hassle to deal with that, and my gf and all the normal work stuff and normal life stuff.

i have some sweet news though. I recently ordered a bunch of my little designs as rings and earings and necklace pendants and things like that, all made from stainless steel. I've learned a lot, and everything i've learned is GREAT news.

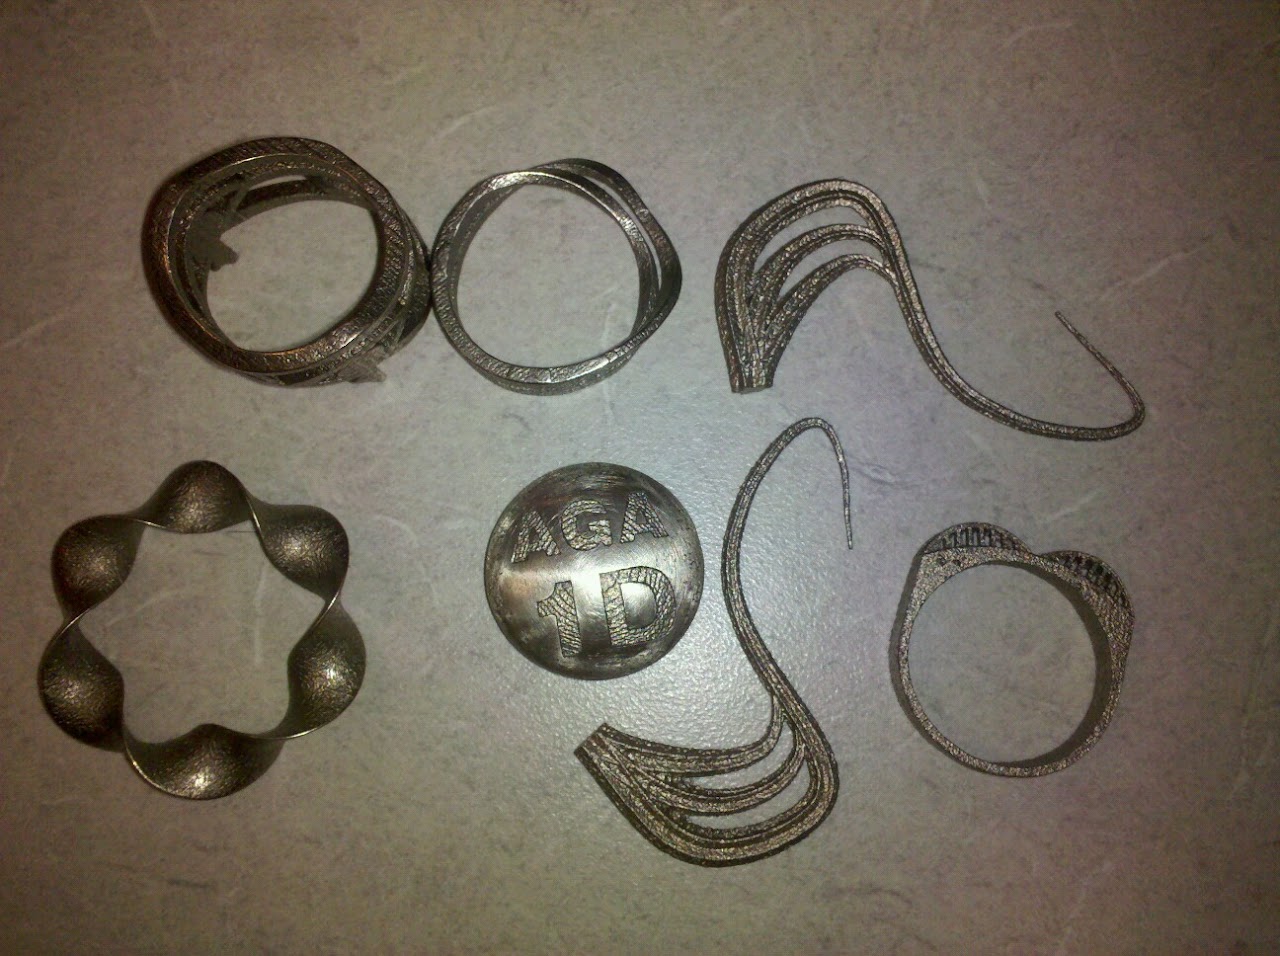
for starters, here is a picture:
%5BUNSET%5D.jpg


in there you see 3 rings:
mobius strip split ring
egyptian eye of horus ring
howard street bridge ring

also you'll see a set of my star of david swoop earings, a twisted pendant, and a go stone with AGA 1D 'engraved'

I want to draw your attention to the go stone and the howard street bridge, and I want to make 3 points.
First, sandability. Looking at the stone, you can see its shinier. I sanded it for a couple minutes with 320 and then 1000, real quick, not a lot of time, and i got great results. pic is from my cellphone but literally i can see my reflection and recognize myself.

second point is the detail on the howard street bridge. i dunno if you can see it in the pic but the beams and top arch are actual I beams and you can make out the i-beam on the arched part of the bridge. you cant see it on the bars cuz they are facing to the left and right. its a clear line taht you can see in this pic on the right arch. i see it on both in real life but th epicture cant grab that i think


Point three is also looking at the bridge. those bars are SO thin.... 0.4mm wide. the I part of the I beam that sticks out is 0.13mm, so like less than two hairs thick.
the strength is this third point. i can make the part thinner and still strong. this brings down the amt of material used so the price will be lower.

sandability, detail, strength.

so i guess sorry for whoever has already ordered, but i'll be revising and making it better, cheaper faster stronger sexier whatever

send me messages if i forget or am slacking off... i guess i respond to $ and to nagging most in life =)

after these results, and the poor results i've been getting with the aluminum sandasting stuff, i'm going to scrap trying to sand cast this in aluminum and only focus on the stainless steel method.
 
Last edited:
Well, good to know, I don't mind not getting the thinner/newer version, it'll still be cool.

On a separate note: has anyone thought what to do with the big open area in the lower right corder of the piece? It looks like a display area, but I'm not sure what to put there. I was thinking it'd be interesting to put an old LCD watch display in there and use it as a watch. The screen caps seem to have something in that spot, but I can't tell what.
 
the point of making it thinner is to reduce the volume, and thereby reducing the cost to you all. it should also make more room in the back for electronics. I'm pretty shore the lower right is a screen or cloth screen, so i bet that means the microphone or speaker is back behind there
 
Back
Top