I've no wish to offend anyone who has put in the effort that is so obvious here, but I've come to the conclusion that none of the layouts for the decals are accurate enough for my OCD. This is my failing and no one else's, but I keep noticing little differences like;
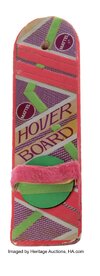
Movie still - word "Hover" almost entirely fills width of board;
View attachment 1947179
Design template; word hover is much shorter
View attachment 1947183
And it's not central. *grits teeth*.
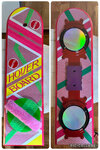
Keep looking at the above design. Now look at this;
View attachment 1947192
Where's the suppose yellow flash gone off the back corner?
That's just a couple of examples. Add in lines that are not parallel, things that line up in different places, angles of anywhere between 15° and 25° ON THE SAME LAYOUT, and as Foghorn Leghorn once said
"Boys, ah say boys, you are about to exceed the limits of mah medication."
I've decided there's nothing for it but to try and build my own.
Which wouldn't be such a bad idea if it weren't for the fact that I ain't exactly a power user at this stuff, so come back in a couple of years.
Kidding...I have six or so weeks to make one...but if it can't be right, I'd rather not do it.
Yes, you're right I don't have many friends. It is my fate. I prefer facts to friends, largely because the former are FAR more reliable!
And as much as I sound harsh, EVERYONE has got far more right than they have wrong; I just want to collate it all, and hopefully end up with the definitive "master document" on how to make this beast. Another problem however is my OCD; it only "sees" sensible numbers. If it turns out the angle on some of those lines is ACTUALLY 28° or 29°, I will distort the fabric of space and time to make it 30°.
But, all journeys start with a single step...what do we know?
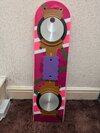
We know the green velcro stripe is 25mm wide (Sorry, I'm British; get away with your inches, America!) and we know the line of green velcro passes EXACTLY through the 25mm hole that Marty left when he ripped off the handle bars;
View attachment 1947201
The first thing that concerns me is that I took (I thought) reliable information that the board was
200mm wide by 710mm long (ie an
aspect ratio of 3.55)...but the first line in this thread says the board is
203.614mm wide x 743.974mm giving an
aspect ratio of 3.65. Now whilst that doesn't seem a lot, it means my board should be 730mm long, not 710mm, meaning my proposed decal would be 20mm short.
I'd really like to get that nailed down before I start, and I realise there's a lot of reasons/factors which could change the length...like....is the 15 degree angle of "kick" on the back correct, and if it is, how much of the board is actually "kicked"? To me, 75mm looks "right", 100mm looks "too long"...but an extra 25mm at 15° elevation works out to (dusts off trigonometry brain cells...) hypotenuse is opposite the 90 degree angle, so the line of the board on the deck is the adjacent, thus;
a/h = cosine 15°
rearrange to;
a = (cosine 15°) * h = =0.966 * 25 = 24.15mm
Depending where we pivot within the board (top, middle or bottom) that could easily replace my "short" 20mm.
Sorry for the maths lesson, but can anyone check my reasoning and confirm that
1. yes I have gone insane but more importantly
2. my numbers are right.
Thanks for listening, I know this was a rant; but hopefully, worthwhile in the long run.