mallu
New Member
Hi everyone,
My name is Melvin. A buddy of mine and i have been planning to go to the 2015 Dallas Comic Con in May since the beginning of 2014 but we had been going back and forth on ideas of what characters to cosplay as. It took us about 2 months to finally decide and then we ended up changing it a few days latter. So this continued on for a few months and it didn't help that we were both in two different states with school, work and had other responsibilities.
After throwing ideas back and forth i played Destiny and instantly liked the game. i really liked the warlock and began trying to figure out how to make everything.
Since this was my first foray into something so big i researched for quite a long time. I ended up putting aside the Star Lord mask i was half done with, reached for the 110lb paper and spent some considerable time sniffing superglue as i made helmets. Thanks to the generosity and efforts of a lot of modelers and others who took time to make the helmets and put them online i had a lot of material to work with. I started working on Tengu Operant III.


Then like the fickle cosplayer and costumer that I am, I decided to change my wardrobe around January 2015. At this point even my friend was telling me to pick something and stick with it. So that's when i decided that i was going to go big or go home. So i decided to go with the Skull of Dire Ahamkara some other armor pieces and a weapon, the Hard Light.


Bear in mind that this is my first attempt at pepakura so I knew i was in for an interesting time.
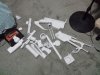
Started the SOA and the Hardlight around February


Then i resined the inside and out using Bondo Fiberglass Resin.


My name is Melvin. A buddy of mine and i have been planning to go to the 2015 Dallas Comic Con in May since the beginning of 2014 but we had been going back and forth on ideas of what characters to cosplay as. It took us about 2 months to finally decide and then we ended up changing it a few days latter. So this continued on for a few months and it didn't help that we were both in two different states with school, work and had other responsibilities.
After throwing ideas back and forth i played Destiny and instantly liked the game. i really liked the warlock and began trying to figure out how to make everything.
Since this was my first foray into something so big i researched for quite a long time. I ended up putting aside the Star Lord mask i was half done with, reached for the 110lb paper and spent some considerable time sniffing superglue as i made helmets. Thanks to the generosity and efforts of a lot of modelers and others who took time to make the helmets and put them online i had a lot of material to work with. I started working on Tengu Operant III.
Then like the fickle cosplayer and costumer that I am, I decided to change my wardrobe around January 2015. At this point even my friend was telling me to pick something and stick with it. So that's when i decided that i was going to go big or go home. So i decided to go with the Skull of Dire Ahamkara some other armor pieces and a weapon, the Hard Light.
Bear in mind that this is my first attempt at pepakura so I knew i was in for an interesting time.
Started the SOA and the Hardlight around February
Then i resined the inside and out using Bondo Fiberglass Resin.


")


