Delete thread

Status
Not open for further replies.
Re: Robo3687's IRON MAN Mark 4/6 Pepakura FOAM Templates -Easy to Build "Green" Versi

Doing a extremely speed build of this today...gonna be a killer. :/, giving myself almost 18 hours tho :).
 
Roy,

I'm 5' 9". I tripled up on the Foam under my feet and put rivets on the boots. Boosted me a couple inches and lasted me all night at a club. So it should work good for u as well
 
Re: Robo3687's IRON MAN Mark 4/6 Pepakura FOAM Templates -Easy to Build "Green" Versi

Roy,

I'm 5' 9". I tripled up on the Foam under my feet and put rivets on the boots. Boosted me a couple inches and lasted me all night at a club. So it should work good for u as well

i see. will do that. thanks... :)
 
Re: Robo3687's IRON MAN Mark 4/6 Pepakura FOAM Templates -Easy to Build "Green" Versi

i want to try making this one...
but would it fit for a 5'4", average build guy like me?? i think that scale is for big guys only...

i hope you can help me.. :D
 
Iron Man VI - 2011 - Success Story

This was my first attempt at Pepakura, my first time working with EVA foam, and my first obsession of 2011. I was inspired, like many, by Stealth's Iron Man tutorial videos. A big thanks to Stealth and Robo3687 for the pepakura files.

I started this build on 10/16/2011 and completed it 10 minutes before we left or the big halloween street party last night 10/29/2011. It was non-stop 14-16hr work days rarely eating and doing little else. I estimate it took about 200 hours including; cutting, assembly, prep, paint, and electrical bits. About 20hours of it ~10% was research and ordering products.

The total cost has not been tallied and maybe I wont complete that task for fear of it being quite expensive. I will estimate it at $1K+. This includes EVA foam, Xacto products, paint, paint, paint, mod podge, EL Film and drivers, voice box, amp, wireless mic, etc etc. The paint was the killer at 14 cans of red (not all used), 4 cans of gold, 9 cans of primer, 5 cans of mod podge aerosol, 6 cans of clear. Yes $300-400 in paint. I used a 4 step process [ mod podge to seal the EVA foam, Primer, Color coat, clear ]. I should have just sourced the correct color and sprayed it since I have the skill and hardware to spray. This would have saved 50% of the painting cost. The killer was spending about $100 / day on this and that from velcro, mounting hardware, and lots of tools and stuff I did not actually need, or that came in a 10 pack and I needed 1.

Helmet; I went a bit crazy and decided to have a computer controlled helmet, so I grabbed a microchip PIC16F819 and threw together a PCB with all the needed hardware to control a stepper motor, EL lighting control, Voice box control (just ON/OFF of a voice changer). Its a lot to cram in the helmet and I think I should have spent the time on other details. The hinge system I used was a copy of some images from this forum I think (gold helmet with red hinge pictorial). Driving a servo requires a PWM signal with a duty cycle from 1-2mS, so a micro-controller was necessary and allowed easy control of the EL strip, voice, and servo; i.e. the EL would turn off with the helmet open. Full disclosure; the servo system cable / pulley failed and honestly was not working well just before departing for the show, so the face was manual after all that work :(. I wrote the software in C and compiled using the PICC C compiler and Microchip IDE (for those with pocket protectors). *I am not interested in selling these modules, software or anything else for that matter.

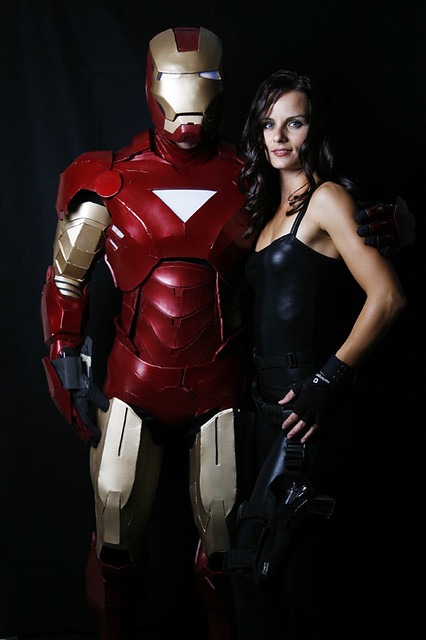
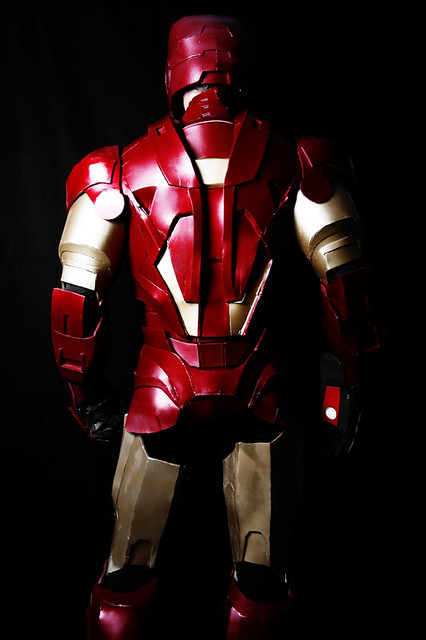
The finished product looked pretty good, I give it 80%. Better painting, more reinforcements, a few more weeks of detail work; airbrush detail, more small EVA parts, etc, and it would have been 95%.

The response from everyone was positive. I was a rock star. The street party had 5K people and my girl and I could not walk more than 10 feet without someone stopping us for a pic. It took 30min to make it to the first drink tent. I posed for no less than 200 pics! It was crazy, almost annoying. I got many comments about it being the "best" costume, but I am sure they tell all the guys that ;)

General Comments:
PAINT:
Red = Duplicolor BGM0509 aka Dark Cherry Metallic (tends to crack, wish it was more flexible)
Gold = Duplicolor BFM0351 aka Sunburst Gold
Source: Ordered from Napa, picked up in store.
Clear = Rustoleum Automotive Clear : Source = Walmart
Primer : I used Duplicolor dark grey (primer color affects top coat color, so if you want a deep red, use a darker primer). I got it at a local autoparts store, just call areound and ask if they carry duplicoolor primer.

LIGHTING:
EL Panel for Chest, strips for eye, and strip for hand. Glowhut had a good selection+service, but you can get this stuff on ebay or anywhere.

EVA Foam:
6mm (9x12") Red or Black : Source : JoAnns or ConsumerCrafts.com. Stick with Foamies brand, the tag is not a sticker so it just rips off. The Michaels 6mm foam has a sticker on each side of the foam that will not easily come off.
3mm sheets (11x17") red+black for neck, abs, strapping and support.
2mm multicolor sheet pack from WalMart for misc stuff

MOD PODGE:
Walmart has it in jar or spray

XACTO PRODUCTS:
2x packs of 15 blades (change blades often)
2x xacto knifes
45 degree xacto cutter (michaels)
JoAnns or Michaels

MISC:
-Voice changer (a must) from Amazon (get the one with 10+ voices), it was like $10
-Glue Gun: Get TWO!! One large and one small and I used 60 large glue sticks (multi-temp). Buy a nice glue gun, one with an on-off switch. You need two guns so you can have one that can reach small places and/or excrete small amounts of glue.
-Clear cover for the triangle : Ace hardware, had to buy a 6ft x 4ft sheet for a 6" triangle
-Erector set for the parts to make the hinges, money well spent. package up the remaining parts and regift ;) I paid like $18. If you try and buy this stuff at lowes or home depot in the screw isle it would be $100+

I have attached images of the $200 Iron Man costume (Deluxe Iron Man Rental Quality) costume which was a plastic helmet + front plate and a jiant one piece pajama. A joke for $200 IMO. I returned it. I also made an Iron Man motorcycle helmet for riding, its cool, has lights. I basically copied a youtubers helmet (copy = flattery)

Once again a big thanks to Stealth!
 
Re: Robo3687's IRON MAN Mark 4/6 Pepakura FOAM Templates -Easy to Build "Green" Versi

is it just me or the cod piece is facing the wrong way?

6297151121_82fd0f509e_z.jpg


6297151259_e0ee29ab34_z.jpg


very impressive build nevertheless...:thumbsup
 
Re: Robo3687's IRON MAN Mark 4/6 Pepakura FOAM Templates -Easy to Build "Green" Versi

yeah, cod is backwards. Awesome work though.
 
Re: Robo3687's IRON MAN Mark 4/6 Pepakura FOAM Templates -Easy to Build "Green" Versi

damn, that looks awesome, and you wear it well. Time to lose some weight for me so I can wear mine(which I need to finish) to some cons
 
Re: Robo3687's IRON MAN Mark 4/6 Pepakura FOAM Templates -Easy to Build "Green" Versi

I didn't get it all done 100% but good enough to Suit up and kick some halloween ass.
SAM_2990.jpg
 
Re: Robo3687's IRON MAN Mark 4/6 Pepakura FOAM Templates -Easy to Build "Green" Versi

turned out great! :thumbsup

congrats stef... :cheers

roy
 
Re: Robo3687's IRON MAN Mark 4/6 Pepakura FOAM Templates -Easy to Build "Green" Versi

I didn't get it all done 100% but good enough to Suit up and kick some halloween ass.
SAM_2990.jpg

Now that's what I'm talking about well done mate that looks amazing
 
Re: Robo3687's IRON MAN Mark 4/6 Pepakura FOAM Templates -Easy to Build "Green" Versi

is it just me or the cod piece is facing the wrong way?

very impressive build nevertheless...:thumbsup

My wife and I laughed so hard for like 10 minutes. I am an idiot. This explains a number of issues with the suit, like it being quite cramped in the crotch, the legs not fitting in the cod well, and the butt not fitting very well. I was in such a marathon to finish I did not check the movie images for cod fitment. Now I have to move the "bathroom flap" to the front. Or you could say I need to change it from a #2 cod flap to a #1 flap ;)

A few things I would have done differently:
1. I would have put some carbon fiber in the chest piece and upper back over the shoulder flaps for reinforcement to keep the EVA from folding and paint from cracking so bad. I did buy the EpoxAmite ® 101 FAST, but I recommend getting the slower epoxy, 10 minutes goes too fast and you really need 24 hrs of dry time anyway.
2. I would have found red gloves, the black ones look bad in photos. I am glad I put EL lighting in the glove so all of the light was about the same color and type. I assumed ** I could paint the black gloves red, but the fabric laughed at the red paint.
3. I would have made shoe covers, just ran out of time. The calfs were still wet at show time.
4. I would have put in a large amplifier instead of the puny voice changers built in amp. The puny amp worked well in testing at home, etc, was loud enough, but when you add 100s of people, live band, club noise, nobody could hear my clever comments. Doing this today. I bought a Danelectro N10B Honey Tone Mini Amp and boy is it LOUD, and small enough (disassembled) to mount in the chest piece. I am using a Pyle-Pro PDWM96 Lavalier Wireless Microphone System to get the audio from the helmet to the chest piece. I have 4x PCBs in my helmet now, one high voltage power supply, one RF transmitter, one 8MHz CPU, and 30 ft of wire! The helmet went from blow away light, to quite heavy. The fitment is still off, but its an easy fix and not needed IMO for the general "halloween" use. You need the ability to be HEARD and seen.
5. Had time to paint the biceps silver, and the knees silver. I had to leave them red / gold because the paint was not dry enough to tape them without peel-off.
6. Make backs for the legs. All this little detail work takes time.

A few more notes;
a. I used a 12v inverter for the EL in the Triangle and then put 2x 9v batteries in series (9+9=18v) and it was much brighter. It would light up a room, very good effect. Just bring extra 9v batteries, I only got 2hrs in this configuration, where the helmets 9v EL lasted the entire night, no issues.
b. I need to figure out a way to make the red duplicolor more flexible, it cracked very bad. I will try some tests of light coats mixed with a flexible second material, maybe a professional latex for paint, or maybe just a thin coat of mod podge aerosol. The cracking paint is a bummer.

I encourage everyone to post comments because its the little comments I found searching the net that saved me 10-20 hrs of build time. Especially Stealths video on connecting the pieces, wow he is good. Worked nearly first try and saved me many headaches.

My suit is very warn and damaged from 5 hrs of wear. Parts look bad with paint cracks, paint rub-off, etc. I will post aftermath pics soon after I wear it out with the kids tonight. After this it goes in my garage as a statue until next year.

*Note: I realize I am an amateur on a professional cosplay site.
 
Re: Robo3687's IRON MAN Mark 4/6 Pepakura FOAM Templates -Easy to Build "Green" Versi

I didn't get it all done 100% but good enough to Suit up and kick some halloween ass.
SAM_2990.jpg


fantastic work stef, def looks the part(y)thumbsup:thumbsup

b. I need to figure out a way to make the red duplicolor more flexible, it cracked very bad. I will try some tests of light coats mixed with a flexible second material, maybe a professional latex for paint, or maybe just a thin coat of mod podge aerosol. The cracking paint is a bummer.

great work FerrariF430 (y)thumbsup
lmao at your tales of the cod piece:lol

this could be the answer to your problems if you where to paint with a spraygun
Mipa 2K-Elastic
its a additive which increases the elasticity of the paint,i've used it on rubber lip spoilers,valances and you can press your thumb in them to distortion with no damage to the paint film

fingaz iron man mk4 wip
 
Re: Robo3687's IRON MAN Mark 4/6 Pepakura FOAM Templates -Easy to Build "Green" Versi

Your helmet looks great Stefano
 
Re: Robo3687's IRON MAN Mark 4/6 Pepakura FOAM Templates -Easy to Build "Green" Versi

Great job stealth! Your speed build inspired me to make one soon!
 
Re: Robo3687's IRON MAN Mark 4/6 Pepakura FOAM Templates -Easy to Build "Green" Versi

Really beautiful jobs, grats!! :) I started mine yesterday, it is my first try with foam, but I'd like to know if and how to sand or cover the "cracks" filled with glue that I see also in stealth videos, they seems so ugly in the end, so I am looking for the next videos about finishing and painting the foam :)

Last thing: what about the glass eye part of the helm? hos did you do that? which material/illumination did you use?

Thank you, amazing works!!!

CRACK FILLER:
A. Minimize cracks by doing a good job to begin with. Use the glue gun to remove excess glue after the fact, sort of as a hot knife. You cant sand hot glue, its too rubbery.
B. I used Mod Podge (wal mart or any craft store). It comes in aerosol and an elmers glue type paste. I used the spray to seal the foam, and the elmers liquid to fill cracks. I used a rubber glove as the "brush" and used many layers. I would say at least 5 for a deep crack. Its not perfect but works well and can be sanded. Most importantly Mod Podge is the only crack filler I tested out of 5 products that remained flexible enough not to crack.

If you make a ridged suit you can use almost anything from the automative world like bondo. I kept my suit flexible so that did not work for me. Some seams look fine is you are going for iron man. I observed a suit that was ridged and had all seams removed and it did not look like metal. Metal needs to have hard edges IMO.

ILLUMINATION: I used EL lighting. I listed my source (glowhut) above but it can be bought from ebay or anywhere. [I have no affiliation with glowhut or any of my vendors] I like my source because they have 5 different inverters, all EL strips have connectors already installed, and the strip they sell was exactly the right height for the eyes. They also sell a EL panel that works for the chest piece. You want WHITE, it will look slightly blue. Also white EL is the brightest by far.

I also cant wait for Stealths prep & paint video.
 
Trick or Treating with the little monsters

Please observe the damage from a night out drinking at a costume street party on a non rigid EVA foam suit. Its beat up bad, but really does not look awful in person, especially at night. The first wear images can be found above, these are images from two days later trick or treating with the kids.

*Yes my cod piece is still backwards, I tried it right side around and it did not fit very well. So I swallowed my pride and wore it backwards again, this time intentionally
 
Re: Robo3687's IRON MAN Mark 4/6 Pepakura FOAM Templates -Easy to Build "Green" Versi

It doesn't look beat up at all.
 
Re: Robo3687's IRON MAN Mark 4/6 Pepakura FOAM Templates -Easy to Build "Green" Versi

Ok so I had a pretty crazy weekend with this build...

The pictures I have right now are not very good, all from facebook. I'm waiting for my friends to give me all the good ones.

The response from the crowd was 99% great, with the exception of a couple ****** bag SWAT & Jersey Shore guys that thought they were funny... I had to remove the whole top half of the suit to get rid of the guys and ended up breaking a shoe.

Anyway, The suit help up pretty good given the fact the I went out 4 nights in a row to crowded clubs and bars.

Wrigleyville, Chicago was the best scene. I was a rockstar there.

As far as costume contest go.... VERY disappointing... I was entered in several contest but showed up too late for ALL of them!
I was either waiting for my group to get ready or being pulled aside by a quasi-paparazzi crowd. I missed out in over $3000 to ridiculous costumes.

Anyway let me know what you think.

Special thanks to STEALTH for the amazing tutorials and modded files, all of which I probably would not have been able to make this without... and Robo3687 for making such an awesome build
 
Status
Not open for further replies.
Back
Top