egonspengler617
New Member
A big hello to the RPF community! While this is not the first costume I've done, this is my first time posting a build thread on any forum site, so I hope you all enjoy what I have to show! Also, if I did something wrong and the pictures aren't showing correctly, I would appreciate info on how to fix it. This past June, my friend and I went to Wizard World Philadelphia. He was designing a tactical Robin suit (to match the tactical Batman suit he made for the last con), so after much deliberation, I figured we should go as a duo. I was originally thinking Cyborg and doing a Teen Titan motif, but even when a Cyborg is done right, I still don't think it looks good (no offense to those of you who have made some awesome Cyborg suits). Since I had never gone the "villian" route, I decided we should go as Deathstroke and Robin. With the idea in mind, the eBay searches began. I won't focus too much on the pieces that are easy/store bought with slight modifications, namely the chest armor, gloves, shin guards, thigh guards, belt/boxes/pouches, etc. These were all found on eBay and military surplus sites based on the style I wanted to do. The big pieces I had to figure out were the mask and the weapons.
Be warned, this is a pic heavy thread, as it is a full build.
After a few searches online, I decided I wanted to keep my build budget low (the finished suit ran me about $250), and since I couldn't find a mask I liked/was comfortable with buying, I decided one would have to be made. But where to start? A few Youtube searches led me to some people who had made Deathstroke masks from the toy store Iron Man masks. This was promising, but the cost of the mask was too high for me to justify. So thanks to eBay, and some luck, I settled on a Rubies Iron Man halloween mask, as shown below:

With the mask base chosen, I started buying everything I could find that matched my style for the suit. But I also had to consider weaponry. I went with the basics: dual silenced pistols, heavy sniper rifle, grenades, tactical knife, and sword.
Pistols were $5 toys from Walmart that got an immediate coat of primer to hide the ugly green and orange color:

Grenades were found on Amazon, 4 pack:

But obviously the plain green wasn't going to cut it, so they got a makeover:


The tactical knife I ordered was a rubber training knife (con safe!), but the black blade got a shot of silver:

"Armored" gloves arrived and got an orange spray:

Finally my helmet arrived. It was much more flimsy than I anticipated, but it was a Rubie's, so I couldn't be too surprised. But modifications began right away. First step was to lose the ear covers that extended out from the sides and patch over one eye (yes, that's right, I actually sealed the eye shut and walked around the con half blind).
First round of bondo:

Primer to find the problem spots (there were many):


While the mask recovered from the first of many rounds of bondo, I held a small fashion show to dry fit some suit pieces before they underwent surgery.
Drop holsters and freshly painted pistols:

Shin guards with tactical knife attched:

Thigh guards with drop holster fit test (and codpiece!):

With all parts fitting nicely, I went back to the mask for round two, which after more bondo, came out much smoother, but not perfect:


At this point, it became time to join to the two halves of the Rubie's helmet together to make one complete helmet. If you happen to follow this method to make a Deathstroke mask, and you wear glasses, this is a nice design, because there is ample room for eyeglasses inside the helmet.
Pretty for about one second:

And then I ruined the pretty to patch the ear holes:

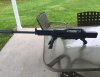
While that bondo set, I went to start working on the big gun, which I unfortunately didn't take a lot (read: any) progress pics of. The base was a Nerf Longshot CS-6, coupled with a nerf barrel extension. After stripping all the non-essential guts out of the Longshot to make it lightweight, I added a wooden dowel as a barrel and a piece of PVC tube on the end of that for a silencer. Add a few odds and ends here and there to fill in some gaps, a whole bunch of epoxy, and some primer, and you wind up with this:


So now my attention went back to the helmet. After more bondo and sanding, we were ready for a test fit:

A bit more cleanup led to it being as smooth as I was going to get it without going insane, and I was ok with how it looked:

Cue the first round of nice paint:

At this point in the build, every piece I ordered had come in, and the helmet was almost done, so a full armor test was conducted:


Everything fit pretty well, so the armor pieces were adorned with orange paint:

I also took care of fabricating the sword. My design was to have it look like a sword in a sheath, but it was actually all one piece of wood. I cut my base pattern, sanded and smoothed the surface, rounded the handle section, and painted. I also added a circle piece of acrylic I had lying around as a hand guard. The handle was wrapped in electrical tape for texture:

Now the gap in the middle of the sword was done on purpose. When I modified the Longshot, I fitted it with a strong magnet inside. Before the sword was attached to the armor, a similar magnet, painted to look like a leather strap, was put in that void. This design would allow me to attach the gun to my back quickly and easily (it didn't work all that well, fyi).
At this point, the helmet received a coat of orange, followed by some clear coat, to render the final product:


For those of you who may be wondering how it was secured to my head, I was able to get hold of a hard hat, and I stripped the harness out of it and fitted it into the helmet. Worked like a charm.
All that was left was a little weathering on the rifle, which at this point had received a base coat of silver, then covered with black. After weathering it to my liking with steel wool, it was coated with a matte finish clear coat, which actually turned the black into a gunmetal gray. Happy accident that worked out very well:

At last, it was the day of the convention! We packed the car and headed into Center City, and I was extremely nervous that the paint on the helmet would chip or scratch, or maybe the helmet would just completely fall apart. But luckily, everything went well, and there were no major malfunctions (one of my belt pouches fell off, and a grenade started coming loose from its sling, but that was about it).
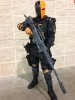
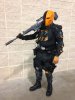
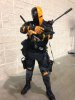
Here is the completed suit:


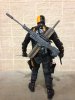
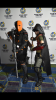
And this is my friend and I right after we got off the stage for the costume contest:

So there you have it. Hopefully this will be helpful to some people either looking to make a Deathstroke outfit, or even to someone who just needs an idea for how to make a helmet or some weapons. Thanks for checking out my long and pic heavy post, and I appreciate any comments or questions you might have!
Be warned, this is a pic heavy thread, as it is a full build.
After a few searches online, I decided I wanted to keep my build budget low (the finished suit ran me about $250), and since I couldn't find a mask I liked/was comfortable with buying, I decided one would have to be made. But where to start? A few Youtube searches led me to some people who had made Deathstroke masks from the toy store Iron Man masks. This was promising, but the cost of the mask was too high for me to justify. So thanks to eBay, and some luck, I settled on a Rubies Iron Man halloween mask, as shown below:
With the mask base chosen, I started buying everything I could find that matched my style for the suit. But I also had to consider weaponry. I went with the basics: dual silenced pistols, heavy sniper rifle, grenades, tactical knife, and sword.
Pistols were $5 toys from Walmart that got an immediate coat of primer to hide the ugly green and orange color:
Grenades were found on Amazon, 4 pack:
But obviously the plain green wasn't going to cut it, so they got a makeover:
The tactical knife I ordered was a rubber training knife (con safe!), but the black blade got a shot of silver:
"Armored" gloves arrived and got an orange spray:
Finally my helmet arrived. It was much more flimsy than I anticipated, but it was a Rubie's, so I couldn't be too surprised. But modifications began right away. First step was to lose the ear covers that extended out from the sides and patch over one eye (yes, that's right, I actually sealed the eye shut and walked around the con half blind).
First round of bondo:
Primer to find the problem spots (there were many):
While the mask recovered from the first of many rounds of bondo, I held a small fashion show to dry fit some suit pieces before they underwent surgery.
Drop holsters and freshly painted pistols:
Shin guards with tactical knife attched:
Thigh guards with drop holster fit test (and codpiece!):
With all parts fitting nicely, I went back to the mask for round two, which after more bondo, came out much smoother, but not perfect:
At this point, it became time to join to the two halves of the Rubie's helmet together to make one complete helmet. If you happen to follow this method to make a Deathstroke mask, and you wear glasses, this is a nice design, because there is ample room for eyeglasses inside the helmet.
Pretty for about one second:
And then I ruined the pretty to patch the ear holes:
While that bondo set, I went to start working on the big gun, which I unfortunately didn't take a lot (read: any) progress pics of. The base was a Nerf Longshot CS-6, coupled with a nerf barrel extension. After stripping all the non-essential guts out of the Longshot to make it lightweight, I added a wooden dowel as a barrel and a piece of PVC tube on the end of that for a silencer. Add a few odds and ends here and there to fill in some gaps, a whole bunch of epoxy, and some primer, and you wind up with this:
So now my attention went back to the helmet. After more bondo and sanding, we were ready for a test fit:
A bit more cleanup led to it being as smooth as I was going to get it without going insane, and I was ok with how it looked:
Cue the first round of nice paint:
At this point in the build, every piece I ordered had come in, and the helmet was almost done, so a full armor test was conducted:
Everything fit pretty well, so the armor pieces were adorned with orange paint:
I also took care of fabricating the sword. My design was to have it look like a sword in a sheath, but it was actually all one piece of wood. I cut my base pattern, sanded and smoothed the surface, rounded the handle section, and painted. I also added a circle piece of acrylic I had lying around as a hand guard. The handle was wrapped in electrical tape for texture:
Now the gap in the middle of the sword was done on purpose. When I modified the Longshot, I fitted it with a strong magnet inside. Before the sword was attached to the armor, a similar magnet, painted to look like a leather strap, was put in that void. This design would allow me to attach the gun to my back quickly and easily (it didn't work all that well, fyi).
At this point, the helmet received a coat of orange, followed by some clear coat, to render the final product:
For those of you who may be wondering how it was secured to my head, I was able to get hold of a hard hat, and I stripped the harness out of it and fitted it into the helmet. Worked like a charm.
All that was left was a little weathering on the rifle, which at this point had received a base coat of silver, then covered with black. After weathering it to my liking with steel wool, it was coated with a matte finish clear coat, which actually turned the black into a gunmetal gray. Happy accident that worked out very well:
At last, it was the day of the convention! We packed the car and headed into Center City, and I was extremely nervous that the paint on the helmet would chip or scratch, or maybe the helmet would just completely fall apart. But luckily, everything went well, and there were no major malfunctions (one of my belt pouches fell off, and a grenade started coming loose from its sling, but that was about it).
Here is the completed suit:
And this is my friend and I right after we got off the stage for the costume contest:
So there you have it. Hopefully this will be helpful to some people either looking to make a Deathstroke outfit, or even to someone who just needs an idea for how to make a helmet or some weapons. Thanks for checking out my long and pic heavy post, and I appreciate any comments or questions you might have!
Attachments
Last edited: