Deadpool - One of many but this one is mine.

SerjicalStrike

New Member
Hello All,

I have been meaning to make a thread and have regular updates but never got around to making it so I thought I would do one long post now and continue from there.

This post may be a long read... it may also skip huge portions of the build as i kept forgetting to take pics of it (first time remember)

I am basing my costume (loosely) on the sixth scale Deadpool figure. There are some aspects that I can try to replicate and some that i simply cant (lack of skills, tools, materials etc) also first time so be gentle.

This is the sixth scale figure i based it on https://www.sideshowtoy.com/collectibles/marvel-deadpool-sideshow-collectibles-1001781/

First things first... POUCHES.!!

This figure has a lot of pouches so i decided to make a start with those.

Started by making a template, this was then cut out and placed onto cardboard which was then cut out, this was then covered in pleather by my lovely and very crafty girlfriend and then a hole was punched and a working snap/button was applied which I think adds a nice detail them.

click on the images to enlarge i guess. that detail.!

Snapchat--8135437615012887887.jpg
Snapchat-6762248351571577118.jpg
box.jpg
box2.jpg
Snapchat--7440002836453057189.jpg
box3.jpg
Snapchat--8816030912404441492.jpg

Rinse, repeat, have some tea, repeat and eventually.. you end up with a crapload of pouches. Perfect.!! (these also all open and close so they are actually useful)

Snapchat-1328525517141833005.jpgSnapchat-3314895147680235141.jpgSnapchat-8144292218479184798.jpgSnapchat-2513349612898673833.jpgSnapchat--1270542835776720901.jpg

After this step there was a bit of a gap waiting on things to arrive. I had ordered two plastic training swords, the mask and suit online. We will get to those in a bit but swords first..

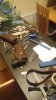
I ordered the swords on eBay from Germany and they arrived super quick so I could get to work making sheathes for these. I used camping mat foam for most of the rest of the build. comes in rolls and its super cheap, which is nice.

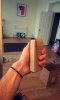
Sword without guard attached below. Not a lot of pictures for this unfortunately. one of those non picture nights really.

sword1.jpg

In the image below you can see the foam i used.. not many pics on actually making it but it took two of us to roll and hold it in place with tape. then once sturdy this was covered in pleather again with extra pleather around it for detailing.
sword2.jpg
sword3.jpg
sword4.jpgsword 5.jpgsword6.jpgsword7.jpg

Swords Done.!!

The mask/hood i decided to order as I didnt think i would have the skillz to make one. I think i made the correct move. I purchased mine on etsy from Illustra studios (http://ilustrastudios.com/)

mask1.jpgmask2.jpgmask3.jpgmask4.jpg

Mask done..(bought) more pics of this later...

The suit I ordered from Zentai Zentai. I couldnt go the route of the heavier suit like on the sixth scale model so had to compromise and get myself in some very revealing lycra. Zentai messed up my order however and it arrived with a hood/blank mask which made things difficult. Their customer service was awful and with a two month turn around for a replacement i just decide to cut it off.. this has been a pain ever since but more on that later also.

I will carry on with this post.. in a few.. image limit reached for one post.. oops..
 

Attachments

  • Snapchat-3389191413686083301.jpg
    Snapchat-3389191413686083301.jpg
    432.8 KB · Views: 136
Last edited:
so the suit..Pictures below. Sorry for some of the filters.. a mans gotta instagram every now and then..

suit1.jpgsuit2.jpgsuit3.jpgsuit4.jpgsuit5.jpg

The thing that annoys me most about this whole build is that the mask and suit are slightly different shades of red. I didnt think of this before ordering but passable i guess.

I moved onto the guns next. for the handguns i used cheap bright blue toy guns which i found very cheap and repainted and weathered them sprayed them black and went over it with silver and gun metal model paint. these turned out really well and I am happy with them however.. the pictures of me painting these are not to be found. So we will move on to creating the holsters for these.

Again the holder templates were drawn on paper, moved to cardboard, then to foam and covered with pleather again by my girlfriend, she was the main pleather master on this. A working snap/button was added so the guns can be taken in and out of the holsters.

holster2.jpgholster3.jpgholster4.jpg

holster5.jpgholster6.jpg

Holsters and guns done.. time to move onto the webbing/attachment points. decided to make these myself as normal store bought belts wouldnt have cut it. These were made from foam and covered again. not many pics but when you see them they are all made the same.

webbing1.jpg

since i dont have much shots of the above here is a bonus action shot..

action.jpg

I was walking around a shopping center one evening and spotted a toy water gun which i thought had a great design. ended up getting it for 1 euro and repainted this and weathered.
gun1.jpggun2.jpggun3.jpggun4.jpg

Next up is armour for the arms.. gauntlets even. designed on paper, then to foam and then the bottom section covered in blac pleather and the upper painted and weathers to my limted ability. belts attached so that i can tie them to my arms and all is right with the world.

arms1.jpgarms2.jpgarms3.jpgarms4.jpg

Next up is attaching the pouches, webbing/belting to the actual belt to hold it all together.. man this is a long post eh?
 

Attachments

  • holster1.jpg
    holster1.jpg
    39.9 KB · Views: 129
so for the next step i used an old leather belt i had and started to attach everything to the belt. figuring out what way i wanted the pouches to sit. attaching the holsters to the webbing and then that to the belt also. also testing out where pouches would go once i added a belt for the thighs.

belt3.jpgbelt2.jpgbelt1.jpg

Next we had to create a harness and for this I couldnt wrap my head around it so my girlfriend took over and design and made it.I later added the snaps so that it can be opened and closed easily no pictures from the build of this but some pics of it actually on along with the gauntlets and pouches.

harness1.jpgharness2.jpgharness3.jpgharness4.jpg

Added extra pouches to the thighs next to the holsters.

pouchy1.jpg

Attaching the swords to the harness. two slits were cut in the harness and some pleather was fed through to create a loop. the swords were then placed in the loops and the loop glued to the sword sheath. it was then tied in a knot on the inside of the harness so they can be removed if needed.

sharness2.jpgsharness1.jpgsharness3.jpg

There was an issue with the swords pulling the harness down due to weight so belts were attached from the main waist belting to the harness to prevent it from being pulled back. it worked great and also added a nice detail to the chest stomach area and will be a good spot for grenades to hang...

Aaaaaaaand this is where i am at so far. pictures of it to date are below.

I still need to get boots, make the belt buckle, makes some shin, knee and shoulder armour. attach grenades and do little detailing but pretty much there.

I will update as i go along now.

Any questions please ask. not sure if this is too big of a post for the first time or too much detail.

I would love to hear your feedback also what could be improved, changed etc...

deadp5.jpgdeadp7.jpgdeadp3.jpgdeadp4.jpgdeadp1.jpgdeadp2.jpgdeadp6.jpg

oh.. a cup. I definitely need to buy a cup.!!!
 
Looks great! Do you have a link to the exact zentai suit you bought?

Only thing I can suggest is shorter swords crossed over your back, rather than parallel. Makes it easier if you want to actually draw them :)
 
Looks great! Do you have a link to the exact zentai suit you bought?

Only thing I can suggest is shorter swords crossed over your back, rather than parallel. Makes it easier if you want to actually draw them :)

This is the Zentai suit that i got: http://www.zentai-zentai.com/deadpo...shades-printed-zentai-suit-products-3012.html

The swords i thought about crossing but went with the same design as the sixth scale figure that i based it all on. crossing them gave it too much bulk at the back.

I can still draw them but its a little tricky :D

Thanks for looking.!!!

- - - Updated - - -

Awesome!
Looks really cool, SerjicalStrike

Thank you. Glad you like it.!
 
I am absolutely in love with the 1/6 figure. I drew a few ideas from it when I was building my suit. It was a toss up for me whether to do the figure version or the movie version. Maybe I should have mixed the two. Are you going to make the shin guards like the figurine? Or did I miss you mentioning it?
 
I am absolutely in love with the 1/6 figure. I drew a few ideas from it when I was building my suit. It was a toss up for me whether to do the figure version or the movie version. Maybe I should have mixed the two. Are you going to make the shin guards like the figurine? Or did I miss you mentioning it?
I love the look of the 1/6th figure. I'm modeling my deadpool costume after that one. It has a more realistic look to it in that its not a 'spandex' suit, its like a coveralls/flightsuit.

And SerjicalStrike . . . your costume is coming out amazing. I bought the ilustra studios mask also and love it.
 
Thanks for looking guys.!!

I did get around to making the shin guards but im not 100% happy with them if im honest... i may spend an evening remaking them. The shin parts are separate from the knees. to i have more movement. They feel great on but the look just isnt doing it for me :/ maybe i need to paint them more.

I also love the flight suit of the sixth scale figure but couldnt find anything even remotely similar so i stuck with the spandex. I knew it was going to be built up a bit with the harness, swords, armour etc so was hoping it would balance out. didnt turn out too bad.

Have a few more details to do like paint the deadpool faces on the grenades and small things of that sort.

Updated pic below.. any suggestions,??

IMG_20151019_003243.jpg
IMG_20151019_183648.jpg
IMG_20151018_234805.jpg
 
Amazing build here! I am in the process of a redux on my own DP cosplay and like what you did with your costume. I am stuck at both the harness and the mask as we speak myself. I guess when it comes to cosplay I am more than a bit OCD in the entire build. You have created a work of art and fans all over would be honored to see you in person and capture this on film. Great job, and I hope to show my build soon as I am still figuring out the kinks right now. Is the mask really that good of an investment? Just want to make certain before spending that kind of money and it not being comfortable or help the costume pop for me.
 
Amazing build here! I am in the process of a redux on my own DP cosplay and like what you did with your costume. I am stuck at both the harness and the mask as we speak myself. I guess when it comes to cosplay I am more than a bit OCD in the entire build. You have created a work of art and fans all over would be honored to see you in person and capture this on film. Great job, and I hope to show my build soon as I am still figuring out the kinks right now. Is the mask really that good of an investment? Just want to make certain before spending that kind of money and it not being comfortable or help the costume pop for me.

Wow, thank you for your kind words. This is my first time attempting a build this big (or any build really) so its really encouraging to hear that.

I think the mask is the most important part of the costume. As you say it really does make the costume pop and it is the first thing that anyone will look at when they see you. If it was a fabric only mask then it really would look right with all the effort put into the rest of it so i thought it was a very important purchase to make. I bought it early to motivate myself also and to set a standard for the costume i guess.

The mask is also very comfortable and breathable. I would definitely purchase if you are going to do an intensive build like mine.

The harness though... is a pain to make. :/
 
I love it! It's very clean and neat. Not a single part is sloppy. Would you mind explaining how you made the shin guards?

Thank you kindly.!

The shin guards are two pieces of foam which are covered in black pleather. The dont go all the way around my leg, just to the sides. I then glued two belts to the front of the shin guards so that they can be tied to my leg. Then I painted two pieces of foam silver and weathered for the armoured part. The part you see with the three circles on my knees is a separate piece which sits on the shin guard but attached to my knee by elastic. Same pleather covers and weathering.

Not sure if that has explained well or not but the belts are working ones and it keeps them very secure.

Any other questions.? :)

- - - Updated - - -

Nice job...with the movie coming out next year the popularity will be insane as if it wasn,t already...........

Thanks for looking.

I think Deadpool is done a lot but I wanted to do one which was a little different and a bit more too it than others. seems to have worked for now.

After the movie i think everyone will try for movie style costumes which i like but I think the comic book design is better.
 
This thread is more than 8 years old.

Your message may be considered spam for the following reasons:

  1. This thread hasn't been active in some time. A new post in this thread might not contribute constructively to this discussion after so long.
If you wish to reply despite these issues, check the box below before replying.
Be aware that malicious compliance may result in more severe penalties.
Back
Top