Darksiders 2 Reaper Form Death - WIP

Little update ....

Not done much on this build during this past week, have been struck down with the flu and Elder Scrolls V: Skyrim has kinda taken over a chunk of my time..... I may be doing some Skyrim armour and weapons too for comicon. Am thinking Daedra But this too I plan on having lights.... Since the armour appears to glow red in areas. But that is for later.

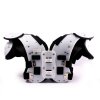
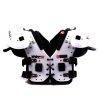
As for this build... I finally got a few things I have been waiting on. Which has been holding me up too. I got my American Football shoulder pads. I will be using these for shoulder buffing and of course as the main support for the wings. They will be mounted onto the back section of the pads. I have began work on the lantern, am using 2 layers of green acetate for the glass diffused with tracing paper between them and I have plans on how to get it all glowing nicely. Then will work on the shoulder spikes and the belt, Then I am kinda screwed till the warmer weather.
 
I know exactly what you mean. I'm still trying to work out parts of the armour so I have a notepad and a bunch of reference pics that go with me when I'm out as well.

Sounds like a good idea and a good way of going about getting it bulked out. You've got good looking results from it all. I'll be interested to see how the hot wire cuts turn out. It's something I've considered a few times but never pursued further.

Sounds like a great opportunity. I've not got the same range but before my wife bins anything I usually eye it up and try and decide if I could possibly make use of that at some point in time. I've built up a collection of bits that I'm sure I'll use some day but don't have a direct plan for. Must be great having a good supply of things for mixing resin in, I've had a tendency to work with muller rice pots so far.

I've got a small breadboard I tend to use for testing my circuits and I can definitely recommend one. Can be much easier to hold the bits together. Not sure how well it would work for testing the placement though. Looking forward to seeing how the lantern is turning out.

I think that's very wise, certainly wouldn't make any friends suddenly spring launching a wing into their face. Sounds like a good idea. I was just in Iron Man the full day and while it was great fun I really didn't have the mobility to get a look at any of the more crowded stalls.

Hope you're back up and running again. Flu can be nasty. Glad that the parts have been coming in. Do you have an idea of how heavy the wings will be in the end? I guess it'll be supported over your shoulders which should help a bit?
 
Time for an update...

IMG_0827.JPG

First off some of the bits I have gotten delivered. Motor, cogs, some more red and black wires. A little lighting mock up for testing with. There is the RC components from the car LEDs of various colours (more on the way too), resistors, battery boxes (9v and 2 x 1.5v) and switches.

Now, on to the lantern. As you can see, this is just pinned together for now, till I get everything wired up as I want it inside. There is only two LEDs in the lantern right now, and those produce a pretty nice glow as it is. but will probably wire in some more to get it really glowing.
IMG_0833.JPGIMG_0830.JPG

51WeqvTBTSL._SL1000_.jpg51RLH66DRcL._SL1000_.jpg

This is the set of shoulder pads I got, they are a nice fit, with two side straps for extra support and the back is pretty sturdy. All in all I couldn't ask for better.

I have not bought a hot wire gun yet. It's on the agenda for the next spending. I try not to do too much at one time, and I got quite a bit of stuff this month as it is.

I am quite the hoarder with bits and pieces. I have a set of drawers full of bits "I could use for something" and a box full of foam off cuts that could be used for something lol.

The muller rice pots are a good idea, if I run out of pots from work, I will look into that.

I usually wire up a little mock up just tapped up, like in the above picture. Which is easy to alter to suit my needs.

Tell me about it... Crowded stalls, and in the Shredder costume all those spikes kept getting bashed, flicked and snagged on people. Also the cloak got stepped on a few times. Being cloaked has it's disadvantages. I got round most of the stalls, but I had to chose my paths wisely to avoid constant damage, I had to glue my pauldron spikes several times throughout the convention. But out of 28 or 30 spikes I only lost 1 the entire weekend. and that was near the end. I was glad i took a "first aid kit" with me, to fix the damage I anticipated. Although, I should have made a few spare spikes. But I was in a rush and didn't get round to doing any spare spikes.

Flu is over. fighting fit once more. I don't know how heavy the wings are going to end up, but I plan only to make the outer appendages be mega sturdy with rondo, as those are going to be the actual flexing parts, the inner appendages will only need to be resined and fillered, as they will be pulled open by the outer appendages. by sinuous fibres to represent the ruined wing. and to limit actual flexing parts.
 
Last edited:
Looking good. Not sure if it will mater in the end but something I picked up at one point, you might want to be careful with gears you have. If the gears are for opening the wings then you'll need to be aware of the weight that will be on them. If they are plastic then I think it can be possible for the gears to strip if theirs too high a load on them. Not sure on the exact details but it could be something to keep in mind.

The lantern is looking good. Have you got anything extra in there for the diffusing effect?

Looks like a good firm basis for them. Should work well.

Just be aware they aren't the most weighty of things. I lost a pair of jeans due to a wind blown tub of resin. I taped it down with a lot of tape after that to be sure.

All I can think of now is the incredibles and 'no capes!' That's not ideal but for being something that could easily catch like that I'd imagine it could have been a lot worse. My handplates and hip pods were the worst offenders for me. Managed to keep hold of them all but was very grateful to someone who chased after me after a hip pod popped off without me realising.

Sounds like it will look great in the end. Looking forward to seeing them.
 
Time for another update on my progress. Since it has been a week since my last update.....

I spent a good while on printing some new bits out... My printer is a pain in the rectum when it comes to card stock. so printing usually takes a very very long time...
I also made a daedric dagger in pep for no other reason than because..but that's nothing to do with this build soooo..

anyway, printed off the crotch template (making that from foam) the pauldron and some skulls...

IMG_0861.JPG
Here are the triplets. They turned out better than I thought they would and yes there is a reason for the hole in the third one's eye...

IMG_0862.JPGIMG_0863.JPG
The skulls are not fixed in place, though I will probably secure them with glue once the painting process is done.

The release of the MCM Comiccon tickets (and my purchase of said tickets) has given me an official deadline... September, so 9 months really,
 
Geez it's been a while since I have done anything here. Okay. Another update.

I wasn't exactly overjoyed with the books I had previously made. So after finding more of the foam blocks....

IMG_0975.JPG
These are packaging bricks I managed to get from work. I glued three of the bricks together to make one brick, I did this four times and glued two of those bricks together, adding a single brick glued to the end.... You will see below.

I made covers from card board and then started work on the fancy trim. I made a load of cardboard templates, and some foam shapes.
IMG_0970.JPG

I glued the card templates to the books, and on the top I hot glued the foam shapes into their allocated positions.

IMG_0974.JPGIMG_0973.JPGIMG_0972.JPG

Those are my books....

books.jpg
Those are the actual books on the character. The full cover design is always obscured by the chains, but I think I have managed to get it fairly similar. Although the trim seems to differ in pretty much every pic I have.

Well, that's all I have for now. Will be more soon.
 
Good to see more progress. The books are looking great. Must have taken patience getting the emblems symmetrical.
 
Thanks CLOTHAR, yeah I love the design of the darksiders games too, just hope the other two games eventually do get made. Seems a shame we only get War and Death but not the other two.. It's like only getting half a book and never getting the rest....

nah Ikras, I cheated... I got card, folded it in half and drew half the design cut the shape out and boom symmetrical template. Did this for all different parts and used the same template for all parts to keep it all even lol

Working on the belt, had a bit of a snafu when it turned out the size was way too small so had to reprint it all again after resizing... the joy of custom builds lol
Also needed a new printer... The old one I was lucky to get 1-2 pages printed in the space of half an hour. Now times that by 50+ pages and you have a lot of swearing ... New one works like a dream!
 
Definitely another vote from me in favour of them making more. Loved the designs and style throughout them. Maybe one day...

Yeah, that would be the sensible way of doing it. Didn't immediately occur to me even though I ended up using a similar idea recently.

Hope the new printer keeps up, the old one would have used your time to deadline just printing from the sounds of it :p
 
I would maybe make it for the last half hour of the Sunday lol

It certainly is the easiest way to get templates, and you already have a central line from the fold. Plus turn the shape around and boom you just got yourself a mirror image Left and right template in the same one. Now that is saving the environment right there. *hides the scrap card from all the pepakura cutting* Go Environment!!!
 
Okay folks another update.

Am getting close to finishing the belt, at least the main part of the belt, the buckle will be separate and carved from foam...

IMG_1013.JPGIMG_1014.JPG

And there it is. It's still open at the back, which is why it is not fully done. the front rings, with the black ring on them, is for the books. The black ring is for extra support for them. The ones at the back only have ribbons with patterns on them, so they didn't need the extra rings.

next is finishing the right hand, still got 3 fingers to go, then starting work on the hand rig
 
I know, I know I told a little lie. Yes, I know those fingers gotta get made sometime but... I dislike making those bloody fingers! lol

Okay so in order to procrastinate on those fingers I did some work on the belt's buckle and the ... well codpiece, for a lack of a better word..

IMG_1023.JPGbuck.jpg

Not quite happy with the cross, yet, and the blue foam is just there to see the cross better.

Also, now it's built, the pepakura face doesn't look so bad. Will see how I feel after sculpting the scythe if I want to replace the face or not.

More to come... probably after those dreaded fingers.
 
Okay, I have remade the codpiece entirely. I had it all in two halves, which I wasn't too happy about in the first place, so I have done each part as a whole piece.... I wanted to redo the trim as it wasn't really measured on a properly drawn out template or anything, as such it wasn't the same thickness all the way round.

Here is the old codpiece... The blue foam is just for visibility.

IMG_1021.JPG
Here both the base and the trim are in two parts, the cross as well... What was I thinking?

And the new cod piece...

IMG_1024.JPG
A much cleaner one piece base and trim, and the cross is much thinner and more in line with what can be seen on the actual model.

IMG_1025.JPG

Here is the new codpiece and buckle together. I have tried to get the belt included in some pics, but I don't have enough arms to keep everything steady and take a pic lol. Soon though.
 
Progress is progress. Putting my speed to shame for sure.

I can understand your reluctance with the finger files too. They don't look like the simplest of things to put together.

The belt is looking good and so does the cod. How do you plan to connect them?
 
I have been off a couple weeks, due to a throat infection. But that hasn't stopped my hands from working lol

IMG_1034.JPG
This is the pep for the fingers. This is a Medium finger, the index to be exact. It's not so much the putting them together, but all the scoring that has to be done to bend and shape the card. I spent a couple hours last night cutting out the remaining fingers, Well two fingers and the thumb. So am a third of the way there. Gonna get these done and out of the way before I do any more.

Last night I finished gluing together the hourglass, its now ready for filler.

What still needs to be done:

Lantern wired properly and glued together
Caulk all foam pieces
Chains for books cut and glued in place
Bones for ribs
Make robes
Make hand rig

Better Weather:
Resin all pep pieces
Sand everything
Sculpt scythe
Paint everything
String up hand rigs
Set wings to remote control opening and closing
Look bad ass!
 
Last edited:
Damn, it has been a while since I posted. Rest assured I have not given up on this project. I had a serious throat infection which required surgery, and so have been not been feeling into the build for a bit. But all is well and I am back to working on this.

I have begun the resin process. Fingers, skulls, shoulder and belt are in the shed now. First coat applied. Will get more done this coming weekend.

I have also set up both hand rigs, and both bracers have been made, but still require details.

I also plan to chain up the books this weekend too. leaving me with ribs, robes and finishing the resin/body filler sections and paint it all.

The scythe will also need done and wired up and the electronics for the wings.

So just a heads up on where I am at. Pictures will come soon.
 
Back
Top