Captain America: TWS - Bridge Cap and Winter Soldier

keepcalmcostume

Well-Known Member
While we're working on our TFA Cap and Bucky costumes, Mousemeat and I are also putting together some TWS costumes. I'm doing one of Cap's casual/civilian blue jacket outfits, and Mousemeat is doing Winter Soldier's main one-armed jacket/vest/thing.

I originally intended to do the costume Cap wears on the bridge (blue jacket, grey shirt, khakis, sneakers), so that it would be a scene match for Mousemeat's costume. But looking for jackets online, the best price I could find that matched anything from the movie was this.
no flash: IMG_3706.jpg with flash: IMG_3710.jpg

It's closer to royal blue than navy and it needs some alteration, but it has the right seams across the chest and paneling on the front to match Cap's first blue jacket (that he wears to the Smithsonian and when he chases Winter Soldier onto the roof). It also has a nice weight to it and fits well. At minimum I'll add some dark blue or black mesh to the center front panels, and maybe remove the black piping on the seams. Beyond that, I might add some zipper pulls to fake the zippers on the front panel and sleeves. I don't think there's much hope of dyeing it, or at least not getting the color I'd want without messing up the whole thing, so I probably won't bother with that.

So with this, I'll be doing the first blue jacket rooftop costume (blue jacket, white shirt, blue jeans, boots). I already have everything else except a shield, so after that and the jacket alterations I'll pretty much be done. (As a bonus, Winter Soldier wears his one-arm vest/jacket in the rooftop scene, so the two costumes are still a scene match.)


Winter Soldier's costume is coming along too. Mousemeat is making crazy good progress on the arm, which we're doing out of craft foam and mylar (or something similar) over a fabric sleeve. She has a bunch of good in-progress photos of that.

I found some good pants to serve as a base.
WP_20140613_008.jpg WP_20140613_011.jpg
I found them at a thrift store and they're some kind of military issue (the label is faded, but I can make out a NATO size designation). We'll be taking them in and adding some panels and pieces to resemble the detailing WS has on his, but there's not much we really need to do since we're pretty happy with them as-is. Plus, solid black tends to wash itself out, so we can get away with less - or less exact - detail.

We also got some little water guns for the COP 357 Derringer and Intratec TEC-38.
WP_20140521_003.jpg WP_20140521_002.jpg
Even though there are replicas and casts and airsoft and 3d-print versions out there, I saw these at Kmart last summer and grabbed them just in case. Worst case, if we don't get anything else, even though these have a weird shape they're at least roughly the right size and can be painted to have the right color scheme (and maybe cut down and reshaped a little).
 
Last edited:
Re: Captain America: TWS - Rooftop Cap and Winter Soldier

Arm progress! (special guest star: my cat)

I have the entire upper half (elbow up) cut out into foam already. The forearm is completely paper patterned, I'm just waiting to get ahold of the rest of the foam I need to cut it all out.
1234024_10154780575090058_6259823626830756465_n.jpg
I wrapped my arm in saran wrap then proceeded to let my helpful assistant (my mom) painstakingly wrap my arm in duct tape super tightly. I'm pretty sure she had too much fun cutting me out of it; we looked rather ridiculous all over the kitchen floor.
I took the duct tape and wrapped it in masking tape so my pencil and pen marks would actually show up. Then, over the next 4 or so months, I proceeded to be very picky as I very carefully drew on my pattern. I was so picky about this, I thought I would NEVER finish it.

10806414_10154894928700058_1531702671391801148_n.jpg
I made up about half of this, using the designs others have made as reference. The biggest problem with this arm is that there are, literally, NO references or angles for the INSIDE of the arm. Anything that lays against his side, we pretty much never see. But there was pretty much no one who just mirrored the pattern on either side of the forearm, so I didn't either. I just kinda winged it and I'm actually happy with how it came out.
I'm making a trip to my local art store today do see if the mirrored material they have there is a viable option. If I end up buying a test sheet, I will take some photos and post them here later today.

This is the kit I bought for my mask from TheRocketeer here on RPF. Curtis is amazing; check him out.
1471271_10154798752155058_8662613057017234928_n.jpg10420382_10154786956545058_3265108011272288102_n.jpg
I need to touch up the paint a bit; as soon as I do that, I'll post some updated photos.
 
Re: Captain America: TWS - Rooftop Cap and Winter Soldier

While we're working on our TFA Cap and Bucky costumes, Mousemeat and I are also putting together some TWS costumes. I'm doing one of Cap's casual/civilian blue jacket outfits, and Mousemeat is doing Winter Soldier's main one-armed jacket/vest/thing.

I originally intended to do the costume Cap wears on the bridge (blue jacket, grey shirt, khakis, sneakers), so that it would be a scene match for Mousemeat's costume. But looking for jackets online, the best price I could find that matched anything from the movie was this.
no flash: View attachment 415917 with flash: View attachment 415918

Not sure if you've already bought this jacket yet or if those are photos the manufacturer supplied you with,but this jacket made by thejacketmaker.com is fantastic and reasonably priced (actually on sale right now for $123.) Although they ask you to pick a standard size, they'll email you to take extra measurements to make sure the jacket has a perfect fit, and the quality is very impressive. I actually bought one from them for Halloween and it's become one of my favorite jackets, especially since all of the pockets are functional (including the biceps pockets believe it or not.)
 
Last edited:
Re: Captain America: TWS - Rooftop Cap and Winter Soldier

Not sure if you've already bought this jacket yet or if those are photos the manufacturer supplied you with,but this jacket made by thejacketmaker.com is fantastic and reasonably priced (actually on sale right now for $123.) Although they ask you to pick a standard size, they'll email you to take extra measurements to make sure the jacket has a perfect fit, and the quality is very impressive. I actually bought one from them for Halloween and it's become one of my favorite jackets, especially since all of the pockets are functional (including the biceps pockets believe it or not.)

Oooh, that's a nice replica. I would love to get one of those someday, and I could kind of justify it since I could use it in "real life" too. But I'm trying to do a very budget version of this costume for now, because being able to get away with doing it cheap means I get to bring it as an extra costume to SDCC (basically with what all my other costumes are costing, I can only do this now because I'm doing it cheap, and if I wanted or needed to spend more on it I would have to postpone it). I did already buy the jacket from those photos, because it was an eBay auction (so just a pre-owned generic jacket that happened to look similar) for around $10, so I couldn't really beat that. I'll definitely keep that site bookmarked though, because I do want to upgrade someday and it's good to hear a review from someone who has one. Thanks for showing me. :)
 
Re: Captain America: TWS - Rooftop Cap and Winter Soldier

I've been busy with the holidays and other projects so there's not a whole lot going on with this right now. But here's a little update at least. This is the jacket I'll be using as a base pattern for WS. I had already started ripping it apart at this point, but you get the idea.

(with flash to show the detail a little better):
IMG_3712.jpg IMG_3715.jpg

Mousemeat and I looked at some commercial patterns (and there are a few out there that would work), but most of them were loose-fitting and not tailored at all, which means more alteration work, but I already had this and already intended to rip it apart. It's old and the pleather outer started peeling off the mesh backing, but I've kept it to use as a pattern because it's a nice shape. I'm going to use as much of the specific paneling and detailing that his jackets have as possible (and definitely all the most prominent parts of the front), but some of it'll have to be scaled down and shifted around to work with the more feminine structure (like the princess seams) of my jacket so that it has the right overall look while being more flattering. I think the silhouette and fit, which is instantly and easily recognizable, is more immediately important than all the detail or exactly accurate detail. So I'd rather throw in some different seams and get a good fit and change up some of the detail than try to just recreate his as-is (at least for a woman's version of the jacket). I'm not even 100% sure what's going on with all the detail on his jackets, so this is a good way to thin the herd.
 
Re: Captain America: TWS - Rooftop Cap and Winter Soldier

Arm shenanigans are ongoing. MouseMeat came up for a short visit last weekend so we were able to take advantage of my dress form and get some work done on the stuff that requires more than two hands.

We made a second form of her arm, then attached that to the dress form. We put the UA shirt we're using as a base layer on over that, and then pinned the foam arm pieces directly to the sleeve. (Plot twist: we're making a motion capture suit.)
WP_20150111_001.jpg WS Bucky Collage 2.jpg

This is mostly a fitting process to get all the pieces to lay correctly in 3D instead of just flat and then trim down any parts that don't fit. Next step after this will be covering each piece with mylar, putting down panels of mylar directly on the sleeve for the underneath layer that shows between gaps, and then attaching each foam piece to the sleeve.
 
Re: Captain America: TWS - Rooftop Cap and Winter Soldier

Sorry for the lack of updates. With school and work and our other costumes and even a few commissions, we've been getting behind on posting. We're getting close to the finish line on our TFA costumes though, so when those are done we'll be jumping into these much more. MouseMeat's been doing some amazing work on her Winter Soldier arm, and I've been figuring out patterning for Winter Soldier's jacket (I also did some impulsive dye tests on my Cap jackets, which didn't produce anything worth showing). So we'll have some real updates pretty soon.

And heads up to anyone going to WonderCon: we decided to go this year, so if we can finish in time we might be wearing our TFA Rescue costumes there as a practice run for SDCC.
 
Re: Captain America: TWS - Rooftop Cap and Winter Soldier

As pseudo-promised, some arm stuff. But not much

10959408_749441015134042_1948613144272539573_n.jpg

All of the mylar is applied, strips are tentatively glued to the sleeve.
The double-tac isn't strong enough to hold to the sleeve 100%, so we'll prolly be peeling each piece off, once adjustments are made, and hot glue them all on, and not just the edges. With this experience, I may very well try using a thick acetate with mylar for the next arm I build (it's inevitable, but at least I have my pattern) instead of the foam to cut down on thickness/bulk.

So. I tried it on, and there is a LOT of adjustments that need to be made, most of which while I'm wearing it. So those will have to wait til us girls are together and there's an extra set of hands around.
I also think I know what I want to do to edit the elbow around and make for a bit more mobility, because right now it's just not happening. I'm going to section my elbow pieces further to create a better "joint" by cutting them in threes (at least). Found out while looking through stills the other day this is totally canon design anyways, so I really feel better about making edits like that. Found out I got to take off the very last piece of foam, as it was too long for my arm and made my wrist unusable. Which is fine because I've hated that piece from the time I cut it :p

TL;DR it looks a lot better on the form right now so we'll leave it there.

10959408_749441015134042_1948613144272539573_n.jpg
 
Last edited by a moderator:
Re: Captain America: TWS - Rooftop Cap and Winter Soldier

Now that TFA is basically finished and WonderCon is over, we're jumping back into these costumes.

I took advantage of being in a big city, so I hadn't even left So Cal after WonderCon before I was doing more costume shopping. These are going to be Cap's sneakers for the bridge scene. I know his are very particular Nike's and mostly blue/grey, but this was the best combo of size/fit/price I could get. I'll be painting the sides of the soles white, probably switching out the laces, and maybe covering the pink piece in the back. I'm not too worried about a little pink though, because hey, why not?
IMG_4238.JPG

When I got home, I also went ahead and got what I hope is the last of the supplies for the round shield. I was torn between the beautiful-but-tricky Dupli-Color Metal Cast that so many people use, and the red and blue anodized from Rust-oleum which I know very little about but seemed potentially easier. But one of my local auto stores had the Dupli-Color and it was a little cheaper than ordering the Rust-oleum online so I went for it. I'm hoping the cans I got aren't as temperamental as some others seem to have been, or that if it comes to it the weathering covers any issues well enough. I did spray a little test swatch of the blue on a ladder last night and I love the finish, so I'm hoping it works okay on the shield.
I didn't want either a really flat or highly mirrored silver for the base color, but I found a stainless steel finish (with real stainless steel in it, so that's cool) that I think will look really nice and natural, especially with the spun texture.
I also got some filler primer and spot putty since I don't want to deal with the pits in the foam like on the TFA heater shield.
IMG_4233.JPG
There's a new dremel attachment for the grooves and some brushes for the spun effect tucked in there somewhere too.
 
Re: Captain America: TWS - Rooftop Cap and Winter Soldier

By way of some kind of update: the really nice looking arm is a bust. There was NO way we could get it to fit my arm properly once on, and there was less mobility than I was expecting. There was just no saving it.
I have since ordered some chrome-finish, iron-on vinyl to make a new one out of. This new one will be completely fabric, so here's hoping it works...

Also, I have the cotton webbing for all my holsters and belt ordered. I have to hand sew everything, so I opted for cotton instead of nylon webbing to save my fingers. I just have to start patterning out the holsters themselves and get them cut out of EVA. I'm having both the TEC-38 and the Derringer modeled and printed by Print My Props in etsy; very nice people. I'll be cleaning and painting the prints myself, in the interest of saving money, though.

Will post more updates as they come along!
 
Small update. I'm in the middle of finals so I'm not doing much else, but with our deadline quickly approaching I am trying to squeeze things in when I can.

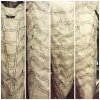
I've been figuring out how to adapt the design of the Winter Soldier jacket to the pattern I'm using. I did a sketch of my jacket, then added details of the Winter Soldier jacket over that until I came up with something that maintains the structure of my base while incorporating what I think is enough details of the movie jacket. This is basically a pre-mockup mockup, so that I can test this design on the muslin mockup and make tweaks from there.
IMG_4554.JPG WP_20150523_013.jpg

I've also been creeping along on the last few bits of my costume. I have yet another new jacket for Cap. I wasn't happy with anything else so far, so I got a Dickie's unlined Eisenhower jacket in navy. With minimal modifications, it could be either the rooftop or bridge jacket, so I decided to go back to the bridge costume I originally wanted to do. I already had a pair of navy blue Dickie's pants I never wear, so I'm planning to use some of that as fabric for the jacket's chest pockets and shoulder loops. I'll post some photos of that once it's done.

And I've finally got some real progress made on my shield. It's measured and cut, the back is partially dremeled, I made a pattern for the straps, and I did some tests with filler primer + spot putty to avoid the surface problems from my TFA heater shield (the test swatch is foam + PVA/water + auto filler primer + auto spot putty + Plasti-Dip + silver spray paint + spun texture with brushes and sandpaper). I'm hoping to get the last of the dremeling and the forming done this week so I can hurry through the PVA layers and start doing some filler.
IMG_4549.jpg IMG_4556.jpg
 
More updates will be coming along in the next week.
For now, here is my finished holsters with weapons mounted with clear elastic. I ended up making my COP all black instead of with a silver barrel :/ oh well. That particular gun comes in all black, anyways, so I don't really care.
3zagLgEgxa
20150611_135759.jpg

The small guns are from Print My Props over on Etsy and FB. Really good people.
I decided last minute I wanted a Benchmade holster, at least, because the spot felt empty. So an hour and a half with the dremel and some paint later, I have something I'm mostly happy with. :)
The "Sig" is an airgun I already had buried in a drawer somewhere. The coloring is right, so I decided to save some money and use it. I secured the trigger down and emptied everything. I also have some snap fit tips (thanks to PMP) to paint and use as an extra precaution.

Both versions of my arm have been a total bust.
So I've now got some silver metallic spandex in the mail and I'm going to try for a bomb ass paint job.

This week I should have a photo of pants + belt/hoslter rig to share. I just have some detailing to do on the pants with top stitching.
 
Only a week to go until I leave for San Diego, so I've got a bit of an 11th hour update. The Winter Soldier jacket is almost done. I don't have any relevant photos of it yet, but I will try to take some and post a little update on that before I leave.

I changed my plans with the shield. I was running into some trouble with the foam and losing precious time, so I ordered a toy one off Amazon. It was down to the Disguise or the Rubie's, and even though I've seen some people use the Disguise and have it look great, I went with the Rubie's instead. Unlike the Disguise having weirdly uneven rings (the surface isn't flat), the rings on the Rubie's are flat with normal grooves (only the star is slightly raised, but it's not too noticeable). The Rubie's shield is also a solid, hard plastic, so it isn't floppy like the Disguise shield. The paint job was so-so, but otherwise it's a really decent toy/prop for $20, so I sanded and repainted. Instead of using the Dupli anodized sprays, which I don't quite trust yet, this is all just run-of-the-mill craft acrylic paint. I mixed a little of the silver into the red and blue to make it a bit metallic. I think it turned out not as good as anodized paint (obviously) but better than some store-bought metallic paints (probably because I was able to customize the amount of silver/metallic). I already had red and blue, and the two silvers were $2-3 each, so I think this turned out really well for about $25.
IMG_4570.JPG
I've left the straps as-is for now, since they work well enough, and I'm still debating whether to go ahead and paint the back silver now (I've held off because I don't need the back to show at all anyway, and I'm a little worried about the silver rubbing off on my jacket sleeve). I also kind of bungled the clear coat on the front today - it went on uneven and dulled the silver too much - so tonight I'm either lightly repainting the red/blue/silver or just doing some of the smudgy black weathering.

Aside from touch-ups to the shield, Cap is done. I had a hard time finding a t-shirt in the right color, so I dyed a light blue Hanes t-shirt with some grey and got something close enough (it's a bit lighter than the shirt looks in the movie, but it's pretty close to some of the on-set photos), and finally found some good khakis (Dickie's as it turned out) last week. I decided not to bother with the pockets or shoulder straps on my jacket. Between my long hair and the way the jacket fits me, neither would show while I'm wearing it unzipped, so there didn't seem much point for now. (I already altered the collar only to find out that doesn't show either.) I'm also leaving the pink on my sneakers, because the pants cover some and the rest looks fine as-is. If I have time, I might take some photos of all of it together before SDCC. Otherwise, I'll be wearing it there on Friday and hopefully I'll end up with some decent photos.
 
I'm a terrible updater. Keepcalmcostume posting something usually reminds me to.

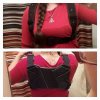
I got my harness done. EVA and craft foam, an old backpack, some slides, eyelets, spray paint, and about 8 hours of extremely tedious hand sewing.
11078154_809158102495666_920066551152812762_n.jpg
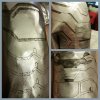
My first two attempts at making an arm FAILED MISERABLY, mostly due to fit. No matter what I did, my tape form didn't seem to match up in size to my arm, so I wasn't producing properly fitted garments. This resulted in attempt 3: silver "liquid spandex" material (it's really polyester, and only like 4% spandex, but ya know) and a really tedious paint job! This is a progress shot. I have since darkened all areas, added highlights, and my star. All done with Jacquard Lumiere and Neopaque fabric paints. I'm actually really proud of this paint job :) My glove is a slightly modified paintball gear glove with the fingers of a silver evening glove cut off and sewed on (I don't have photos yet as my paint job isn't QUITE done).
11201900_821131967964946_3063335625401487923_n.jpg

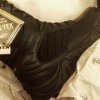
I splurged and bought Bates GX-8s in order to have the correct sole. I'll prolly make the boot covers later on down the road. Side note: these are the most comfortable things ever.
10403543_821559371255539_2959641159303029086_n.jpg

A quick photo process of my knee pads.Foam pads with the right shape, cut down to size and squared off. Pipe cleaner for ridges and edging; black cotton sheet I use for patterning glued and sewed over the top. That's it. I know his have six ridges down the center; the way I had to shape these, I could only fit four. It doesn't bother me at all.
11400971_817657378312405_6279523225806416380_n.jpg

A nice bathroom shot of my shower.
Oh, yeah. And my entire bottom half put together. I have snaps sewed to my pants (and glued to the holsters) to keep things from flapping around everywhere. I'm really happy with all this.
11665594_823819221029554_4153460825936144646_n.jpg
 
That arm looks really good. Great line detail and I really like the weathered/ scratched star!
 
That arm looks really good. Great line detail and I really like the weathered/ scratched star!

Thanks! I have a shaky hand, especially when it comes to painting, so I'm happy with how this has turned out. I had to freehand the pattern all over again since I couldn't get it to transfer properly. Once I get everything sewn on, I'll try and snap a couple photos before it gets packed for the weekend. :)
 
http://www.therpf.com/showthread.php?t=226923. I made a heavy duty shield out of two disguise shields that held up to a kick to the face from the winter soldier. That may help for San Diego or for cap 3

Thanks! :) I think your thread was one I looked at after I gave up the foam, but I wanted to do something more straightforward since I was short on time. But for any shields I make in the future I might look at something like that again. Standing up to Winter Soldier kicks is definitely a bonus. :p


With the usual home-work-school stuff that came up when I got back from SDCC, I've been dragging my heels on uploading photos. There aren't many that we've got back from people yet, and not that many were taken to begin with (which was a strange change this year, since other years and even WonderCon this year have usually been a lot more busy for us). But whatever we have, we'll put up soon.
 
So we never ended up getting any photos back after SDCC, and honestly in all the other stuff we've started since I kind of forgot about updating this with the few things we *do* have.

Even with it being unfinished at that point, these are the best photos I got of the Winter Soldier jacket.
IMG_4604.JPG IMG_4617.JPG IMG_4621.JPG WS Bucky Collage 4.jpg

And I did end up painting the back of my shield with the stainless steel spray. I don't remember if I sealed it or not, but either way, there wasn't any transfer onto my jacket sleeves.
IMG_4612.JPG

We have a few other projects in the works right now that are taking priority, but we do plan on making adjustments to these over time, so we'll keep posting as things get done.
 
Back
Top