spclfxguy
New Member
So, years ago, I was approached by Planet Hollywood to refurbish one of the original, Studio Scale Jupiter 2 filming miniatures they had acquired, and then make a copy of it that they could hang in one of their restaraunt facilities.
One of the byproducts of that request was the mold we had to make, in order to generate the copy for them. I offered my company's services to do the job, in exchange for my keeping the mold, which they were more than happy about.
Years later, I FINALLY managed to get around to making a casting for myself. And, it has sat, unfinished, in my garage, for a few more years until about a month ago, when i got this insane idea in my head... Why not build an interior for it?!
On the surface, it seemed simple enough. Just grab a bunch of research material and have at it!
Only one small problem: The top and bottom parts of my casting have been joined together, and I am not about to try to cut it open -and- I really don't want to cast up another one in halves.
Here comes the part where I think I may have lost my mind.
So, I thought, what if I made all of the interior assets so they could be fed through the main viewport (and/or the engine core opening) and assembled in place??! Kinda like a ship in a bottle, in a way.
It's not like the level of effort wouldn't be enough of a challenge to get the interior to look right, just building it, by itself. But now, just to keep it interesting, let's try to squeeze it all through a tiny rectangular hole!
I'm not sure if I can pull this off, or not, so this project may die on the vine, if I run into a problem that i can't resolve, or i go broke, but I shall attempt to post my progress here, and welcome any feedback/input/ideas you may wish to share!
The first order of business in my process is to mock up as much as necessary, to determine what kinds of things might be a problem, how to resolve them, etc. Also, it serves as a bit of motivation/inspiration when you can get a hint of what the outcome will be (conversely, it can also be a bit of "are you sure you really want to do this?")
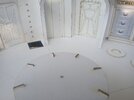
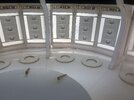
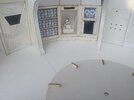
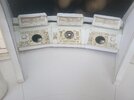
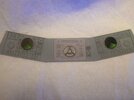
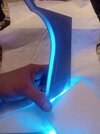
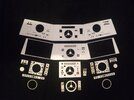
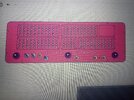
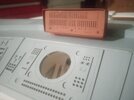
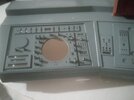
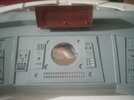
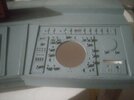
Here are some photos of my Jupiter 2, fiberglass hull(shell), unpainted. Also, some photos of my first iteration of the interior, as I attempt to figure out size, location, how things relate to each other and to the hull. Most of the assets for the interior are made using various paper/card stock, matte board, railroad board, and foam core. There are a couple pieces of styrene and Acrylic, but nothing yet to write home about...
I'm currently working on my 2nd version, and have already started thinking about version 3!
I hate it when you think you have things about figured out, and you just finish up making a bunch of parts and.. BANG! It occurs to you a better solution! But, that's why we do mock-ups!")
One of the byproducts of that request was the mold we had to make, in order to generate the copy for them. I offered my company's services to do the job, in exchange for my keeping the mold, which they were more than happy about.
Years later, I FINALLY managed to get around to making a casting for myself. And, it has sat, unfinished, in my garage, for a few more years until about a month ago, when i got this insane idea in my head... Why not build an interior for it?!
On the surface, it seemed simple enough. Just grab a bunch of research material and have at it!
Only one small problem: The top and bottom parts of my casting have been joined together, and I am not about to try to cut it open -and- I really don't want to cast up another one in halves.
Here comes the part where I think I may have lost my mind.
So, I thought, what if I made all of the interior assets so they could be fed through the main viewport (and/or the engine core opening) and assembled in place??! Kinda like a ship in a bottle, in a way.
It's not like the level of effort wouldn't be enough of a challenge to get the interior to look right, just building it, by itself. But now, just to keep it interesting, let's try to squeeze it all through a tiny rectangular hole!
I'm not sure if I can pull this off, or not, so this project may die on the vine, if I run into a problem that i can't resolve, or i go broke, but I shall attempt to post my progress here, and welcome any feedback/input/ideas you may wish to share!
The first order of business in my process is to mock up as much as necessary, to determine what kinds of things might be a problem, how to resolve them, etc. Also, it serves as a bit of motivation/inspiration when you can get a hint of what the outcome will be (conversely, it can also be a bit of "are you sure you really want to do this?")
Here are some photos of my Jupiter 2, fiberglass hull(shell), unpainted. Also, some photos of my first iteration of the interior, as I attempt to figure out size, location, how things relate to each other and to the hull. Most of the assets for the interior are made using various paper/card stock, matte board, railroad board, and foam core. There are a couple pieces of styrene and Acrylic, but nothing yet to write home about...
I'm currently working on my 2nd version, and have already started thinking about version 3!
I hate it when you think you have things about figured out, and you just finish up making a bunch of parts and.. BANG! It occurs to you a better solution! But, that's why we do mock-ups!
Attachments
-
 IMG_20240529_174402658.jpg2.4 MB · Views: 157
 -
 IMG_20240529_174621100.jpg2.7 MB · Views: 160
 -
 IMG_20240529_174623241.jpg2.5 MB · Views: 139
 -
 IMG_20240529_174347845.jpg2.4 MB · Views: 140
 -
 IMG_20240529_174525351.jpg2.4 MB · Views: 141
 -
 IMG_20240529_174454149.jpg2.3 MB · Views: 143
 -
 IMG_20240529_181849987~2.jpg916.1 KB · Views: 154
 -
 IMG_20240529_181849987.jpg2.9 MB · Views: 140
 -
 IMG_20240529_174340597.jpg2.4 MB · Views: 141
 -
 IMG_20240530_160548958.jpg3 MB · Views: 141
 -
 IMG_20240530_160558669.jpg3 MB · Views: 143
 -
 IMG_20240530_160604239.jpg2.9 MB · Views: 140
 -
 IMG_20240530_160659123.jpg3.2 MB · Views: 130
 -
 IMG_20240530_160626652.jpg3 MB · Views: 132
 -
 IMG_20240530_160757091.jpg1.3 MB · Views: 135
 -
 IMG_20240530_160813212.jpg1.2 MB · Views: 140
 -
 IMG_20240530_161142733.jpg1.4 MB · Views: 120
 -
 IMG_20240530_161142733~2.jpg978 KB · Views: 128
 -
 IMG_20240602_085844738.jpg1.2 MB · Views: 119
 -
 IMG_20240602_085847153.jpg1.5 MB · Views: 116
 -
 IMG_20240603_073240810.jpg3.1 MB · Views: 117
 -
 IMG_20240603_073944488.jpg4.9 MB · Views: 113
 -
 IMG_20240603_074111581.jpg3.3 MB · Views: 123
 -
 IMG_20240606_071314961.jpg2.9 MB · Views: 121
 -
 IMG_20240606_071340851.jpg3.1 MB · Views: 125
 -
 IMG_20240606_071345745.jpg3.3 MB · Views: 109
 -
 IMG_20240606_071348842.jpg3.3 MB · Views: 155