Building a Single Point Scope -FINISHED-

Clutch

Master Member
RPF PREMIUM MEMBER
I've been wanting a realistic Single Point scope for my Nostromo pistol and my Rebel Blaster. Since they are so hard to find,
I figured I could bastardize one of the round-cone ones.

So I got one off ebay and sure enough, the round endcap twisted right off. The greenish cap and stem would not budge.
Since I have no idea how to disassemble one of these, I took the sledgehammer approach and cut the end off:
mrscope2z.jpg


Now, what I had intended to do was to take Shawn M.'s clear casting of the tip that was included with the Nostromo
pistol and mount it to the real scope. The only drawback is that the tip is solid and would look good from a distance,
but so-so up close.

So I got the idea to hack the one off of the Master Replicas one from the Rebel Blaster! Once I felt all the resistance
from the cutting wheel, my heart sank because I knew I was grinding through solid metal.

Even worse, when I was finished, the orange rode inside just flopped to the side. The extreme heat had melted it right
off the mounting post. The inside of the clear cap had also fogged up pretty bad. I thought ok, it is ruined and peeled
the cap away:
mrscope1z.jpg


Amazingly, the cap had retained its shape and there was only some slight melting of the rod inside! I ground the cap
leftovers down until I had 1/4" of a lip left and it fit perfectly inside the real scope:
mrscope3z.jpg


Now my question is how do I grind down the center piece in the real scope at (A) so that it is nice and flat?
Not a lot of room in there. I plan on just gluing the orange rod holder to it.
 
Last edited:
Re: Building a Single Point Scope

Now my question is how do I grind down the center piece in the real scope at (A) so that it is nice and flat? Not a lot of room in there. I plan on just gluing the orange rod holder to it.
Being someone who has only very rudimentary tools, my approach would be to add to it rather than take away.

A thin layer of epoxy over the rough surface, scraped smooth with a strip of plastic, then gently sanded when its totally cured, and then painted, would probably do the job you desire.
 
Re: Building a Single Point Scope

I'd love to do that, but it would set the needle too far forward. It mounts to a cap-like piece that must be recessed so far into the scope body. :)
 
Last edited:
Re: Building a Single Point Scope

If you really want to grind down the center piece, I´d do this with a stepped drill bit like this one:

2515000.jpg


Otherwise I´d simply put a small washer on the center to make it even and shorten the acrylic needle to the neccessary length.

Markus
 
Re: Building a Single Point Scope

Rather than grind down the centre piece see if you can find a plastic or rubber 'cap' that fits over it. That's what you see on some of the real coned singlepoints. There's a rubber cap that fits over the centre rod and the translucent red rod sticks out of the cap.

I was a bit surprised to see what you ended up with from your dome tipped one as I've also done this and was able to remove the inaccurate translucent part without damaging the metal rod.

Did anyone ever manage to successfully make decent clear cast tips? Been waiting for years!
 
Re: Building a Single Point Scope

I took the translucent part off with no damage. My original intent was to put Shawn's cast tip on the end and the bit of the center rod that sticks out would prevent it from sitting flush with the scope body.
 
Re: Building a Single Point Scope

Here's a pic of Shawn's cap on a finished pistol. It is the best and only casting I have seen. The center rod and cone section are hollowed out of the resin:
IMG_2495a.jpg
 
Re: Building a Single Point Scope

You know, if you had asked asked how to take the original apart, you could have saved a lot of time and effort. There was a thread on a rifle forum I visit where several folks disassembled theirs in an attempt to replace the radioactive tritium vials inside the tips. (Yes, there is radioactive material in these scopes).

Try here

Going from the above link, you should be able to remove the inner post to grind it down with ease.
 
Re: Building a Single Point Scope

Is that what that green gas was? :lol

Thanks for the link btw. Will have to check when I get home.
 
Re: Building a Single Point Scope

To be fair, you probably still would have had to saw off the green cap but, I imagine it would have been a hell of a lot easier without the rest of the scope in the way. The green cap contains a small vial of tritium but, it's likely past it's half life by now given the age of most of these.

If you haven't died in 12 days, you should be fine... :lol
 
Re: Building a Single Point Scope

It should come right off as far as I remember. I'll double check mine when I get home.
 
Re: Building a Single Point Scope

The green cap is intact. the only thing I could tell is to unscrew the ring from the viewing side, but it would not budge.
 
Re: Building a Single Point Scope

Damn, I can't get at my domed singlepoints right now. They're fitted to DH17 blasters somewhere in a huge mountain of over 30 large boxes packed with most of my props!

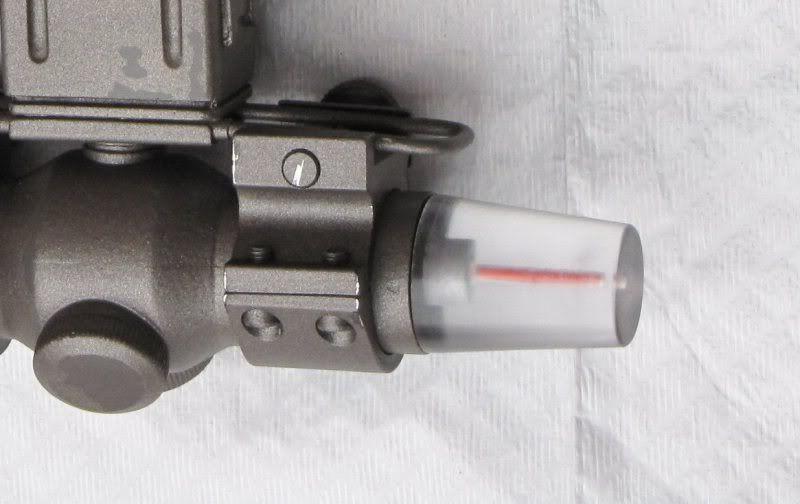
I took some photos of the tip from a coned singlepoint to illustrate what I was trying to explain about the cap:

singlepoint1.jpg
singlepoint2.jpg


singlepoint3.jpg


And this cap fits over the centre rod:
singlepoint4.jpg
 
Re: Building a Single Point Scope

As I feared, I have to remove that outer ring. The only thing I have succeeded in doing is scarring the f out of the ring and the body trying to unscrew it. :(

And now I can't get the rubber boot back in because I think it is supposed to be in place before you screw the ring back on.

Sometimes, ignorance is bliss...
 
Last edited:
Re: Building a Single Point Scope

Noticed the ring is out of round, so it is most likely a permanent part of the scope. I also saw that the glass/rod assembly had slid back and that was what was preventing me from inserting the rubber boot. Now to grind.
 
Re: Building a Single Point Scope

Finished it. Drilled through the MR plug and glued the clear rod in with 1 min epoxy. The plug was then glued to the scope with JB Weld.

spt2z.jpg


I polished the inside of the cap with Novus Plastic Polish. There was one bad spot here where the melted
end of the sight rod came into contact with the clear dome. The dome was attached with some clear rubber cement.

spt3z.jpg


The scope still works somewhat:

spt1z.jpg


I have a bad casting of one that I may harvest the snap caps from:

spt4z.jpg


Here are the original parts. I don't see how anyone could replace that radioactive capsule. It is in the clear green cap and it is tiny.

spt5z.jpg


Too bad the MR scope had to be destroyed, but I just cannot stomach those graphics. :sick
 
Last edited:
Great job!

May I request a bit of on-topic education? I never did figure out how this particular scope works (in terms of target acquisition) despite having a real one...
 
Thanks! Here is an explanation taken from the great link posted above by GrenadeKing:

close your right eye, and your left eye sees this:

standard.jpg


Close your left eye, and your right eye sees this:

standard.jpg


Open both eyes and your brain translates the input from both as this:

standard.jpg
 
Back
Top