Buck Rogers Season 2 "Hero" Blaster Build

There's enough room in the forward or barrel section to accommodate the sound cards, so I've used a couple of pieces of mounting tape to keep the larger board in place. Another piece attached to the inside will help to keep it in place:

IMG_5054.JPG

Because of all of the wires soldered to it, the smaller board isn't going anywhere, so I'm leaving it as is:

IMG_5055.JPG

The wires attached to the sound card are already in place, so now it's just a matter of re-attaching the wires leading to the LED. Before soldering the wires, I've placed red and black shrink wrap in place. I can't stress this enough: Always place the shrink wrap before soldering any wires together.
Once completed, I use a heat gun from all angles possible to help shrink the wrap:

IMG_5056.JPG

At this point, I put back the AAA batteries and test the switch. We're looking good. There's plenty of room in the handle section to store the wires, so I push them into place and then test fit the two parts. They fit great.
It's safe to glue the two parts together, so I use a toothpick with a little clear silicone all along the edges and finish the assembly. It's sturdy enough at this point to install the battery holder:

IMG_5057.JPG

There's plenty of room on the bottom of the access panel, so I'm going to date it. It's always nice to know when these things were built.

IMG_5058.JPG

I'll let it set over night before detailing it. Almost done. :)
 
Last edited:
Before detailing it, I thought I would take some beauty shots:

IMG_5104.JPG IMG_5105.JPG

This is basically what it looked like during the first season. Oddly enough, it was far more detailed during it's use on Battlestar Galactica, but I thought they did a nice job with it during the second season of Buck Rogers. Stay tuned. ;)
 
Now it's on to the detailing.
Something I did early on (while waiting on paint to dry) was to scale up one of the reference photos to figure out the exact width of the white, detailing tape on the left side of the blaster. At first, I thought it was the same size as the detail tape used on the X-Wing Pilot chest box and the HIC Hero panel, but it's actually much smaller. The size turned out to be very close to 1/12", which is so small that I had to special order it on eBay and it can be seen in my box of goodies below. Also pictured is a piece of standard, metallic or foil duct tape which was something I had originally purchased to help keep wires in place within my R2 dome. Ironically, I used it recently to help keep an air duct attached to new bathroom fan which of course is its original purpose. Tonight, it will be used for another purpose:
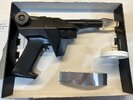
IMG_5110.JPG

My original thought was to start with the white, detailing tape, but figured that the metallic tape would be easier to start with. That did not turn out to be the case. In fact, I spent a couple of hours working with the tape, making one mistake after another, so here's how I finally did it.
First, make sure that your fingernails are well trimmed, otherwise they'll leave marks all over the tape. Trust me on this one. Also, be sure to only touch the tape with your fingertips. Any edge will leave a mark on the tape.
As for the tape, it's not simply a rectangular piece of tape. Because of the angle of the area where it goes, the tape needs to be cut an angle, so I cut out a template and then traced/cut around the template to cut out the section of tape:
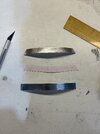
IMG_5111.JPG

The width is just under half an inch. The length is about 4" to 5". I tried removing the backing and then applying it to the blaster, but it did not leave a smooth surface. In fact, it was a crinkly mess, so my solution was to bend the piece around the rectangular area to get it to fit properly:
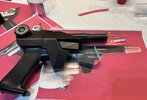
IMG_5112.JPG

Once it looked good, I applied a small amount of clear silicone with a toothpick and then attached the tape to the blaster:
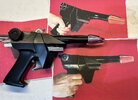
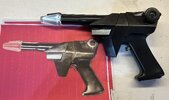
IMG_5113.JPG

IMG_5114.JPG

Now is this exactly how the guys at the Universal prop department put these together? I have no idea, but the finished prop certainly looks darn close. In fact, the finish reminds me of the Star Trek TOS Klingon disruptor.

Up next, adding the white, detailing tape.
 
For the final detail, I'm going to add the white detailing tape to the left side, "Adjustor Knob". The detailing tape I purchased on eBay actually has two sizes on it:


IMG_5179.JPG

I just cut the tape in half, lengthwise. The bottom of the "knob" is the shortest area, so I'm going to start there and take a measurement:

IMG_5180.JPG

It looks like the tape that goes around the knob is closest to the edge where the bottom of the knob meets the actual blaster.
I'm measuring the tape that needs to go in this area at 11/16" in length:


IMG_5181.JPG

We want a perfect circle around the knob, so each piece will need to be measured at 11/16" in length. This tape has a clear covering so it can be placed with even pressure:


IMG_5182.JPG

And then removed:
IMG_5183.JPG

Once the four pieces are in place, I just wrap one long section of tape around and over each piece. It's not clear exactly where the two ends meet, so I just chose a random spot near the top:

IMG_5184.JPG

Fairly quick and easy to do. Much easier than the metallic tape. :)
 
Here's some final photos with reference photos of an original second season, screen used blaster:


IMG_5185.JPG IMG_5186.JPG


IMG_5187.JPG IMG_5188.JPG

IMG_5190.JPG IMG_5191.JPG

IMG_5192.JPG


Ironically, I find myself closing out 2023 finishing this prop in its final hours. It will be nice to start a new year with some new projects.

Again, special thanks goes out to Joatrash FX who did the run of these. He also suggested the sound card which worked out well. The last several months of working on this kit have been a real flash back to 1979/1980. It's just too bad that we can't walk into Universal Studios and simply buy one of these in one of their many gift shops. :)
 
Last edited:
The rear of the clear tip needs to be painted black.

The original tips were shot glass shaped.
 
Last edited:
Back
Top