Buck Rogers Season 2 "Hero" Blaster Build

Corellianexports

Sr Member
RPF PREMIUM MEMBER
Reference photos:
s-l16002.jpg
(Screen used from "The Golden Man" episode.)

unnamed2.jpg

(Used briefly in Battlestar Galactica)


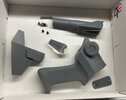
Here's the kit:
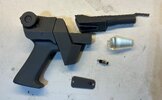
IMG_4803.JPG

While waiting on my other Buck Rogers blaster to dry, I figured I would start work on this one.
I went through a bunch of reference photos but unfortunately, I couldn't find a good one of Gil Gerard holding this particular prop, so I'll have to go through my Blu-Rays. From what I've seen of the other versions, I think this one is my favorite. Oddly enough, it was used briefly in Battlestar Galactica, probably by a security guard or "bad guy".
 
Last edited:
The nice thing about a 3D printed kit is that all of the parts fit together snugly, so there's not a lot of clean up involved. I used a large X-acto knife to remove some of the "piping" or excess resin. After that, all of the parts were cleaned up with soap and water. As with the last Buck Rogers blaster I worked on, I started with 220, then 600 and 1500 grit to sand down the clear, acrylic part. I've spent the last 2 or 3 evenings polishing it with Novus #2 to remove the surface scratches, while watching TV. I should probably be watching Season 1 and 2 to find this particular blaster because there seems to be very few screen shots of it out there.
I went through a box of left over screws and bolts to find something identical to what was used on the original prop. The originals appear to be slotted, pan head screws. Here's what I have so far:

IMG_4804.JPG

Next up, putting together the wiring and then the painting.
 
While watching "The Cyrstals" episode last night, I finally spotted this version of the blaster. Buck is carrying it in a holster along with about 6 or more security guards. They all seem to be detailed the same way. I also spotted Wilma's as well as Hawk's blasters:

crystals4.jpg
 
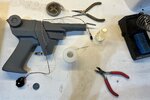
For the wiring, I've put together the entire blaster temporarily to get an idea as to how much wire is needed and where it all goes.
I've used a LED holder (black piece) to help keep it in place and to hold it properly against the emitter (clear acrylic) part:

IMG_4855.JPG

The wires continue to the switch. For easier assembly later, I'm going to hold off attaching the switch for now, but I've attached the 3-cell battery holder and tested the LED by touching the ends of the positive wires. So far so good.

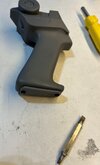
The bolts I found for the battery access panel fit perfectly, so I only need to thread the holes on the bottom of the handle, and I'm done:

IMG_4856.JPG

I'm going to double check the reference photos, but I think it's ready for paint at this point.
 
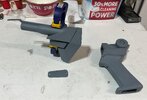
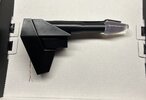
After about 3 coats of primer and a good amount of sanding (600 and 1500 gritt), the front section is ready for assembly. The 3D printing of the parts was very clean, but it did leave a good amount of small divets and tiny bumps that had to be removed and sanded down. Super glue seems to be holding the two forward parts together:


IMG_4887.JPG

I was hoping to bolt the two sections together, but it doesn't look like it's going to work, so I'm going to try some clear silicone instead.
Up next, I'll hit it with some black primer and then satin black for the final coat. The sound card is almost ready. If anyone happens to have some good wav files for this prop, please feel free to post a link. I'm using a recording of a video I found online for now.
 
The 3D printing of the parts was very clean, but it did leave a good amount of small divets and tiny bumps that had to be removed and sanded down.
Every manufacturing method has it's issues. With resin prints, the support structures leave tiny bumps. At least the stuff is easy enough to sand down, compared to PLA prints!
I was hoping to bolt the two sections together, but it doesn't look like it's going to work, so I'm going to try some clear silicone instead.
I have found that JB Weld "plastic bonder" (NOT "plastic weld") is the best glue for that resin (aside from using liquid resin with a UV laser). I did quite a bit of testing different glues on it a few years ago. The JB stays ever-so-slightly flexible... just enough to let it handle shocks much better than (for example) superglue.
The sound card is almost ready. If anyone happens to have some good wav files for this prop, please feel free to post a link. I'm using a recording of a video I found online for now.
Someone uploaded the 'raw' sounds on Youtube. Is that the one you have? When I made the "poster blaster" those were the ones I used.
 
One trick with resin is to "glue" with the same resin and cure it until it is secure.
That's what I meant above, when I mentioned using a UV laser. The problem with that method is that you can't glue very thick pieces together. Once UV resin cures, it actually blocks UV light, so liquid resin in the center of two thick parts will not cure. Even a strong UV laser will only go maybe 2-3mm deep into resin and even that is pushing it. So the trick there is to do it in several thin layers. (Greenstuffworld has a good UV torch and small bottle of liquid resin that works pretty well.) In the case of this blaster, I think it might be doable... been a while since I looked at the files so I don't remember how thick I made the walls but they would be around 2mm or thereabouts. (The thickness varies throughout the model.)
 
Last edited:
It would not be very bright to glue without pinning first anyway. Solid parts should be drilled and aligned with a post before gluing.

The other option is, of course, to print the parts as "ready to be assembled" rather than resin chunks. They may as well be cast if they are going to be blocks of resin.

Printing allows for parts to precisely interlock, so it seems odd that assembly should be a problem.
 
It would not be very bright to glue without pinning first anyway. Solid parts should be drilled and aligned with a post before gluing.
This isn't a solid model. It's entirely hollow to allow for electronics. And depending on the model, even a solid part might not need pinning, depending on the weight. And printing "chunks", at least sizeable ones, is usually not a good method when it comes to resin due to the material cost as well as the strain heavy parts cause to the build platform.

Casting has its own issues, being messy and health-hazardous.
The other option is, of course, to print the parts as "ready to be assembled" rather than resin chunks. They may as well be cast if they are going to be blocks of resin.

Printing allows for parts to precisely interlock, so it seems odd that assembly should be a problem.
The parts in this model slot into each other. You still need a good glue for it.
 
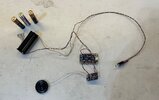
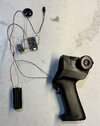
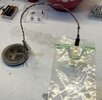
Over the weekend I finalized the soundcard setup. I didn't think the sound volume was high enough, so I considered a larger speaker, but the area inside of the blaster can't fit anything larger than about 1", which is the diameter of the speaker below. Also, after testing the setup with 3 AAA batteries, the volume is actually very good. I'm using an Adafruit sound card with an amplifier (smaller card below). I probably should have gotten the sound card with a built-in amplifier, but this amplifier has a volume pot, so it's easy to adjust with a small screwdriver:

IMG_4888.JPG

I had originally tried one and then two 3 cell batteries but after a couple of tests, they ran out of power quickly. The tutorial suggests using either 3 AAs or 3 AAAs. The AAs won't fit inside the grip area, so I opted for the 3 AAAs. I didn't have a AAA battery holder on hand, so I pulled one out of a small flashlight I got as a freebie from Harbor Freight Tools. One of the problems with this type of setup is that once the sound card is engaged, the LED light flickers or turns off, but with this setup (3 AAAs) I didn't experience this problem.

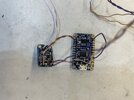
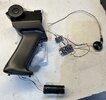
Adafruit doesn't appear to have a schematic (which I prefer to use) on their website, but they do have some nice tutorials, including one specific to the Han Solo blaster or any blaster for that matter. It's a fairly straightforward setup because we're only using one sound that gets repeated when the switch is engaged. For future reference, I'll draw up a schematic and post it at some point but for now here's a shot of the tops of the cards wired up:


IMG_4889.JPG

Both cards require power, so they're wired together via the power connectors (ground and positive), which also goes directly to the battery holder. An alternate way of connecting power is through the data connector using a smart phone battery with a standard USB/Data cable. This is the same connection used to transfer wave files. I have the sound card wired up so that it uses the first sound selection. The wave file is named "T01.WAV" for this selection. To create the wave file, I used the Audacity app to record the sound from a video of the Buck Rogers blaster. It actually sounds a lot like the same sound used for the Battlestar Galactica Viper laser cannons and probably is. The Audacity app allows any sound recorded to be trimmed and then saved as a wave file.

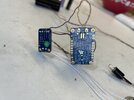
Here's a shot of the back of both cards:

IMG_4890.JPG
 
Very nice.

There is plenty of room inside the actual props. If you can create a large enough chamber to mimick this, you could reflect the sound, giving it a natural boost. You just need some gaps or holes to let the sound out.
 
Btw, the Galactica version appears to have the correct shaped hero tip. Later revisions were often cobbled together and replaced with simple, clear, acrylic tubes when they broke.
 
Last edited:
Unfortunately, I ran into some paint related problems at the end of the summer and basically had to start all over again, so that's one reason why it's taken so long to finally get to this part of the build. The good news is that the final paint job turned out really nice and now that all of the parts are full dried, I can start installing the electronics. At this point, the electronics are still testing good, so it's time to remove the battery pack and attach the button, monetary switch:

IMG_5010.JPG

As with any electronic project, the switch acts as a go between on the positive wire that connects the battery to the sound card/LED. I'm using purple wire to signify a positive connection, so I've attached two pieces to each end of the switch.

The switch is installed, just like the original prop with the lock washer and the nut attached to the outside of the handle:

IMG_5012.JPG

The battery back will eventually go into the handle so that the batteries can be easily replaced.
 
With the positive wire now attached to the switch, I've pulled it through the handle and have attached it to the battery box. The negative wire is attached to the LED and the sound card:

IMG_5044.JPG

I tested the switch with batteries installed and everything is still working perfectly.
Since the length of the wires attached to the LED are a bit too long, so I've cut them off, to make it easier to run them through the barrel section.
I've attached the LED to the clear, acrylic emitter using a little contact cement:

IMG_5045.JPG

I'll let this set over night before final assembly with the barrel section.
 
Probably the easiest part of the build is simply snapping the clear emitter into place:

IMG_5050.JPG

Definitely one of the nice options of 3D printing. :)

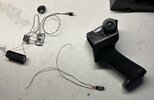
The speaker also needs to go into the barrel or "forward" section of the blaster. I tried lifting the speaker above the "speaker grill" area, but it sounded better right on top of it, so I've kept it in place will a little clear silicone:

IMG_5051.JPG

Once it's dried, I'll attach the boards with some mounting tape I found at the Dollar Store.
 

Your message may be considered spam for the following reasons:

If you wish to reply despite these issues, check the box below before replying.
Be aware that malicious compliance may result in more severe penalties.
Back
Top