BTTF: From Krups Coffina to Mr. Fusion - Discussion, Questions, Tips and Tricks

jhk1976

Well-Known Member
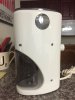
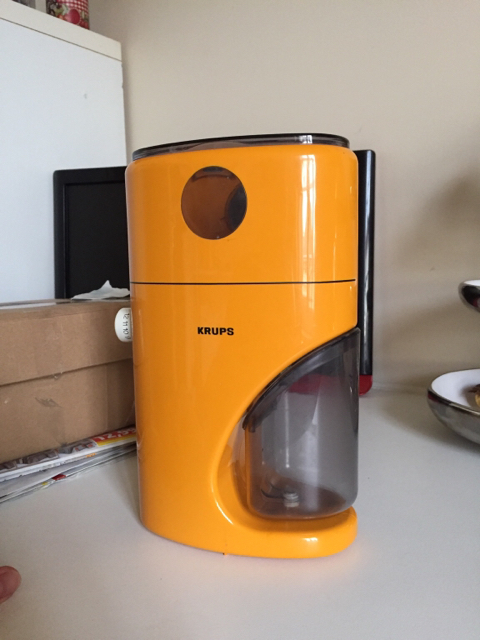
A couple of weeks ago, I managed to score a used Krups Coffina 223 Coffee Grinder on eBay, which I've decided to transform into a Mr. Fusion replica. The one I purchased didn't come with the box, manual or any accessories, but it's in was in marvelous shape for its age. I've read through some of the other threads on this forum on how to go about transforming it, but since those threads haven't been updated in some time, I thought I'd start up a new one.

IMG_6142.JPG

I've gotten as far as removing the imprinted Krups logo and black line from the unit. After trying mineral spirits with unsatisfactory results (suggested in one of the other threads),I elected to go with a color restoring compound for cars called T-Cut. This was suggested in James Bruton's "XRobots" video series featured on YouTube. Since he lives in the UK, I had to import a bottle, as this product doesn't appear to be otherwise available stateside. I selected it because it was able to remove the black imprinting without ruining the glossy finish on the plastic. Since my Krups doesn't appear to be yellowed from age, sanding and re-paining it wasn't necessary. I just needed to get the graphics off, and the T-Cut did a fine job.

IMG_6143.JPG

So from here, the next step will be to obtain or produce the Mr. Fusion graphics for each side. I'll likely go with a custom cut vinyl for this, but I was curious about how others approached it. I know there are sets of graphics available on eBay, but I've also seen water-slide decals used for more of a seamless look (this was Gary Weaver's approach on an archived Mr. Fusion modding page found elsewhere in these forums). Has anyone else tried this method? If so, how challenging is it to apply them? The impression I got was that it's a bit tricky.

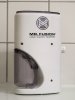
Then there's the base: the white lid, the red latch and the black housing -- a Singer Librascope Memory Core that I'm not imagining I'll have an easy time locating. I wasn't entirely certain I even wanted to mess with the base, but I wanted to see what other folks ended up doing for theirs. The aforementioned XRobots video series featured some 3D printed pieces which were then carefully glued together, pained and assembled. I don't have access to a 3D printer, nor do I have clue as to how much producing those pieces would ultimately cost. If anyone has any ballpark info on pricing, I'd be curious to know what something like that runs.

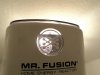
There was also some talk of using the base from the Diamond Select Mr. Fusion replica in another thread, but there didn't seem to be a definitive answer as to whether this would work or not because of the way the white lid wad molded together for the replica. Even if it did work, spending $300 on the Diamond Select replica just to get the base seems a bit much. Did anyone actually go that route?

Lastly, did anyone who managed to get a hold of a Krups 223 manage to find a manual for it online in PDF form? The ones sold on eBay sometimes come with the instruction booklet, and I was just curious about how the machine worked. I doubt I'll be grinding any coffee with this one, but I've toyed around with the idea of buying a second one for that purpose (I do love me some coffee).

Thoughts? Suggestions? Feedback? Feel free to share them below. :)
 
Last edited:
this is going to be exciting!! the bottom lid is very hard to fabricate... there are from time to time very pour recasts of Gary's lid and librascope. I don't recommended buying those because they have been recast so many times the lower lid is smaller then the kurps grinder.

this is a key give away for a certain time machine builder... the kurps stand out like a soar thumb

u might want to drop a line with Gary or Bruce and see if they have any resin casts of the lid and librascope. that's where I would start


Sent from my iPhone using Tapatalk
 
Yeah, I want to get a base for mine but after speaking to Gary it is so large that it takes quite a bit of resin to replicate. So for now, it just sits in my kitchen looking pretty.
 
this is going to be exciting!! the bottom lid is very hard to fabricate... there are from time to time very pour recasts of Gary's lid and librascope. I don't recommended buying those because they have been recast so many times the lower lid is smaller then the kurps grinder.

this is a key give away for a certain time machine builder... the kurps stand out like a soar thumb

u might want to drop a line with Gary or Bruce and see if they have any resin casts of the lid and librascope. that's where I would start

Sent from my iPhone using Tapatalk

Not a bad idea, but it was my understanding that Gary's getting out of the BTTF prop biz. Bruce might be worth a try though.
 
Not a bad idea, but it was my understanding that Gary's getting out of the BTTF prop biz. Bruce might be worth a try though.

Bruce's are just slightly reworked recasts of my older stuff. Just an FYI.

Funky's right, they take a bit of resin and a properly detailed latch is a ton of work. Once DST released their replica for $300-$350 there was no way to compete so I just sorta quit doing them. Still have all the molds and everything on the shelf, but they just collect dust these days.

-Gart

Thanks for the input, Gary.
 
Not a problem.

Just a note about building up a Mr Fusion. Although they are molded in white and the existing graphics can be removed - I've found from experience that it's still best to paint them up in white. I do that for two reasons - the plastic will eventually yellow. This was critical for car conversions because they are outside enough that it will turn super yellow pretty quickly. Secondly, if you have a base, you were going to have to paint it white and getting a match between the two without painting the top is almost impossible.

-Gary

Good point.
 
... So from here, the next step will be to obtain or produce the Mr. Fusion graphics for each side. I'll likely go with a custom cut vinyl for this, but I was curious about how others approached it. I know there are sets of graphics available on eBay, but I've also seen water-slide decals used for more of a seamless look (this was Gary Weaver's approach on an archived Mr. Fusion modding page found elsewhere in these forums). Has anyone else tried this method? If so, how challenging is it to apply them? The impression I got was that it's a bit tricky. ...

If it helps, here is my file for the Mr. Fusion sticker, I posted two years ago: http://www.therpf.com/showthread.php?t=67267&p=3233929&viewfull=1#post3233929

If you want to use a Vinyl cutting plotter, here is a file that I made especially for such plotters:

PDF version: Mr_Fusion_Sticker_Cutting_Plotter_Version_remade_by_Roland_Zubcic.pdf
Version for Silhouette Studio plotters: Mr_Fusion_Sticker_Cutting_Plotter_Version_remade_by_Roland_Zubcic.studio

A small instruction, how to use that file: You need 4 x 3 inches of Vinyl - the upper 4 x 2 inches (upper 2/3 of the sticker) is white Vinyl and the lower 4 x 1 inches is black Vinyl. Put the white and the black Vinyl on the same Vinyl carrier.

Preview picture:

attachment.png


This is the finished sticker on my own Krups grinder. The small letters of "HOME ENERGY REACTOR" and especially the "®" sign are very thin and difficult to cut and stick to the coffee grinder, but it works as you can see. :)

attachment.jpg


By the way: A seamless look is only needed if you want to replicate the Mr. Fusion version from the first movie. In the other two movies you can clearly see a rectangular seam around the black logo part.
 

Attachments

  • Mr_Fusion_Sticker_Cutting_Plotter_Version_remade_by_Roland_Zubcic.png
    Mr_Fusion_Sticker_Cutting_Plotter_Version_remade_by_Roland_Zubcic.png
    40.9 KB · Views: 1,958
  • mrfusion_sticker.jpg
    mrfusion_sticker.jpg
    64.6 KB · Views: 2,038
Last edited:
If it helps, here is my file for the Mr. Fusion sticker, I posted two years ago: http://www.therpf.com/showthread.php?t=67267&p=3233929&viewfull=1#post3233929

If you want to use a Vinyl cutting plotter, here is a file that I made especially for such plotters:

PDF version: Mr_Fusion_Sticker_Cutting_Plotter_Version_remade_by_Roland_Zubcic.pdf
Version for Silhouette Studio plotters: Mr_Fusion_Sticker_Cutting_Plotter_Version_remade_by_Roland_Zubcic.studio

A small instruction, how to use that file: You need 4 x 3 inches of Vinyl - the upper 4 x 2 inches (upper 2/3 of the sticker) is white Vinyl and the lower 4 x 1 inches is black Vinyl. Put the white and the black Vinyl on the same Vinyl carrier.

Preview picture:

http://www.therpf.com/attachment.php?attachmentid=598493&d=1456857325


This is the finished sticker on my own Krups grinder. The small letters of "HOME ENERGY REACTOR" and especially the "®" sign are very thin and difficult to cut and stick to the coffee grinder, but it works as you can see. :)

http://www.therpf.com/attachment.php?attachmentid=598496&d=1456857639


By the way: A seamless look is only needed if you want to replicate the Mr. Fusion version from the first movie. In the other two movies you can clearly see a rectangular seam around the black logo part.

That helps immensely, thank you Roland! I'll probably have several copies made in case I screw it up the first time. There's a sign shop near my workplace that produced paint masks for me back when I was trying to emulate the Valterra Skateboard paint job. I'll relay this info to them when the time comes. :)

Jay
 
If it helps, here is my file for the Mr. Fusion sticker, I posted two years ago: http://www.therpf.com/showthread.php?t=67267&p=3233929&viewfull=1#post3233929

If you want to use a Vinyl cutting plotter, here is a file that I made especially for such plotters:

PDF version: Mr_Fusion_Sticker_Cutting_Plotter_Version_remade_by_Roland_Zubcic.pdf
Version for Silhouette Studio plotters: Mr_Fusion_Sticker_Cutting_Plotter_Version_remade_by_Roland_Zubcic.studio

A small instruction, how to use that file: You need 4 x 3 inches of Vinyl - the upper 4 x 2 inches (upper 2/3 of the sticker) is white Vinyl and the lower 4 x 1 inches is black Vinyl. Put the white and the black Vinyl on the same Vinyl carrier.

Preview picture:

http://www.therpf.com/attachment.php?attachmentid=598493&d=1456857325


This is the finished sticker on my own Krups grinder. The small letters of "HOME ENERGY REACTOR" and especially the "®" sign are very thin and difficult to cut and stick to the coffee grinder, but it works as you can see. :)

http://www.therpf.com/attachment.php?attachmentid=598496&d=1456857639


By the way: A seamless look is only needed if you want to replicate the Mr. Fusion version from the first movie. In the other two movies you can clearly see a rectangular seam around the black logo part.

Follow up questions:

Do the graphics go on both sides of the Krups? The back side has several screws to work around.

IMG_6146.JPG

Also, from the photos you posted, it looks like you opted for the solid round sticker for the circular window? I can't quite tell. I know there's variants based on which film you're attempting to match it to. I envisioned using die cut black vinyl for the lettering, and die cut white vinyl for the window instead of a solid sticker.
 

Attachments

  • IMG_6146.JPG
    IMG_6146.JPG
    982.4 KB · Views: 353
Follow up questions:

Do the graphics go on both sides of the Krups? The back side has several screws to work around.

View attachment 598511

Yes, both sides have the logo. No worries about the screws - they are far away from the logo. :)

attachment.php


Also, from the photos you posted, it looks like you opted for the solid round sticker for the circular window? I can't quite tell. I know there's variants based on which film you're attempting to match it to. I envisioned using die cut black vinyl for the lettering, and die cut white vinyl for the window instead of a solid sticker.

What makes you think that my sticker isn't die cut? On the photo in my last post you can see that the background of the white logo is the naked plastic of the transparent grinder window (you can even see the other window of the backside through). Here's another picture that shows it better:

attachment.php


The die cut version with the white logo on transparent background can only be seen in the end of movie 1 and the opening scene of movie 2 (it was hand painted on the circular window). The rest of movie 2 and the whole movie 3 shows the inversed logo (transparent logo on black background).
 

Attachments

  • mrfusion_sticker2.jpg
    mrfusion_sticker2.jpg
    38.3 KB · Views: 3,465
  • mrfusion_sticker3.jpg
    mrfusion_sticker3.jpg
    36 KB · Views: 2,273
Yes, both sides have the logo. No worries about the screws - they are far away from the logo. :)

http://www.therpf.com/attachment.php?attachmentid=598518&d=1456862327


What makes you think that my sticker isn't die cut? On the photo in my last post you can see that the background of the white logo is the naked plastic of the transparent grinder window (you can even see the other window of the backside through). Here's another picture that shows it better:

http://www.therpf.com/attachment.php?attachmentid=598519&d=1456862658

The die cut version with the white logo on transparent background can only be seen in the end of movie 1 and the opening scene of movie 2 (it was hand painted on the circular window). The rest of movie 2 and the whole movie 3 shows the inversed logo (transparent logo on black background).

I couldn't tell if it was just a reflective silver or not. No biggie. Thanks for clearing it up.
 
Bruce's are just slightly reworked recasts of my older stuff. Just an FYI.

Funky's right, they take a bit of resin and a properly detailed latch is a ton of work. Once DST released their replica for $300-$350 there was no way to compete so I just sorta quit doing them. Still have all the molds and everything on the shelf, but they just collect dust these days.

-Gart

heh i didnt know that... i thought he bought all his stuff from you? makes me think differently now.. not very cool
 
I'm just here to post that @Gary Weaver II is a genius and personal hero of mine.

i as well have always looked up to gary as the "grand father" or "founding father" of the BTTF prop world. i miss back in the days with his website and parts runs. too many idiots ruined the BTTF prop community, and no matter how many times you try and start over they always seem to find their way back in and cause trouble all over again..

thats what i appreciate the most about gary is he's always willing to share, heck just the other day i asked for help on a lightning catch rod and right away he gave me a ton of info and where to start..

i also hear he's tired of the bttf prop world and wants to move on, i really hope not because he's the only one willing to share all his knowledge... every other bttf prop maker is strictly business and won't share... which is a shame.

if gary disappears whats left of the bttf time machine community is going to be hurting... and left completely in the dark

see gary stick around we all need you!! ;)

- - - Updated - - -

I think it's okay if he's done it with Gary's permission.

yes i agree
 
Oh... I can assure you that he did NOT do it with my permission. I busted Bruce years ago with selling copies of my Fusion Bases and slightly reworked lids. He added some goofy details to the base but didn't correct a few blemishes that were only original Librascope base used to make all the Gen 1 kits. They were still visible in his built up parts. When called out about it he claimed to have gotten them from someone else, but that's Bruce's MO for all this BS in the past - "it was someone else".

It's old history and frankly I could care less these days, but it still happened.

-Gary

I think it's okay if he's done it with Gary's permission.
 

Your message may be considered spam for the following reasons:

If you wish to reply despite these issues, check the box below before replying.
Be aware that malicious compliance may result in more severe penalties.
Back
Top