BRRogers / Verity Cosplay / 7 Chambers - "MoM of All Heroes"

Wait, so these aren't in stock?
They are… Lewis did say “soon” not “right now”. I make the distinction because he gets in trouble for lead times when he says “soon”. But they ARE in stock.

Waiting a little while there are
those in this thread that have waited far longer (coolhanluked did he follow up yet?) If you’ve ordered recently you are more likely to get everything you need.

For instance the updated helpers he’s been waiting to get in for MONTHS just arrived last Monday. He’s got to de-panel them and get them out to people who’ve been waiting the longest
BE62C952-BD70-40B7-8FC4-6E811DC4547E.jpeg


And of course, he moved into the building with his local machinist and is restructuring the way he does everything.

1274C933-5C7A-4B65-876E-F19EBAAACDC5.jpeg


So the reality is that while there are still customers out there that feel they’ve been left with the short stick from the first, second, third batches he has been following up slowly.
Properly packed and fitted Gen 2 Hero batches and new helper boards coming out of his new setup *should* come through much faster relative to previous deliveries. Someday soon they may be able to go out same day but in the meantime I’d say give it a couple weeks if you can stand it.
 
Last edited:
Apologize for my apparent ignorance, but is there a trick to getting the clamp card to slide into place? It seems too wide to insert into the grooves, and I am not seeing any mechanism that loosens/tightens the ‘clamp grooves’.
 
Apologize for my apparent ignorance, but is there a trick to getting the clamp card to slide into place? It seems too wide to insert into the grooves, and I am not seeing any mechanism that loosens/tightens the ‘clamp grooves’.

You need to sand it to fit if its too wide. It doesn’t need much and it is kinda soft to sand.
 
if you’re going to spend a few bucks on something to sand it I would get a coarse file. You can lay the file on your table flat. And then push the card over the file surface until the fiberglass substrate on the side has the friction fit you’re looking for.

If you have an issue with the card after you attempt the fitment shoot me a PM
 
Apologize for my apparent ignorance, but is there a trick to getting the clamp card to slide into place? It seems too wide to insert into the grooves, and I am not seeing any mechanism that loosens/tightens the ‘clamp grooves’.
There might be a better way, but I had to sand down the edges until it fit snuggly
 
if you’re going to spend a few bucks on something to sand it I would get a coarse file. You can lay the file on your table flat. And then push the card over the file surface until the fiberglass substrate on the side has the friction fit you’re looking for.

If you have an issue with the card after you attempt the fitment shoot me a PM
Thanks, man!
 
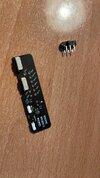
So these are v3 boards already?
It’s the second version generally speaking… switching out all the components and newly adjusted traces as well.

With first board (second+ batch) the slide switch was the primary thing removed. With supply chain issues Lewis had to supply those separate in the bag. So, you could say that was board 1.5.

(Basically >> This is the true Gen2 board.)
Yeah I got that for my Gen2 MoM, with the DIY button, kinda weird.

300027147_584907569962584_1076315354217372376_n.jpg

But as I see you changed the side buttons also since. I hope you don't mind me asking, but why not those ones came with the Gen2 hilts?
 
Last edited:
Yeah I got that for my Gen2 MoM, with the DIY button, kinda weird.

View attachment 1611188

But as I see you changed the side buttons also since. I hope you don't mind me asking, but why not those ones came with the Gen2 hilts?
Simple answer; Lewis finally got those in (months after promised delivery) on August 2nd… frustratingly and cripplingly later than the factory originally quoted (due to component shortages… so basically the same old story from the past 2 years of dealing with foreign production)
Gen 2 hilts were supposed to get them but Lewis had a lot of stock of “1.5” ready… so he sent them out.

So yes: the buttons are new because the supplier is able to supply and we found a footprint that should be more durable in the long term. The LEDs are new because they are simple red and green… the neopixels were experience a lot of dead Red LEDs and couldn’t be programmed for a variety of other boards like the ones from plector labs etc…
And the slide switch is a better regulated-modern switch with more consistency.

So basically anyone who has issues with the original helper. Or “1.5”, or wants the Gen 2 helper should get a hold of Lewis directly or use the form I posted above.

He’s still working on de-paneling them but I’m told there is extra for those struggling with the earlier helpers.

(That is to say, if you’re not having any issues with the original helper boards that’s fantastic! Keep and use them!)
 
So yes: the buttons are new because the supplier is able to supply and we found a footprint that should be more durable in the long term. The LEDs are new because they are simple red and green… the neopixels were experience a lot of dead Red LEDs and couldn’t be programmed for a variety of other boards like the ones from plector labs etc…
And the slide switch is a better regulated-modern switch with more consistency.

So basically anyone who has issues with the original helper. Or “1.5”, or wants the Gen 2 helper should get a hold of Lewis directly or use the form I posted above.

So the buttons are better, the leds are better and the switch is deffinitely better. I mean, of course I would like to install the new, improved and better one.
 
So the buttons are better, the leds are better and the switch is deffinitely better. I mean, of course I would like to install the new, improved and better one.
Those are the pros, there are some cons but for the sake of a functional product, the cons (mostly aesthetic) are negligible.
But yeah if you feel strongly about the new one go ahead and ask mr LP about it :)
 
100%
MoM of All Heroes - 21700 Proffie 2.2 Chassis For Chamber by drizzt1234
This is the chassis designed by Adam to pair with the chamber, we have plans for a printable metal ‘complex’ chassis but haven’t gotten there yet.
There are other well done chassis out there but I haven’t been able to keep track of them so you’ll need to dig into the FX-Saber forums or Facebook groups

How is development going for a printable metal chassis? I understand if it's on hold, but would like to know the E.T.A. if there is any at the moment.

Otherwise I'll probably use the chassis you linked here for my setup in the meantime.
Thankful for a reply, and best wishes to you all!
 
How is development going for a printable metal chassis? I understand if it's on hold, but would like to know the E.T.A. if there is any at the moment.

Otherwise I'll probably use the chassis you linked here for my setup in the meantime.
Thankful for a reply, and best wishes to you all!

Hi,
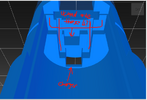
Got this chassis printed out and I have some questions. It is obvious where the pogo connector the speaker etc goes, also the charger port. But what are the purpose of those cuts? Could they be used to make the battery removable? I was thinking about putting the spring/metal there to hold one side of the battery and other side maybe could go on the bottom of the chassis somehow? So when we unscrew the crystal chamber we disconnect the battery and it could be just slid out?

1661723473254.png


Edit:

So my idea is, that on the chamber's bottom there is this space
Screenshot 2022-08-30 114226.png

and if it would be possible to 3D print a socket there that can hold any of these battery contacts and it will still have enough space for wiring. The other battery contact would go there at the end of the chassis.
 
Last edited:
Hi,
Got this chassis printed out and I have some questions. It is obvious where the pogo connector the speaker etc goes, also the charger port. But what are the purpose of those cuts? Could they be used to make the battery removable? I was thinking about putting the spring/metal there to hold one side of the battery and other side maybe could go on the bottom of the chassis somehow? So when we unscrew the crystal chamber we disconnect the battery and it could be just slid out?

View attachment 1612334


Edit:

So my idea is, that on the chamber's bottom there is this space
View attachment 1612647

and if it would be possible to 3D print a socket there that can hold any of these battery contacts and it will still have enough space for wiring. The other battery contact would go there at the end of the chassis.

Something to think about is you're probably not going to ever want to take the crystal chamber out once you've finished wiring since it screws in. The chamber's instructions recommend either using a chassis pogo pin setup or wiring the chamber to the chassis outside of the saber and twisting the entire assembly in together. I can't think of any real way you could have battery contacts there along with a pogo connector. At least not without redesigning the chassis. I'd imagine you'd need to go back down to an 18650 for that.

I think the slots you asked about are just meant for running the thick battery wires through cleanly to the charging port.

For me it is not about removing the crystal chamber but to being able to pop out the battery anytime I want, without soldering.
 
Does anyone happen to know if all of the missing chamber greeblies have been shipped or are people still waiting on them? I sent an email through the site, but haven't heard back yet.
 
Does anyone happen to know if all of the missing chamber greeblies have been shipped or are people still waiting on them? I sent an email through the site, but haven't heard back yet.
Hit or miss, some have gotten them. Some are still waiting
 
Back
Top