blickfangQ2 - Iron Man MK46 XLVI - lifesize NECA statue refinish

blickfangQ2

Well-Known Member
Hi everybody,

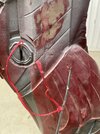
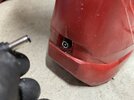
every once in a while I take opportunities that present themselves. I was able to get my hands on one of the last NECA 1:1 IronMan 46 statues in Germany.
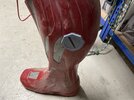
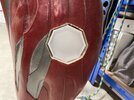
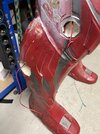
Since the finish is questionable to say the least, I knew I had to overhaul the whole statue and finish it closer to my understanding of quality

My plans are pretty straightforward:
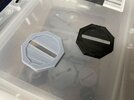
1) replace all reactor-screws
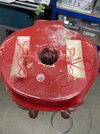
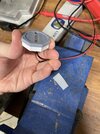
2) replace the Arc Reactor
3) replace the eyes
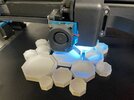
4) put LEDs in every bit that lights up - so cable management through foam is needed
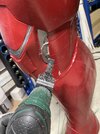
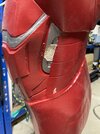
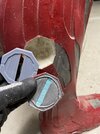
5) grind all seam lines out and touch up all blemishes that I can find
6) maybe add some vent details and other little things that I might want to make more accurate
7) coat everything in ****** let’s say something for now. I’m not sure yet…
8) prime and finish
9) convince the wife to let it stand in the living room
 

Attachments

  • 81430DC0-DA67-4348-BE71-4EBBABD0E937.jpeg
    81430DC0-DA67-4348-BE71-4EBBABD0E937.jpeg
    885.2 KB · Views: 143
Started printing and wasn’t satisfied with the results. So I threw the parts on my resin printer. Much better!
Built the reactor screw in fusion360 :cool:
 

Attachments

  • D25F1933-3C09-4FE6-A4F3-AEDB624E1BD0.jpeg
    D25F1933-3C09-4FE6-A4F3-AEDB624E1BD0.jpeg
    3.4 MB · Views: 88
Starting cutting:
 

Attachments

  • 8F539A3C-3730-4307-8351-E74FC3D21DE5.jpeg
    8F539A3C-3730-4307-8351-E74FC3D21DE5.jpeg
    1.5 MB · Views: 103
  • 90141AE1-2CC7-44F3-8BC3-98BE335E5CF8.jpeg
    90141AE1-2CC7-44F3-8BC3-98BE335E5CF8.jpeg
    1.5 MB · Views: 98
  • 89366FA8-4AD3-40C7-B570-F21C6962816B.jpeg
    89366FA8-4AD3-40C7-B570-F21C6962816B.jpeg
    1.9 MB · Views: 109
Cable Management: I use a thick steel wire to poke through the foam core. Angled the tip on one side so I can twist the wire to change directions.
It’s a lot more complicated than I thought though… for the longer distances I go from reactor to reactor instead of all the way to the collecting stomach area.
 

Attachments

  • 47261FF9-9AE8-4796-8D65-8EBA0AC7A96F.jpeg
    47261FF9-9AE8-4796-8D65-8EBA0AC7A96F.jpeg
    2.2 MB · Views: 92
  • 87650756-C4C4-4DB5-A583-46C779C099BE.jpeg
    87650756-C4C4-4DB5-A583-46C779C099BE.jpeg
    1.9 MB · Views: 87
So another weekend and I made some progress:
Did some cable management and pulled all the cables with the cords I poked earlier. I really underestimated how stiff the foam core is.
Printed the back covers for the lights in white PLA so I get the most brightness out of the led lights. Will add a Diffusor plastic strip too so it’s hopefully even light without hotspots.
 

Attachments

  • 442F8DB2-80C0-43B4-96A5-C6D1694F0FC2.jpeg
    442F8DB2-80C0-43B4-96A5-C6D1694F0FC2.jpeg
    3.9 MB · Views: 106
  • F84177A4-83CE-498B-A0C3-71357B164851.jpeg
    F84177A4-83CE-498B-A0C3-71357B164851.jpeg
    2.8 MB · Views: 93
  • 8B362B71-3665-454C-9ED0-172B531FD380.jpeg
    8B362B71-3665-454C-9ED0-172B531FD380.jpeg
    3.6 MB · Views: 91
  • 098139F9-502A-49DD-B85B-AFFCDE3408B3.jpeg
    098139F9-502A-49DD-B85B-AFFCDE3408B3.jpeg
    1.6 MB · Views: 102
  • C4218A2E-80EA-451C-9D91-7C5D1DC90C33.jpeg
    C4218A2E-80EA-451C-9D91-7C5D1DC90C33.jpeg
    5 MB · Views: 97
  • C3DA230D-5608-4524-91D2-5EF928D2A2D9.jpeg
    C3DA230D-5608-4524-91D2-5EF928D2A2D9.jpeg
    1.9 MB · Views: 90
  • F9585C53-8746-4413-B3F0-10933E990C43.jpeg
    F9585C53-8746-4413-B3F0-10933E990C43.jpeg
    2.6 MB · Views: 91
Unfortunately I have to face some problems.
When I sand the original paint comes off and reveals a rubbery 2-3mm silicone coat before I get to the foam core. To seal that silicone I tried to use Mod Podge but I really disliked the stroke lines I got even when using a foam brush. So I tried to sand them down and got this:
6F3AF4B5-06A5-43B1-A73E-3554384B152C.jpeg
The Mod Podge chips off! I even applied spray adhesive on another part and got the same result..
I‘m thinking about covering everything in some kind of resin to make the surface stiff, but I’m afraid even that would crack.

For filling uneven areas it looks like plastic filler works good:
E7B9A07E-9071-490C-940E-4608DED3759C.jpeg
 
Perhaps a thin coat of an epoxy resin would be a solution? Something like xtc-3D may work well as a brushable solution. It’s gonna add a bunch of sanding work to your project though
 

Your message may be considered spam for the following reasons:

If you wish to reply despite these issues, check the box below before replying.
Be aware that malicious compliance may result in more severe penalties.
Back
Top