Blade Runner Blaster news: model kit version of the Tomenosuke Blaster is coming

Sent my payment last night and it should be on its way to me soon. I'm hoping that somebody (hint hint!) puts up a YouTube instructional video on how to assemble this prop. I would like to blue/paint it up to look like it did in the movie.
 
Mine is on it's way to me. I would be interested in a machined barrel also.

Paul

I've got my kits so I can measure the barrel for machining. I'll do a prototype this weekend and see how it works out.

It'll be interesting to see what's involved in cleanly cutting off the plastic barrel. There is a metal plate and slug cast into the barrel to add weight. The rear end of the barrel is open about an inch deep so it should be fairly easy to cut off (and through the metal plate as well) then file or mill the stub up to the front of the frame.
 
Last edited:
Mine arrived here in western Canada today. I thought it felt light, but it was just a trick of how it was centered in the larger shipping box. The actual parts are satisfyingly weighty. Beautiful kit. Exactly what I wanted.
 
I've got my kits so I can measure the barrel for machining. I'll do a prototype this weekend and see how it works out.

It'll be interesting to see what's involved in cleanly cutting off the plastic barrel. There is a metal plate and slug cast into the barrel to add weight. The rear end of the barrel is open about an inch deep so it should be fairly easy to cut off (and through the metal plate as well) then file or mill the stub up to the front of the frame.

Can't wait to see these!
 
I just put mine into my po track and trace and the details are shown. I'd guess it be the same for you to?
 
Thanks! Now where's the video? lol! I think the hole in that thumb switch is too small. The spring will fit but the pin doesn't at all.

I was holding out on building the Sid because the screw holes get more and more worn out when you assemble and then disassemble. This is due to the softness of the metal.


Trial and error. :lol The screws are grouped by button head sockets, flat head sockets, countersunk phillips and slot head machine screws. Follow the instructions which call these out by type, M number (mm diameter) and length. If metric isn't your thing have a metric ruler to hand. According to the instructions there are four M2 L4 phillips screws but I had two M2 L4s and two that were shorter; I used those to fix the Ejector Rod Block into the frame, part 35; they seem correct for that. (Note it is fitted from the INSIDE of the two flanges on the rear of the frame, but really there's only one way to do it).


You should have seven pins with your kit. The three large pins are used for the two triggers and the lower attachment of the grip frame to the frame. They are all the same size. The others are all small, and different - they are for the ejector, the hammer, the thumb catch and the "hand" of the rear trigger.

First insert the brass tubes AKA part 61, 'trigger collar' into each trigger. These tubes each retain a spring of the same design but a different weight (and if someone can tell me which spring is which I'd be really grateful. Currently I have the heavier spring in the rear trigger but I'm not sure that's correct at all.)

For the front trigger, fit the Cylinder Stop part along with the spring by inserting the collar. For the rear trigger just fit the spring - you will need at least three hands for this. Then attach the Hand, part 39, to the rear trigger. Note the small pin for this has to be pressed into the Hand - you'll need grips for this and it works best done from the inside rather than the outside as suggested by the instructions. The Hand also retains a spring, no mistaking that one but get it the right way around. Now you can fit both triggers into the receiver using the pins. These need force to be pressed into place.

For the thumb switch the smallest pin (really tiny, has two diameters) and spring fit inside the small hole that faces the main screw which holds it onto the body of the gun and are retained by that screw. The whole deal attaches via, on the inside of the frame, a small brass collar which inserts into the ABS and on the outside the large washer. Then the screw and the smaller oval washer finish the job. Fit the pin and spring first. They're shown over on the right on diagram 4 - but it's really not clear where the hell they go till you look at the exploded view. Disclaimer; I haven't got all this right yet and it doesn't work properly. :lol


It's larger than I expected, too. I don't have a Sid but this is a bit bigger than a Rick Ross. Couple of mms taller, receiver is about 7mm longer, grips are bigger.
 
I'm not at all up to scratch in the lore of this gun really, but I don't think that is known. I don't know if it's accurate or not, but I'm hoping to somehow get that "oily blue-brown" look you see on some real firearms. Years ago I had a paintinch technique to mimic the look, onvolving the use of blue citadel Color ink, which shifted in tone, but that stuff is no longer available. Been thinking of seeing if there is a way to extract ink from magic markers and making some kind of solution that can be sprayed with an airbrush, because that stuff also gives a shifting tone...

Thanks. Think I am gonna chicken out and see what other people do before I move on this. :lol

Thanks! Now where's the video? lol! I think the hole in that thumb switch is too small. The spring will fit but the pin doesn't at all.

Urrgh, I don't have a good voice for recording. Saying I sound like Richard Taylor would be kind. I might make a quick stab at it, we'll see. Equally I may run and hide in shame. :lol

You are using the smallest pin, right? It has two diameters, i.e. a thicker end and a thinner end, with a step.
 
Yes, the stepped one. The spring goes fully in the hole and the thin end of the pin goes in the spring and hole, but thats where it stops. The thicker end doesn't go in at all. I'm assuming it should go in enough that only a little sticks out?

I built small sub assemblies and then used the bags to group parts that go together. I'm thinking that I'll blue this before I assemble fully. I'd hate to have to take those triggers apart after I finally got them together.
 
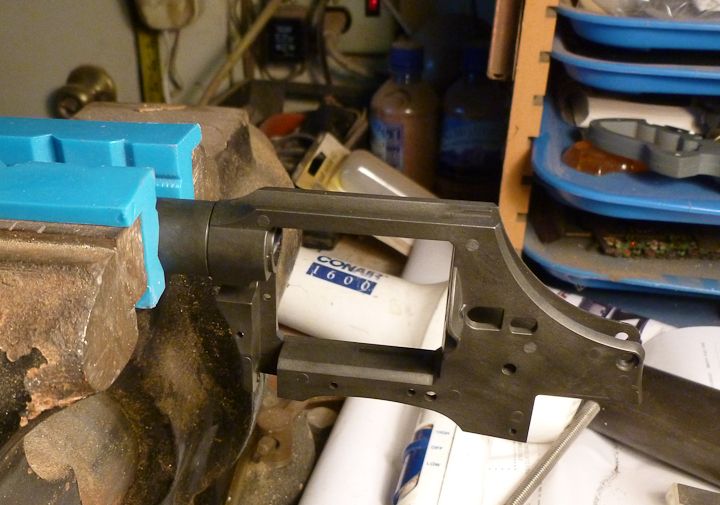
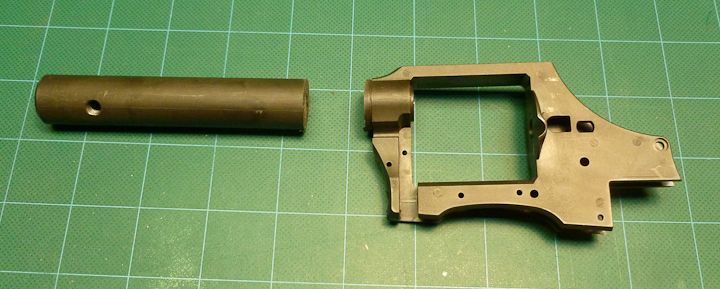
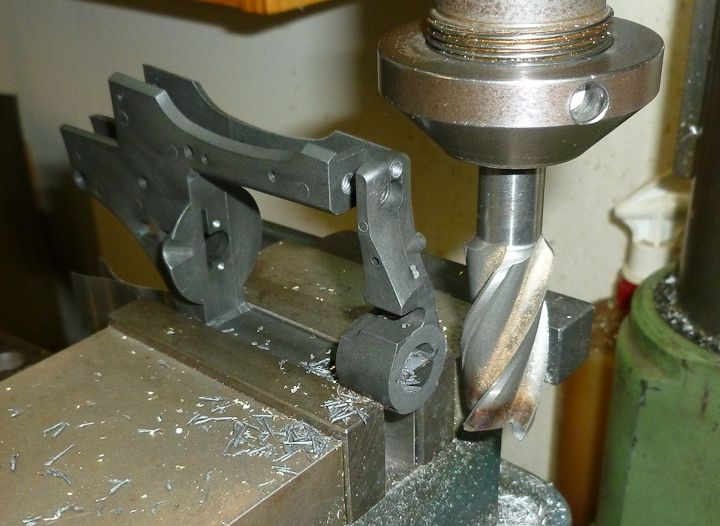
Dammit! Somebody had to be the first to whack off the barrel! Didn't hurt that I had some wine first.

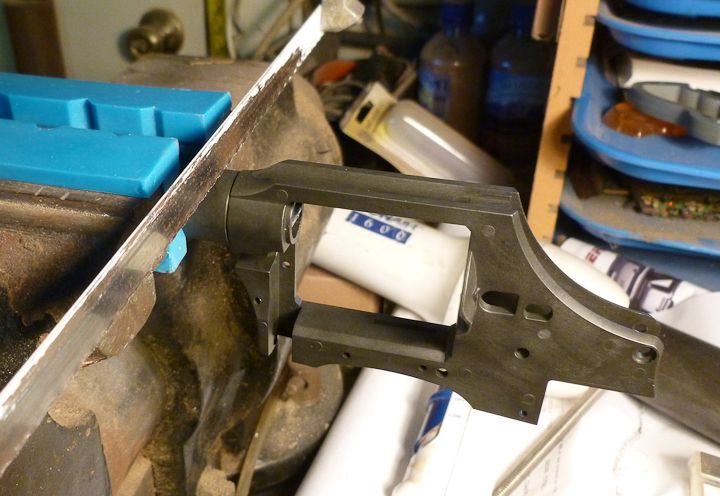
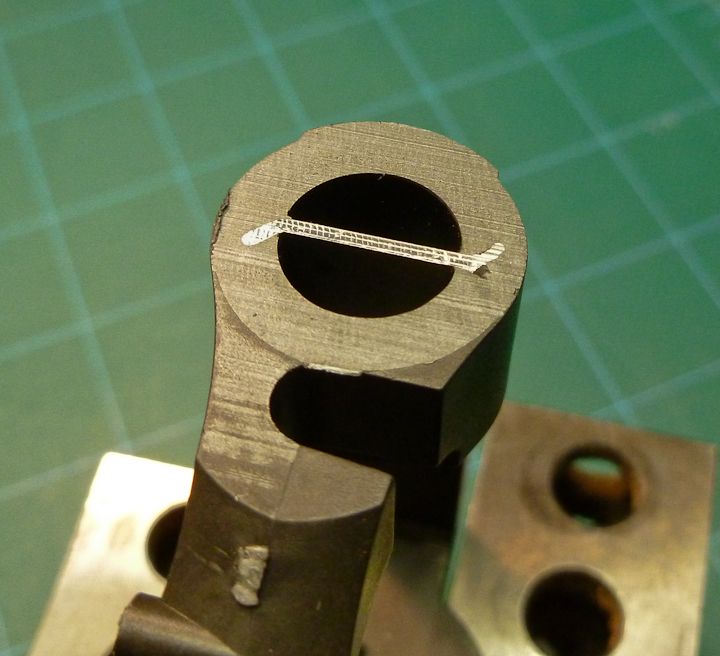
Clamped the barrel in a vise and cut through about 3/32" in front of the face of the frame. I didn't want to cut right in the groove since that might damage the frame. It cut really easily with a fine tooth hacksaw. The barrel is hollow at this point and the flat metal bar is zinc.


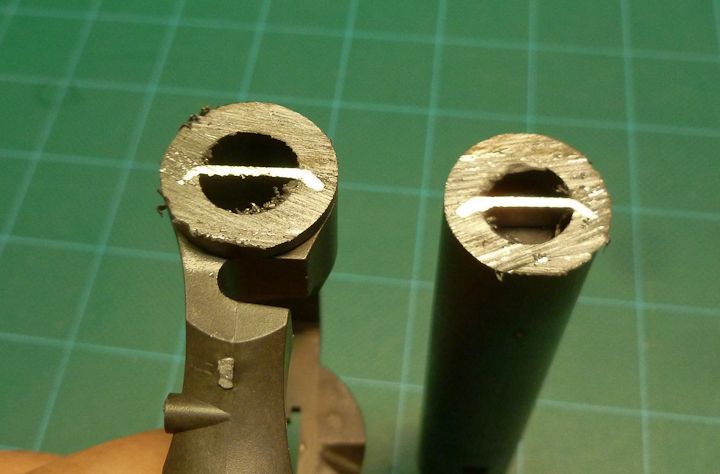
After I made the cut I discovered that the bar was not flat, but had bent edges, to make it cast in place more securely.


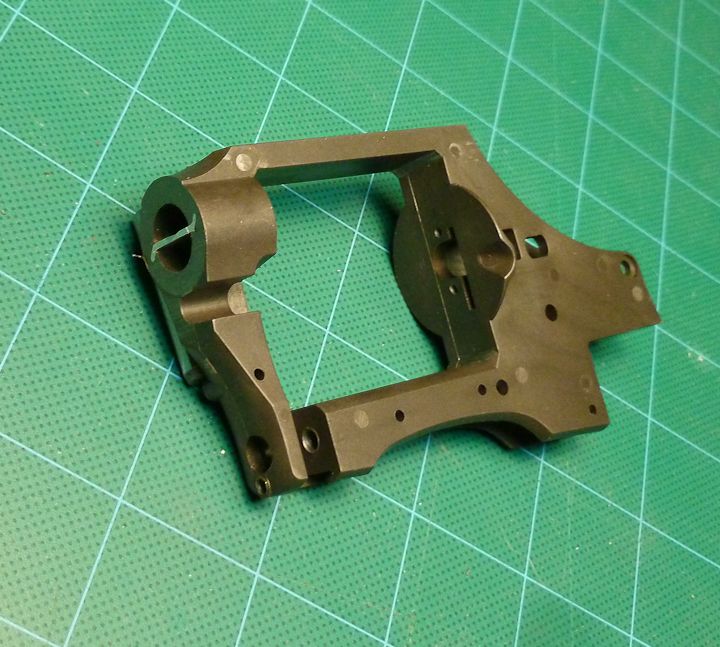
The frame was clamped in the vertical mill and the stub end of the barrel milled flush with the front of the frame. This step could be done with a file very carefully, My intent is to turn a shoulder on the steel barrel that will slide into the hole in the front of the frame to align the barrel straight. So if this surface isn't filed perfectly square it shouldn't affect the alignment of the barrel.


After I milled the barrel flush I discovered that the exposed metal bar was zig zag shaped. So the bent edges must be notched and alternate back and forth for even more casting rigidity.


My original intent was to file or grind the flat bar out but the zinc is pretty tough for such a delicate operation. So I guess I'll just slot the shoulder to fit around the bar. This should help with the alignment anyway. Next step, turning a prototype steel barrel.

 
Great! Nothing so far that I can't match to some kind of not-totally-awful standard with a saw and hand file, so I'm not scared yet. :)

Clutch, I'll pull mine apart tonight and see if I can offer any insights. My stepped pin is currently standing in for the missing ejector pin, lol.
 
Has yours made it through UK customs yet? Mine arrived there this morning.
Awaiting charging, so it states. Mine got there same day the other guys in States first got theirs its been stuck there some time :(
If I'm right it then has to go to the local distribution center, so earliest I'm likely to see this with the Bank holiday next week will be round Wednesday I'm guessing (dread to think what the charge will be mind - processing cost plus 20% item value).

Yeah, charges are going to be hefty! :angry You've got to love this countries tax laws!! Sounds like it's going to be worth it though! :D
 
Clutch - ripped mine apart again and the stepped pin FALLS into the hole in the thumb catch. Tolerances aren't exactly fine. It only might seem difficult if you're getting the angle a little bit off. Try using tweezers...seriously, the hole should swallow that pin. It should drop right in; if not maybe a pin vise and small bit will open it out.
 
This thread is more than 7 years old.

Your message may be considered spam for the following reasons:

  1. This thread hasn't been active in some time. A new post in this thread might not contribute constructively to this discussion after so long.
If you wish to reply despite these issues, check the box below before replying.
Be aware that malicious compliance may result in more severe penalties.
Back
Top