You are using an out of date browser. It may not display this or other websites correctly.
You should upgrade or use an alternative browser.
You should upgrade or use an alternative browser.
Blade Runner 2049 Joi's Emenator
- Thread starter Djblingbling1
- Start date
willrhami
Member
Hey all! I've been looking for an emanator for a while now, I found a file I like that even has a model of the box that it comes in, which is great. so, in the picture from The Art and Soul of Blade Runner 2049 (great book by the way) of the actual prop, there's a clear exterior package seen in the movie, and in the art book you can see an exterior orange hard case that is only seen on screen THROUGH the clear packaging. (sorry for the bad image quality y'all)


I swear I've seen the clear package before and actually held one in man hand, if anyone knows what its called that'd be a huge help, however, the orange case is much weirder. This seems way too well made to be a custom piece, I'm thinking that maybe they got it in a store? I've heard from several professional industry prop makers that working with plastic molding ESPECIALLY with clear parts is something they try to avoid as it sucks up time doing multiple molds to get it just right and all that, but there's a chance they took that time. Does anyone know anything about this orange case?
(Also, are there any developments on the sound installations inside the thing? Thanks guys!)
willrhami
Member
this is a SUPER old thread, I know, but I had a few questions about your model (which is fantastic by the way).
- could you realistically fit a small speaker and a sound chip in here, or is that just asking too much?
- is this made to be used with the metal rail you guys identified a while back/does it work with it?
- is there a file for a box that fits the emanator you designed that you know of?
thanks so much man!
NoahSimpson
Active Member
So I work at an office supply store and can tell you for sure that it's what small electronics like laptop power adapters and toner cartridges come in. Hope this helps.Hey all! I've been looking for an emanator for a while now, I found a file I like that even has a model of the box that it comes in, which is great. so, in the picture from The Art and Soul of Blade Runner 2049 (great book by the way) of the actual prop, there's a clear exterior package seen in the movie, and in the art book you can see an exterior orange hard case that is only seen on screen THROUGH the clear packaging. (sorry for the bad image quality y'all)
View attachment 1286678View attachment 1286677
I swear I've seen the clear package before and actually held one in man hand, if anyone knows what its called that'd be a huge help, however, the orange case is much weirder. This seems way too well made to be a custom piece, I'm thinking that maybe they got it in a store? I've heard from several professional industry prop makers that working with plastic molding ESPECIALLY with clear parts is something they try to avoid as it sucks up time doing multiple molds to get it just right and all that, but there's a chance they took that time. Does anyone know anything about this orange case?
(Also, are there any developments on the sound installations inside the thing? Thanks guys!)
willrhami
Member
I must have missed this message somehow, and that does help a lot actually, thank you! ill look into it! I just re opened this project after a while of not gathering information and was considering it again, with that orange box I mentioned, so that's great, thank you! I love this community on this site, its such a diverse group of people helping each other out, just like this, and I appreciate that. thanks again.So I work at an office supply store and can tell you for sure that it's what small electronics like laptop power adapters and toner cartridges come in. Hope this helps.
ajaxjones
Active Member
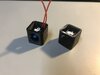
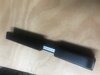
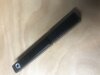
Love this prop, just finished remixing some of the available models so that it fits better and makes for better printing in resin. Also re-worked the internals to actually allow it to light up. Came up with a neat battery holder to take a couple of watch batteries and using magnets to make the power connections.
Attachments

willrhami
Member
Dude, after all these years, I randomly today just started working on this, and in the middle of thinking about electronics and how to do them this was posed and I got a notification on my email. that's a sign. and thank you, im gonna check It out now!Love this prop, just finished remixing some of the available models so that it fits better and makes for better printing in resin. Also re-worked the internals to actually allow it to light up. Came up with a neat battery holder to take a couple of watch batteries and using magnets to make the power connections.
willrhami
Member
I was looking at that switch and I was wondering where you got it, asme with the battery holder? I've ben looking for those pieces on and off for a while nowLove this prop, just finished remixing some of the available models so that it fits better and makes for better printing in resin. Also re-worked the internals to actually allow it to light up. Came up with a neat battery holder to take a couple of watch batteries and using magnets to make the power connections.
ajaxjones
Active Member
Dude, after all these years, I randomly today just started working on this, and in the middle of thinking about electronics and how to do them this was posed and I got a notification on my email. that's a sign. and thank you, im gonna check It out now!
there are some nice little 7mmx7mm latching switches that do the trick for the power. The alternative as well is to locate the batteries in the lower part and run the wires up the middle. I decided to lower the position of the switch and store the battery above that.
willrhami
Member
Thats smart! I'll be looking into that for sure. its gonna be interesting to figure it out for sure haha!there are some nice little 7mmx7mm latching switches that do the trick for the power. The alternative as well is to locate the batteries in the lower part and run the wires up the middle. I decided to lower the position of the switch and store the battery above that.
ajaxjones
Active Member
you should be able to find them on ebay etc. lots of suppliers selling the same thing.I was looking at that switch and I was wondering where you got it, asme with the battery holder? I've ben looking for those pieces on and off for a while now
The batteries are 2x LR626 with a LED @ 5v , but the battery holder I designed myself and they are held in with 6mm x 2mm magnets at each end to squeeze the wires into contact
willrhami
Member
Hey there, Ive been tracking your build fo a while now of the emitter without the rail piece, and I was wondering how you did electronics. I have been trying to figure out the battery and ave had a strange time trying to figure it out, do you have any advice? Thanks!Just wanted to throw up some pics of my all printed version I'm working on.View attachment 786726View attachment 786727View attachment 786726View attachment 786727
I ended up ordering a metal slide for my other version. Ill post pics if it works out.
Hey there, Ive been tracking your build fo a while now of the emitter without the rail piece, and I was wondering how you did electronics. I have been trying to figure out the battery and ave had a strange time trying to figure it out, do you have any advice? Thanks!
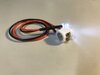
I use 3 LR41 coin cell batteries. I make a custom holder that fits in the emanator body. It's tough. I've changed things a little between runs. Always looking for a better option. Wireless charging would be ideal, but there's just no room for what's available out there.
willrhami
Member
Yeah, it's TOTAL mess. And Im trying to fit in a speaker too.  It's going to be REAL rough. But its worth it.
It's going to be REAL rough. But its worth it.I use 3 LR41 coin cell batteries. I make a custom holder that fits in the emanator body. It's tough. I've changed things a little between runs. Always looking for a better option. Wireless charging would be ideal, but there's just no room for what's available out there.
willrhami
Member
Hey, so the battery. where do I even put this thing? do I just have to put it at the bottom of the top section, or do I put it somewhere else? and if it does go in the top section, how do I even get it out if batteries die? just a bit confused. thanksLove this prop, just finished remixing some of the available models so that it fits better and makes for better printing in resin. Also re-worked the internals to actually allow it to light up. Came up with a neat battery holder to take a couple of watch batteries and using magnets to make the power connections.
ajaxjones
Active Member
I put mine in the top section, using 2x SR626 cells its small enough to easily slide in and out. You could put them in the bottom section but you would need to hollow out the slider to fit them as well as a hole through the middle.Hey, so the battery. where do I even put this thing? do I just have to put it at the bottom of the top section, or do I put it somewhere else? and if it does go in the top section, how do I even get it out if batteries die? just a bit confused. thanks
wayouteast
Sr Member
Can someone be so kind to recommend what kind of black paint I should use? and dose it need a base coat of a different colour?
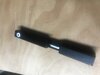
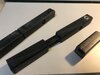
I used grey Taniya Surface Primer on mine, followed by a rattlecan satin black (Hycote XUK0271) for the main housing and Molotow chrome for the internal 'extension' bit. Printed in resin on an Elegood Mars.
Similar threads
- Replies
- 4
- Views
- 314
- Replies
- 0
- Views
- 286
- Replies
- 1
- Views
- 360
- Replies
- 10
- Views
- 1,221