So beautiful!!
You are using an out of date browser. It may not display this or other websites correctly.
You should upgrade or use an alternative browser.
You should upgrade or use an alternative browser.
Bilbo's writing desk build 1:1 from LOTR
- Thread starter N2darkness
- Start date
N2darkness
Sr Member
I would be emailing him and either ask of the plan or a refund. He has alway been responsive to me. Try againI bought those plans and he never sent or replied
BearKat Wood – All about woodworking.
of try this email as well bearkat_wood@yahoo.com
Its been too long now--no biggie seeing how it was 20 bucks. I did it right after reading this post when it first went up.I would be emailing him and either ask of the plan or a refund. He has alway been responsive to me. Try again
BearKat Wood – All about woodworking.
of try this email as well bearkat_wood@yahoo.com
I'll look at it as a donation. I might try to buy another one. My wife would fall over if I made her one.
I caught Covid so I'm grumpy and tired..Didnt mean anything by saying anything.
Last edited:
Its been too long now--no biggie seeing how it was 20 bucks. I did it right after reading this post when it first went up.
I'll look at it as a donation. I might try to buy another one. My wife would fall over if I made her one.
I caught Covid so I'm grumpy and tired..Didnt mean anything by saying anything.
And he could have sent them. But to the wrong email address, or any number of flukes.
It's good you brought it up, if other people have good experiences and communication, then it doesn't seem to be a persistent problem. and having those ways posted on how to contact him, might help others.
I've had a person or two contact me to find out where their product was, and both times I tracked it down to they had mistyped my email address when sending PayPal, and because I never actually received payment, I never sent the product. Simple fluke.
N2darkness
Sr Member
I came to the conclusion that I needed to make the chair, and it's now finished and all of Bilbo's office furniture is complete! My wife made the seat cushion today and hem'd a piece of faux suede to hang on the spindle.
I'm very happy with the way it turned out considered I have never made a chair before and thankfully despite it's fragile design it can hold my weight!


Also made another brass acid etched plaque to go on the bottom of the seat to match the rest of the pieces.

I'm very happy with the way it turned out considered I have never made a chair before and thankfully despite it's fragile design it can hold my weight!
Also made another brass acid etched plaque to go on the bottom of the seat to match the rest of the pieces.

Metalalien
Sr Member
That is some nice work!
joberg
Legendary Member
While chair making is a specialty in itself, you did a great job for a first try


 As you now, I'm sure; chairs built with this type of leg design (and back rest also) have a tendency to come apart after a few years. The weight load on that back rest is high, in general, and that's why it'll fail eventually because the back legs are not part of the back rest. The legs will stay in place longer, since the torsion/weight factors are directly applied by down forces making it sturdier.
N2darkness
Sr Member
While chair making is a specialty in itself, you did a great job for a first tryAs you now, I'm sure; chairs built with this type of leg design (and back rest also) have a tendency to come apart after a few years. The weight load on that back rest is high, in general, and that's why it'll fail eventually because the back legs are not part of the back rest. The legs will stay in place longer, since the torsion/weight factors are directly applied by down forces making it sturdier.
This chair is very flimsy in it's leg design without the cross supports to keep them from moving. All of the spindles and legs have split wedge mortises and glued, thus will never be coming apart. The backrest also has a mortise and epoxied into the seat and screwed and doweled into the arm rail. It will break well before it will ever fall apart.
As it's meant to be a copy of a movie prop, accuracy over function is what I was going for. It will honestly only be used to sit in every once in awhile and I'm sure it will out live me.
Last edited:
This chair is very flimsy in it's leg design without the cross supports to keep them from moving. All of the spindles and legs have split wedge mortises and glued, thus will never be coming apart. The backrest also has a mortise and epoxied into the seat and screwed and doweled into the arm rail. It will break well before it will ever fall apart.
As it's meant to be a copy of a movie prop, accuracy over function is what I was going for. It will honestly only used to sit in every one in awhile and I'm sure it will out live me.
Yep. Awesome as is.
If you wanted to make a similar chair and make it usable, you'd have to have a metal plate with rods for legs and the plate screw to the bottom of the chair, and the metal rods going through hollowed out wooden legs. It would be a chair with metal legs, that look like wooden legs.
Looks great!...Love it!
mono92
New Member
Dear Strive, thank you for sharing such a wonderfull work, for a couple of years ago i was also lookinf for building this scriptorium, is there any posibility for you to share the dimenssions or some blue prints?The center piece was turned on the lathe and then mortises were chiseled in to align the top and base pieces together. The top "L" piece was mitered and splines added to support.
View attachment 1498435
The spiral was done on the lathe, but entirely by hand and a rotary tool, the end cap was turned.
View attachment 1498436
The back support was turned and then a steep angle cut. The main holder is removable with just one screw on the back and aligns with a small dowel. The support piece has a tenon that allows the entire top to turn and swivel.
View attachment 1498437
The completed piece. As the piece looks accurate, is isn't a very functional design and top heavy. It won't fall over due to the stability of the feet but it does sag quite a bit if a book is rest on it. I did epoxy a 3/8" threaded rod through the "L" piece all the way down into through the base and secured with a washer and nut, which does help.
View attachment 1498438
View attachment 1498439
Now, no other choice but to start on the inside. I went with some mail dividers on the left, a door in the middle and 3 drawers on the right. I engraved the letter "B" in the door for Baggins, as I assumed this piece was a family heirloom passed down from his parents.
View attachment 1498440
And for extra measure I decided to make a window from to go behind the desk on the wall.
View attachment 1498441
Then it was time to sand, stain and finish everything! I used a water based pecan stain and a dead flat polyurethane finish, both by General Finishes.
View attachment 1498442
View attachment 1498443
View attachment 1498444
On to final assembly, darkening the metal and ink staining the leather. Aging, weathering and distressing everything.
View attachment 1498445
Here is the final piece in my display room.
View attachment 1498446
View attachment 1498447
View attachment 1498448
View attachment 1498449
View attachment 1498450
If there are questions or if someone decides to build one feel free to ask. I'm happy to help where I can.
N2darkness
Sr Member
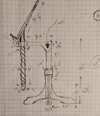
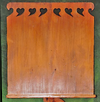
This is the only thing I drew up as made this piece. And used this image as a template for the top detail with the heart shaped cut outs.Dear Strive, thank you for sharing such a wonderfull work, for a couple of years ago i was also lookinf for building this scriptorium, is there any posibility for you to share the dimenssions or some blue prints?


Hey I wanted to come on here to show some appreciation again, I keep coming back to this thread over the years as inspiration, and recently completed my most involved woodworking project, based on a sketch from the Weta Workshop art books. I just finished my frame/mount for my Hobbit map, but I wanted to ask where you got a lot of the paper props on your desk? Ive been searching for good high resolution maps drawn by Tolkien to print and age, and the ones you have are beautiful. I'm currently working on putting together my version of the pipe stand as well, just working out how to cut perfect circles. Thanks again!


N2darkness
Sr Member
Excellent job on the table! I really want to build a few more pieces from Bagend someday, maybe the chest seen in the hallway.Hey I wanted to come on here to show some appreciation again, I keep coming back to this thread over the years as inspiration, and recently completed my most involved woodworking project, based on a sketch from the Weta Workshop art books. I just finished my frame/mount for my Hobbit map, but I wanted to ask where you got a lot of the paper props on your desk? Ive been searching for good high resolution maps drawn by Tolkien to print and age, and the ones you have are beautiful. I'm currently working on putting together my version of the pipe stand as well, just working out how to cut perfect circles. Thanks again!
Some of the paper props were purchased from Magnoli props and others were found on-line and printed or handmade by me.
Hobbiton Town Notices by Magnoli Props
Any questions on the pipe stand, I'll try my best to help!
I've finally finished my take on the pipe stand, with many many errors and learning moments along the way. I'm not very experienced in leather working so this was a large leap for me, messed it up a couple times by using too much heat but I feel like I'll be attempting the leaves again sometime. The process images were a huge help in dialing in layout, and I felt multiple moments of 'leveling up' almost in detail and precision woodworking. Its still drying hence all the shininess in the gaps and I'll probably end up slapping a few more coats of wax on it but I couldn't wait to get some glamor shots. One of these days I want to attempt Bilbo's Desk but it seems the website has been privated, I might reach out via email if it hasn't been too long.Excellent job on the table! I really want to build a few more pieces from Bagend someday, maybe the chest seen in the hallway.
Some of the paper props were purchased from Magnoli props and others were found on-line and printed or handmade by me.
Hobbiton Town Notices by Magnoli Props
Any questions on the pipe stand, I'll try my best to help!
afolgas
New Member
Hi Sir,Quick video tour of the stand and writing desk.
More than incredible work,
Do you have all the exact measurements of your desk?
Where did you find the measurements of the film?
Thank you,
N2darkness
Sr Member
Thank you!Hi Sir,
More than incredible work,
Do you have all the exact measurements of your desk?
Where did you find the measurements of the film?
Thank you,
I found a fellow woodworker who was selling plans here:
Hobbit Writing Desk Plans — bearkatwood.com
I made a few modifications to get a bit closer to the LOTR version of the desk as the plans were based upon the one in the Hobbit movies.
I designed and built the bookstand and chair myself to fit with the desk.
Similar threads
- Replies
- 3
- Views
- 344
- Replies
- 10
- Views
- 998
