The fabric of her tunic - at least from that screenshot- appears to be either velour- or most likely microsuede. Which makes sense because it looks like they used microsuede for Anakin's Clone Wars costume. Microsuede isn't a form of actual leather suede. It's a synthetic fabric which has a similar napped surface, sometimes offering stretch depending on the weave- and the reverse side is typically a plain weave. You can find it at Joann's or most fabric stores that offer a decent selection of materials. I hope this helps. As a side note, I have to say the costume designs for this show are quite impressive.
You are using an out of date browser. It may not display this or other websites correctly.
You should upgrade or use an alternative browser.
You should upgrade or use an alternative browser.
Baylan Skoll / Shin Hati Dark Jedi Costumes - Ahsoka (Series) Star Wars
- Thread starter Peralton
- Start date
Exactly what I'll be doing at the start (will get metal hilt later). I got the 3D files from 3Demon, and already have LGT Obi Wan complete saber. Guy who made the 3D files said some people are adding steel tubes for strength. My LGT core is 2mm bigger diameter than the standard files, so a little scaling will be needed.You might be best trying to adapt a 3D print to fit a LGT core and an aluminium tube for reinforcement. The thing will end up fatter than the prop, but looking at them, they are probably way too slender for most installs anyway.
I'd like to say what an awesome thread this is. I only joined this forum because of it!!
I'm embarking on my Baylan Skoll journey having just watched the Ahsoka series. I already have Obi Wan cosplay, based on last year's series.
Lots of great info and tips on here, but was wondering if anyone can share a pattern (or the process in putting one together...eg getting the chevron angles and widths right, etc) for the tunic?
I've updated by Obi Wan light saber with Skoll's blood orange colour, and sound font from Saber Font, downloaded 3D saber from ETSY as well as the armour from 3Demon.
I haven't been this excited since putting my first cosplay together!!!
Given myself plenty of time...aiming for SupaNova on the Gold Coast (Aus) in April next year.
Looking forward to sharing my own experiences with you all.
Dark CMF
Member
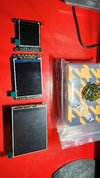
I've ordered 1.44", 2.2" and 2.8" TFT screens with attached MicroSD card readers and I'll power/control them via breadboard, for the forearms.Great information you guys are posting here!! I was wondering about the tunic clasps - looks like that mystery has been solved.
I printed the same model you guys are printing. I went to 110% for most parts, 120% for the ring. For reference, I'm 6'2", 215 lbs. Seems to fit.
Some things I'm doing a bit differently, like many of you, I'm redoing the buttons on the gauntlets for better accuracy. I'm also carving out the space for some electronics, lights, batteries and LCD panels. I'm very close to printing the first test - after I get the electronics working properly.
I'm using RP2040 boards (maybe switching to RP-Tiny) with LIPO batteries and a 1.54" LCD screen.
For the saber, I'm also modifying the model to hold speakers, a proffie board, batteries, etc. I'm also going to experiment with making a triple sided neopixel (which I guess is already a thing).
All models I've printed seem to be working out well. I just finished printing the belt crystal in clear resin and it looks fantastic. I'll coat it in green tonight and add some airbrushing. I hope to capture that green tint shown in the recent episodes.
Still working on growing out the beard. Lol.
View attachment 1747772
View attachment 1747773
View attachment 1747774
Tracking on a similar path as your own.
Looking good so far!! Keep at it!
Attachments
Chance Rohter
New Member
I am currently working on Shin Hati as I'm typing this. So far I have acquired all the fabric needed and in the process of dying the skirt pieces.
These are the files I am printing currently. It even includes the tunic clasps.
Highly recommend!
Shin Hati Armor


These are the files I am printing currently. It even includes the tunic clasps.
Highly recommend!
Shin Hati Armor

Botozis C
New Member
Aaaan, another strage detail in her costume: A little-noticed detail... on Shin's belt you can see some kind of hooks just above each hip? What do they hold? The weight of the belt, which otherwise would fall downward because it carries the defenses on the upper part of the legs_ is intriguing and in very few images we will be able to appreciate them. I can't think of any other function for those hooks, although it disorients me that they have a certain angle towards the outside of the body.
Attachments

division 6
Master Member
I looked through a few images.
The hooks are attached to her tunic to hold the belt up with the weight of the armor plates.
The hooks are attached to her tunic to hold the belt up with the weight of the armor plates.
Vagabond Elf
Well-Known Member
Aaaan, another strage detail in her costume: A little-noticed detail... on Shin's belt you can see some kind of hooks just above each hip? What do they hold? The weight of the belt, which otherwise would fall downward because it carries the defenses on the upper part of the legs_ is intriguing and in very few images we will be able to appreciate them. I can't think of any other function for those hooks, although it disorients me that they have a certain angle towards the outside of the body.
They're holding the spaulders (hip armour) to her belt. Because the spaulders are almost certainly plastic they wouldn't weigh that much, and the belt is sitting squarly on the actor's hips and is next to a quilted gambeson that's probably got good friction - and let's be honest, the belt only needs to stay in place for a few minutes at a time before it gets adjusted off-camera even if it did slip.
Also, I assume it's no longer a spoiler to note that Shin makes it to the end of the season, at least - and I figure it's 50-50 whether they recast Baylan or just have Shin fill his part of the story in Season Two. Either way, I'm sure we'll see more of her!
Botozis C
New Member
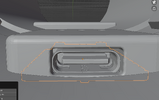
My hypothesis is that they are supported by a belt-base under the garments, which would be noticeable in the folds that form on the outside of the tunic, in addition to the smooth surface at the waist. Without that base structure (from which the hooks I mentioned before would emerge, perhaps) those sheets would have no reason to exist. I mean that the costume is "marked" from the inside. Here is a shot where both effects can be seen on the fabric.

Botozis C
New Member
That is exactly what I believe, but it remains to understand how, because if they did it from the same belt it would not be of any help. I hypothesize that they could do it from a belt directly on the body, under the layers of clothing... look at the strange fold that the tunic makes when it fallsI looked through a few images.
The hooks are attached to her tunic to hold the belt up with the weight of the armor plates.
Botozis C
New Member
i know, but precisely... why use a military belt in this case since the spauldrons won't have much weight? I suppose that if they chose a belt with those support hooks it is for a reason, not by chance, and in fact they must help SOMETHING to supportThose hooks are common on old military uniforms for holding up the belt. If you look at a lot of Victorian era uniforms they have them. I’ve used them myself on various costumes to do the same thing.
Botozis C
New Member
I must admit my error in the previous hypothesis_ the support hook that keeps the belt elevated DOES NOT come from a belt underneath, but from the tunic itself_ here it can be seen (it may be one of the Metal Clasp Closures that he uses in the closure of the back...)i know, but precisely... why use a military belt in this case since the spauldrons won't have much weight? I suppose that if they chose a belt with those support hooks it is for a reason, not by chance, and in fact they must help SOMETHING to support
neophyl
Sr Member
traditionally it’s not just the weight that the hooks are fitted to military jackets for although they do help with that too, it’s also for fit and repeatability. They ensure the belt is always in the same place and that the uniform looks correct. its why I used a couple on my Dooku tunic.
I don’t think it’s the same as the back clasps either, just looks like the normal double loop eyelet on many of the hooks.
I don’t think it’s the same as the back clasps either, just looks like the normal double loop eyelet on many of the hooks.
Hi Bob,1. Def a leather of some kind. I managed to find some faded black scraps leather for mine. While we didnt have time to whip-stitch or attach cording, just sewing didnt look too bad for the short production time. the pointed end was used for tucking behind the obi. Its mostly about getting the pattern right and people will know instantly, as they did when we were out there in June.
2. There is an obi under the belts (a sash like fabric worn on traditional Japanese uniforms) Its weird deconstruction this costume wife and I found they borrowed form medieval knights, Scandinavian materials and Japanese outfits. Since Lucas originally drew his inspiration from Akira Kurosawa's feudal Japan films its not that surprising I guess.
3. So to not get overheated with the layers, a gauze type fabric as the undershirt(with a mock turtle neck) and the visible sleeves, was under the leather tunic and a cloth vest as a middle layer(under vest) that I used to attached the shoulder armor to under the leather tunic vest.
4. Bottom half of the tunic we made as a separate piece for dressing/undressing. Think of it like a skirt with velcro on the side to enclose. made of a rough linen fabric that had texture. Sewed the obi to the top of this for, again, ease of dressing.
5. I made it two belts for the sake of dressing/undressing. Ordered two 60" long by 1/12" wide brown leather straps. I cheated the loop and tie with hidden rivets. that part worked out well. It was 3 pieces: belt around waist, 4" strip (riveted opposite of the 3rd strip), that 3rd strip makes the end that hangs(16" long). The reasoning for the opposite sided 4" strip was to fake that wrap around the waist of the belt. Simply taking a long piece of leather didnt work as it was not pliable enough to create that wrapping cleanly. it was bulky looking. Wish I'd had time to create some sort of attaching mechanism between the two belts. They kept separating when I moved. My assumption on the costume design was that it was meant to be a really long belt he double wrapped and then loop tied, but they def had to fake it as well, otherwise it would not have laid so well.
6. Yep! had that as well. Wonder if we find out later that the stone on the ring and his belt are force artifacts later?
Also, after watching the first 2 episodes, I am definetely going to reprint the gauntlets and modify to fit an apple watch on one side (make a custom screen face) and a disney band port on the other.
Can I ask how wide your belts are?
The 3D file I have for the 'belt buckle' in 44mm high. In Aus, standard belts are 38mm, then there's a few larger sizes that seem more 'custom'. Thinking 45mm might be the best, based purely on my eye!
Hitman322
New Member
Nice one! My screens and boards are separate, but similar. I just got the screen to light up on the bread board last night so the connections are solid. Working on getting BMPs to display. Happy to share files and info in this sub and gain more knowledge for myself as well!I've ordered 1.44", 2.2" and 2.8" TFT screens with attached MicroSD card readers and I'll power/control them via breadboard, for the forearms.
Tracking on a similar path as your own.
Looking good so far!! Keep at it!
Hitman322
New Member
Just adding my input. I got 2 inch strips of leather and upscaled the belt buckle to 50.8mm to match. Printed the "kyber" crystal in clear resin with a bit of green pigment. Looks pretty good. Will post pics when complete. First time working with leather, but isn't too difficult so far. Still putting off the soft parts because that's truly scaring me. lol.Hi Bob,
Can I ask how wide your belts are?
The 3D file I have for the 'belt buckle' in 44mm high. In Aus, standard belts are 38mm, then there's a few larger sizes that seem more 'custom'. Thinking 45mm might be the best, based purely on my eye!
Hitman322
New Member
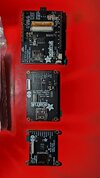
Modding the excellent 3d files from 3demon. Adding spaces for RP2040 Tiny, modded the button holes, and adding space for a LIPO battery. Added the "screen" hole to fit the 1.54 inch panel. Also adding a cover for the circuit board.
Attachments


Last edited:
I thought about scaling too. Being tall I might be able to get away with a wider belt. I like the clear crystals I've seen...I have some green UV resin, so thinking about 3D printing the crystal, using foam clay to make a mold, and then use my green resin to make a new crystal.Just adding my input. I got 2 inch strips of leather and upscaled the belt buckle to 50.8mm to match. Printed the "kyber" crystal in clear resin with a bit of green pigment. Looks pretty good. Will post pics when complete. First time working with leather, but isn't too difficult so far. Still putting off the soft parts because that's truly scaring me. lol.
I need to enlist my wife for the 'soft parts' of the costume ;-)
Similar threads
- Replies
- 4
- Views
- 2,429
- Replies
- 1
- Views
- 2,026