Battlestar Galactica 2003 scratch build

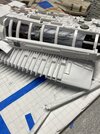
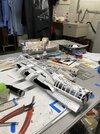
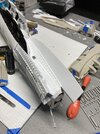
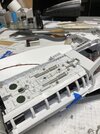
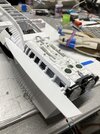
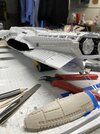
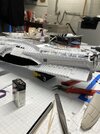
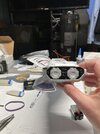
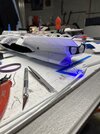
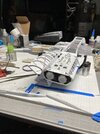
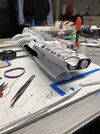
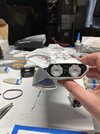
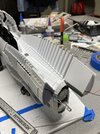
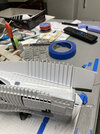
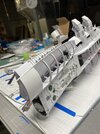
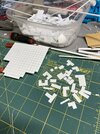
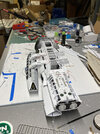
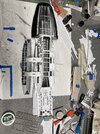
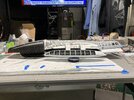
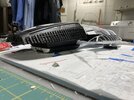
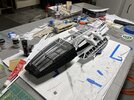
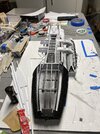
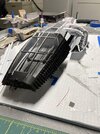
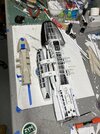
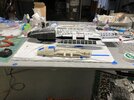
Well fellas, she’s getting there. The flight pod looks a little skinny but once I get it ribbed and all the panels on it it’ll fatten up a little. It’s starting to look like Battlestar Galactica to me
 

Attachments

  • B0122E50-D6B1-441D-97C6-40379055BA71.jpeg
    B0122E50-D6B1-441D-97C6-40379055BA71.jpeg
    2.1 MB · Views: 88
  • 8A1BF4B7-5450-4A34-9E2F-1369EF3AA541.jpeg
    8A1BF4B7-5450-4A34-9E2F-1369EF3AA541.jpeg
    2.4 MB · Views: 83
  • 422BB991-8677-4C84-977B-2AE3748E51A9.jpeg
    422BB991-8677-4C84-977B-2AE3748E51A9.jpeg
    3.6 MB · Views: 87
  • 465FA5F5-9D2B-42C5-8290-6A6F985D2D9C.jpeg
    465FA5F5-9D2B-42C5-8290-6A6F985D2D9C.jpeg
    2.9 MB · Views: 81
  • 9BEE0D5B-800D-4E8B-9222-BFBE78FA31F7.jpeg
    9BEE0D5B-800D-4E8B-9222-BFBE78FA31F7.jpeg
    3.9 MB · Views: 82
  • 57A5F1E2-12E5-4249-AB1F-590B7CB651CC.jpeg
    57A5F1E2-12E5-4249-AB1F-590B7CB651CC.jpeg
    1.9 MB · Views: 87
  • E95CAE23-45AC-4ED6-836E-A990C9E76014.jpeg
    E95CAE23-45AC-4ED6-836E-A990C9E76014.jpeg
    1.6 MB · Views: 65
  • 2DF79C4D-9CC1-4C01-ABFA-AB71239A2551.jpeg
    2DF79C4D-9CC1-4C01-ABFA-AB71239A2551.jpeg
    2.2 MB · Views: 70
  • C3B20B5D-993C-45BF-9B10-C72FB3113FC7.jpeg
    C3B20B5D-993C-45BF-9B10-C72FB3113FC7.jpeg
    3.8 MB · Views: 78
Beautiful work on all the details. I hope you will allow me to suggest an alternate method of applying the hull plating to how you are currently doing it and not think me rude or mad, lol.

I understand your concern about supporting the large plating, but rather than cutting the ribs the exact size of the plate pieces, please consider cutting much smaller sections out so that the cuts in the ribs are hidden underneath the plating. You could then use the same strips you used to make the ribs to add smaller support between the ribs, thus keeping the plating looking like it rest atop the ribs. This is most visible at the back of your plating where you can see the cuts in the ribs and makes it appear that the ribs end where they meet the plating.

You could also not cut the ribs at all and just use the same strips (same height) that you used to make the ribs to build up small support sections between the ribs for the plating, this way keeping the illusion that the plating sit atop the ribs.

Just my 2 cents, but this is a detail that the Mobeius kit got soooo wrong. IMHO, the only way to make that sows ear into a silk purse is to add all the additional plating seen on the Blood and Chrome version.

I still want this model when your done, even though I know I could never afford what it is worth considering its size and completely scratch-built.
Yeah, I think you mentioned that before and you’re probably right. I wish I could find some mosaic sheets that I could cut for the plating whether they’re correct in their little Jenga configuration I don’t really care about. If I had that I could cut that and lay it over the top of what I’ve done and hide the areas that you’re talking about
 
This is what I got done today
 

Attachments

  • 47ABE877-F17D-48A5-AED9-0A6807BA2052.jpeg
    47ABE877-F17D-48A5-AED9-0A6807BA2052.jpeg
    1.7 MB · Views: 74
  • E6B53E66-F219-422A-9A4C-2B11E6FE4629.jpeg
    E6B53E66-F219-422A-9A4C-2B11E6FE4629.jpeg
    1.4 MB · Views: 61
  • 0D29CBBC-2738-4FFF-A8BE-A9853B2AAE52.jpeg
    0D29CBBC-2738-4FFF-A8BE-A9853B2AAE52.jpeg
    1.3 MB · Views: 66
  • 37152B93-33E6-4C35-9E13-CE944E24712D.jpeg
    37152B93-33E6-4C35-9E13-CE944E24712D.jpeg
    1.5 MB · Views: 63
  • 4093C89D-F086-4FE3-9CDA-02594752593A.jpeg
    4093C89D-F086-4FE3-9CDA-02594752593A.jpeg
    1.1 MB · Views: 63
  • 1DC6A009-2FCB-4D78-AF5C-20B021B5511C.jpeg
    1DC6A009-2FCB-4D78-AF5C-20B021B5511C.jpeg
    1.4 MB · Views: 78
I’m going to add like an eighth of an inch to the outer edge of the upper engine because it just doesn’t hang out as far as it should and then I think by the time I scan it armor plated and Ribbit it’ll be OK. I decided to add a little entertainment in the front of the engine where the deep ribs go on the inside I planted a red LED in there the glow out across the stern panel.
 

Attachments

  • 822E66F6-AC03-4E88-9315-E92BE3D732B5.jpeg
    822E66F6-AC03-4E88-9315-E92BE3D732B5.jpeg
    1.2 MB · Views: 55
  • 5A9E82D6-1923-463E-A21C-1571445F0551.jpeg
    5A9E82D6-1923-463E-A21C-1571445F0551.jpeg
    1.1 MB · Views: 55
  • 8C8EE682-027D-45CF-BBCC-CBC56157F317.jpeg
    8C8EE682-027D-45CF-BBCC-CBC56157F317.jpeg
    1.3 MB · Views: 52
  • D2171C35-737D-48F3-9C4A-E0FA2E90FD24.jpeg
    D2171C35-737D-48F3-9C4A-E0FA2E90FD24.jpeg
    1.7 MB · Views: 53
  • 0AC67BB6-61FD-4936-B3AD-F8D07E6633E8.jpeg
    0AC67BB6-61FD-4936-B3AD-F8D07E6633E8.jpeg
    1.6 MB · Views: 60
  • 804BDBED-076D-4995-AA0C-9909B7B88308.jpeg
    804BDBED-076D-4995-AA0C-9909B7B88308.jpeg
    1.1 MB · Views: 63
Trying to figure out a way to make these mosaic armor tiles easier. Doesn’t look like they come on sheets which would be great. I thought about a small grid sheet and filling the cracks but that seems like a lot of work too. Any thoughts on that?
 
I just blew thru all 11 pages of this thread just to relive the excitement of this build, and I realized that I have been beating you over the head with the ribs and plating. I apologize for that.

As for the tiles, there is a decal sheet for the Mobeius kit that has all the patterns of the tiles for each armor plate. You could scan/copy those and enlarge to twice the size and at least have shapes to just cut out, rather than have to take the time to figure out what the tiles are for each plate.

It’s ok dude, you’re right about the point you were making. I think I’m going to pencil out grids on a sheet so they’re even and not my sloppy eyeballing and just chop them out with the straight blade exacto knife
Still it’ll take time but measuring each one and cutting the shapes is BS
 
Well, with a copy of the enlarged decal sheet you would not have to pencil out any of the tiles, just simply use low tack spray glue to stick them to a piece of styrene sheet then simply cut them out. The other benefit is that the decal sheet also gives you the shape for the main plate. I think that this would speed up the process.
 
I just blew thru all 11 pages of this thread just to relive the excitement of this build, and I realized that I have been beating you over the head with the ribs and plating. I apologize for that.

As for the tiles, there is a decal sheet for the Mobeius kit that has all the patterns of the tiles for each armor plate. You could scan/copy those and enlarge to twice the size and at least have shapes to just cut out, rather than have to take the time to figure out what the tiles are for each plate.

It’s ok dude, you’re right about the point you were making. I think I’m going to pencil out grids on a sheet so they’re even and not my sloppy eyeballing and just chop them out with the straight blade exacto knife
Still it’ll take time but measuring each one and cutting the shapes is BS
Well, with a copy of the enlarged decal sheet you would not have to pencil out any of the tiles, just simply use low tack spray glue to stick them to a piece of styrene sheet then simply cut them out. The other benefit is that the decal sheet also gives you the shape for the main plate. I think that this would speed up the process.
well I get what you mean but I think I want the actual depth with the individual pieces as opposed to the the flat of a decal. I feel like a dumb **** for not thinking of what I mentioned in the last post, before
This is an insane quest I’ve set my feet upon
 
No, what I mean is, if you look at those decals, the white lines within each plate represent the mosaic panels on the plate. You use these as guides to cut them out on styrene sheet and viola. You would not be placing any decals on your model, but just using them as cutting guides. Make sense?
 
Ok yeah, now I get it…that would make each panel visually correct, but I’m not super concerned with them being exactly right. As long as I get the spirit of the representation I’m content
 
A little fin ribbing, sounds like something they do on the rivers in the south…and this is what I came up with for the armor plates. It probably only took a half hour to make these which wasn’t too bad. Tomorrow I’ll put it to the test
 

Attachments

  • C06CA266-DA9C-411D-B1CC-1D3375403D9D.jpeg
    C06CA266-DA9C-411D-B1CC-1D3375403D9D.jpeg
    1.4 MB · Views: 48
  • 7B0EE074-C544-48A3-8EFA-C56208723D48.jpeg
    7B0EE074-C544-48A3-8EFA-C56208723D48.jpeg
    1.6 MB · Views: 50
  • DE00245C-7C8B-4934-9CA5-96FB128FEE68.jpeg
    DE00245C-7C8B-4934-9CA5-96FB128FEE68.jpeg
    1.5 MB · Views: 55
  • 6D954302-4155-4088-A49C-BF753E1A927B.jpeg
    6D954302-4155-4088-A49C-BF753E1A927B.jpeg
    1.8 MB · Views: 52

Your message may be considered spam for the following reasons:

If you wish to reply despite these issues, check the box below before replying.
Be aware that malicious compliance may result in more severe penalties.
Back
Top