Decided to make my first 3D printed costume. I've done a Deadpool and Ironman in EVA foam. This will be mostly the Arkham Knight outfit but I'm going with a black camouflage under-suit (at least for now) and will be using the Arkham Origins bicep, tricep and thigh pieces. I'll also add a codpiece, but not sure from what so far. I'm thinking I'll do some weathering with wear and tear on the pieces. I may redo the carbon fiber vinyl also. I'm OCD and the directions bother me, plus I'm running into some adhesion issues, even with adhesion promoter.
You are using an out of date browser. It may not display this or other websites correctly.
You should upgrade or use an alternative browser.
You should upgrade or use an alternative browser.
Batman: Urban Knight (Arkham Knight)
- Thread starter mfergel
- Start date
The symbol was driving me nuts so redid the carbon fiber vinyl. Here is a potential cod piece (I'm not 100% certain I'll actually use it) that actually came from a Halo stl file. I really need to learn to design with some of the apps available. Here's also a shot of some other pieces that are still being cleaned up and prepped.
Attachments
")
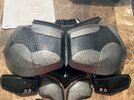
More progress (a lot of stuff I haven't taken photos of yet). Here are some of the back pieces. Some have been attached to each other. Having to reprint the large pieces. I've printed two different belt buckles. I like the detail on the smaller one but think I will go with the larger one because it's curved and larger. Have some touch-ups to do on the cowl (still need to figure out the magnetic attachment setup for the back plate). I'm also using the bicep and tricep guards from the Origins costume. At least until I have a muscle suit of some kind.


I'm kind of all over the place with what I'm finishing as I'm working on all the parts at once. I still want to weather these, but mostly finished the pouches. I decided that, instead of permanently mounting the parts to the belt, I created brackets for the belt to slot through. This will allow me to center the parts easier with the buckle being on my back. I made the pouches functional as well using magnets to hold the latch in place. I wish they were a bit wider in order to be able to put my cell phone in one (I have no idea what I'll put in these). I may make a wider one and just paint it all black and place that further on the side of the belt in order to have something to hold my phone.

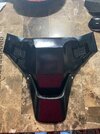
Some more updates (though there is progress made that I don't have pictures of). First is the cowl. There was an stl file for this and I tried printing it multiple times. There were issues with the file itself (walls to thin), which I corrected in meshmixer. with the size of the cowl, I've had to break it down into 5 pieces to fit on my printer. I tried TPU to make it flexible and I tried PLA. I just couldn't get it to work out the way I wanted. I'm not even sure how many pieces I printed. I finally decided to make it from EVA foam, and made several versions of that. I took my assembled PLA version of the cowl, applied tape to half of it and then cut that into different sections to make paper templates. The first version was done in 6mm foam and much closer to being what I wanted. I still wasn't happy and cut that apart and made modifications to various pieces. Much happier with this version done in 3mm EVA foam. Part of me thinks I may want to do it in 4mm foam. This is going to have to hold up the shoulder armor, back, and chest/abdomen pieces to some extent, so I'd like like it to be tough and still flexible. Will see how it works ultimately as it would be easy enough for me to make a 4mm piece now that I have the paper templates.


I've also made progress on the gauntlets. The most disappointing part was, that in my prints, the edges of the three "spears" didn't print really well. They were really thinner than they needed to be. It would have been nice if I had them as separate parts, but worried that they'd break off if bumped to hard. I corrected the issues with two part epoxy putty and red bondo. I was also bothered at the low poly used on the gauntlets. You could really see it on some portions. I decided to hide that by creating a mix of red bondo and acetone. Kind of a textured steel look. I applied this twice and then rubbed across the second layer before it was totally dry. I've actually got them in primer/filler right now. Need one pass of sanding and another application of primer/filler before painting.

I've also made progress on the gauntlets. The most disappointing part was, that in my prints, the edges of the three "spears" didn't print really well. They were really thinner than they needed to be. It would have been nice if I had them as separate parts, but worried that they'd break off if bumped to hard. I corrected the issues with two part epoxy putty and red bondo. I was also bothered at the low poly used on the gauntlets. You could really see it on some portions. I decided to hide that by creating a mix of red bondo and acetone. Kind of a textured steel look. I applied this twice and then rubbed across the second layer before it was totally dry. I've actually got them in primer/filler right now. Need one pass of sanding and another application of primer/filler before painting.
Some updates. First the cowl. I've completed the pieces that go on the sides. They mount on the back with two purse magnets on each. I may need to add a small standoff on the sides of each to stop the chest piece from sticking out on the top area.


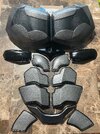
I've also got most of the abdomen and chest done. The textured portion for the abdomen was a yoga mat. I had to create templates for the that and the eva foam that surrounds the individual pieces of the abdomen. I still have an elastic strap I need to add on the bottom to go around back (even though the belt should hold it in place). I have to make some modifications on how the chest mounts. I feel like it sticks out to far right now, but it's hard to really get that piece close to the body (and really shouldn't be too close anyway). I think it's really the design on the edges that make that tough. I'll find a way though.


I've also got most of the abdomen and chest done. The textured portion for the abdomen was a yoga mat. I had to create templates for the that and the eva foam that surrounds the individual pieces of the abdomen. I still have an elastic strap I need to add on the bottom to go around back (even though the belt should hold it in place). I have to make some modifications on how the chest mounts. I feel like it sticks out to far right now, but it's hard to really get that piece close to the body (and really shouldn't be too close anyway). I think it's really the design on the edges that make that tough. I'll find a way though.
Guess it's been awhile since I posted updates. Making progress though. Decided I didn't like the options I was coming up with for making my helmet removable, so I picked up some different files and am currently working on cleaning that helmet up.
Finished up the shoulder pads. I mounted them by putting a 1" elastic strap that goes under the arm pit (that has a snap on each side to make it removable) and then a 2" strap on the top that attaches to my neck piece with two snaps. It actually works pretty well and the design of the shoulder piece makes the 1" strap nearly invisible, especially when your arm is down. Once I put on a cape, that will hide most of the upper strap. You can see the one snap ahead of the 2" elestic that will be part of the cape attachment.


Finished up the shoulder pads. I mounted them by putting a 1" elastic strap that goes under the arm pit (that has a snap on each side to make it removable) and then a 2" strap on the top that attaches to my neck piece with two snaps. It actually works pretty well and the design of the shoulder piece makes the 1" strap nearly invisible, especially when your arm is down. Once I put on a cape, that will hide most of the upper strap. You can see the one snap ahead of the 2" elestic that will be part of the cape attachment.
Made an addition to the belt. Decided to make a larger pouch to hold my phone. I removed one of the canisters on the left side and then painted the pouch black so that it was less obvious. I'll be able to put my cell phone in this one. I'm thinking I may print up a bunch of smaller batarangs and leave them around as my debut for this should be a booze crawl that happens on Halloween.

Finally, I struggled to come up with a way of putting this on my wrist. I had thought either nylon straps or elastic. Snaps, latches, etc. There really isn't a lot of space between the sides to do any of those and still be able to connect anything together. I finally had the idea to use sweatbands. It's a 4 inch sweatband that is hot glued in. I maybe attached about a 3/4" width/length of the sweatband as not to inhibit the stretching. It isn't the easiest to get off and on as I have to slide my hand into it, but it works. I may create an EVA foam piece that attaches with magnets to cover up the sweatband, but I think it will be largely invisible with my actual undersuit, which will be black. Also pictured here with the gloves I bought. I'll just use these as is.


I've still been plugging away at finishing parts. I have about a month left to finish stuff. I probably won't have a cape finished in time, which kind of sucks, but this will be an ongoing project where I plan to redo some parts anyway.
I finally finished the back as well as creating the attachments to my neck piece. I'm actually kind of happy with the way it came out and it's going to suck to have this covered ultimately by a cape.

I had originally planned for the shins to be black, but have kind of liked the addition of the metallic gray that I've used on a lot of the pieces, so I opted to go that direction. I'm actually working on the mounting system for these right now. I'm using elastic straps that wrap around the back pieces. I may redo these again and use a different system that hides all the connections.

Finally, the helmet has been finished. Again, I may redo this in the future. I sized it at 102%, but I really think 100% might have been the better option. I'd prefer just a slighter tighter fit. Still came out great though.

I finally finished the back as well as creating the attachments to my neck piece. I'm actually kind of happy with the way it came out and it's going to suck to have this covered ultimately by a cape.
I had originally planned for the shins to be black, but have kind of liked the addition of the metallic gray that I've used on a lot of the pieces, so I opted to go that direction. I'm actually working on the mounting system for these right now. I'm using elastic straps that wrap around the back pieces. I may redo these again and use a different system that hides all the connections.
Finally, the helmet has been finished. Again, I may redo this in the future. I sized it at 102%, but I really think 100% might have been the better option. I'd prefer just a slighter tighter fit. Still came out great though.
Here is a shot of the back piece attached with my neck. I still want to create an attachment piece at the bottom (probably velco) to keep it snug on the back.

This piece goes over the shoulders and fills in that space between the helmet and the back piece. It's attached by magnets on back and then actually screws in on the front portion.

Finally, the shin and calf guards. I created an elastic criss-cross with D rings to attach it. Not sure how crazy I am about this but it works. This is over the boots I got from eBay. Really impressed with how comfortable these boots were for the price (about $50). I still have to attach some velcro that will lock down the elastic strap at the end.


This piece goes over the shoulders and fills in that space between the helmet and the back piece. It's attached by magnets on back and then actually screws in on the front portion.
Finally, the shin and calf guards. I created an elastic criss-cross with D rings to attach it. Not sure how crazy I am about this but it works. This is over the boots I got from eBay. Really impressed with how comfortable these boots were for the price (about $50). I still have to attach some velcro that will lock down the elastic strap at the end.
Similar threads
- Replies
- 4
- Views
- 2,622
- Replies
- 1
- Views
- 2,011
- Replies
- 3
- Views
- 1,706