Batman Begins "Wayne Enterprises" transport case -- Finished pics on pg. 3

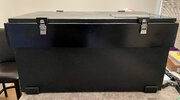
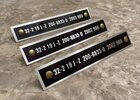
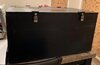
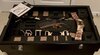
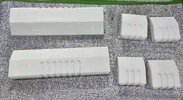
Been awhile since my last update, I was really busy finishing up my PASIV but now my attention is back on this. I'm about 75% done with the "riser" panels that mount around the top of the box, with only the long sides left to paint and then mount them.

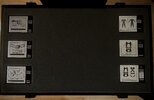
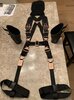
I also have the 3D printed "latch mounts" in (the little brackets that fit on the lid that the latch catches screw into). In this shot, the latches are just hanging from them so far, as the main latch body will attach to the risers that aren't secured in place yet.

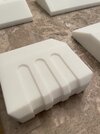
Hoping to get the riser painting finished tonight and, fingers crossed, be able to install them. Then the only things missing will be the rubber cast side bumpers and feet.
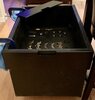
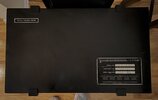
 

Attachments

  • 0-1.jpg
    0-1.jpg
    25.3 KB · Views: 185
  • 0.jpg
    0.jpg
    13.7 KB · Views: 194
Panels almost done. Just need to fill in the joint seams a bit and touch up some spots. Next up will be fully installing all the latches.
 

Attachments

  • 40F898E7-DACF-4D66-B00A-2C62BBBAAEEE.jpeg
    40F898E7-DACF-4D66-B00A-2C62BBBAAEEE.jpeg
    1.2 MB · Views: 226
All riser panels and latches installed.
 

Attachments

  • 49950662-EA1F-44B7-9559-04E12D591AD6.jpeg
    49950662-EA1F-44B7-9559-04E12D591AD6.jpeg
    1.6 MB · Views: 180
Harness buckles are painted!
ODcC1zf.jpg


Huge thanks to my buddy Johann Leiter for the absolutely professional paint job on these. The paint work on his utility belt is spectacular, so I definitely wanted these to match.

We also took this opportunity to completely repaint the Grapple Gun in the darker, bronzier, Begins tone to make it fit in better too. There's a couple more nice upgrades to the gun I'll show later.

cUFphqM.jpg


Hopefully I can get most of the harness assembled tonight. I'm refraining from showing too much of the harness buckles until it's put together.

Progress on the transport case outer bumpers continues, nothing new to show just yet.
 
I've decided to show more of my progress rather than just waiting for everything to be done.

First, the center barrel of the Grapple Gun has been drilled out and replaced with a metal spacer, along with the accurate retention screw for that front block:

FrbhiAC.jpg


And I got most of the harness built last night:

jNqAtJA.jpg


I need to redo the 1" straps connecting the leg T-buckles to the leg boxes, and put a couple of screws into those boxes. Then trim and attach the wide main straps to the bottom set of quick-releases, and overall just tweak the positioning of everything. The layering around the shoulder sections is deceptively complex once you start trying to actually put it together. There's 1", 1.5", and 2" wide strapping.

The only problem I've run into is that in all the designs, I never accounted for the thickness of the webbing. So one slot in particular is too thin to easily get the 1.5" wide strap through. I've tried a lot of things, including soaking and ironing the nylon, but it's just too thick to make it. I am considering two approaches to solving this:

1) Cut out a middle section of the aluminum cross bar and feed the nylon in sideways, one side at a time. The nylon will be folded over and attached to itself, so the cuts will never be visible, and the width will be tight enough that it will not come loose. The main con here is that these buckles were so well made and expensive, professionally painted, and I'm loathe to just cut into them, even on the back side, even on a part that will be covered up anyway.

2) Feed a short strip of 1" nylon through the thin slot, which is structurally different than the 1.5", and actually thin enough to fit through. Then attach the 1" to the 1.5" strap directly below the box, right up to its edge. The upside is I won't have to cut into my shiny, expensive buckles. Downside is that it might be noticeably weird that the main strap extending out of the bottom of the leg box doesn't actually directly connect to it.
 
Harness is built. I went with option 2 for the leg connectors.
 

Attachments

  • 3B3F9DCC-8CB0-426D-8523-05203D6BE155.jpeg
    3B3F9DCC-8CB0-426D-8523-05203D6BE155.jpeg
    2.2 MB · Views: 151
The urethane parts of the suit (torso, legs, calf and forearm armor, gauntlets, cowl), gloves, and cape are from coofunkcurly. The boots are from UD Replicas. The belt is a resin build from Johann Leiter (leitPROPS). Undersuit I'm not sure of the provenance of; got it second-hand from someone on here.
 
Slow going... but I finally found a source for getting the rubber parts made. I'm starting with the 4 feet as a test, which should be here in a couple of weeks. If that goes well, then I'll use the same method for the side bumpers.
 
So I was digging through my various "Art of the Dark Knight Trilogy" type books, which usually come stuffed with fun little in-universe extras like GCPD case files on villains, blueprints for Arkham, etc. I came across these info cards for the harness. Well that's just too good to pass up, so I scanned them, did some slight alterations to make things fit, and Feezlenuts has printed them on aluminum plaques for me. These will be mounted on acrylic blocks inside the crate lid along with the others for the Grapple, Belt, and Memory Cloth.

Interestingly, this looks like an earlier harness design that isn't exactly what we ended up with on screen. But it does match the Takara 1:6 figure harness, which I always thought was oddly inaccurate. Now I know why.
 

Attachments

  • D7ED1B80-94EC-48F2-815E-1B0620275772.jpeg
    D7ED1B80-94EC-48F2-815E-1B0620275772.jpeg
    581.8 KB · Views: 162
The new plaques from Feezlenuts came in and they are perfect. I’ll probably put them on the right side of the lid, but I’m not 100% sure yet. I have some ideas for a couple more plaques and I may need them all in hand to decide.
Also included in this package were the narrow Serial Number plates, and wow what a nice effect these add. I think there will be a few more on the short sides near the handles as well. Hopefully will have these riveted in place sometime this week.

But most exciting is that the bumpers are finished and ETA ~2 weeks. I’m still mulling over exactly how to attach these. I’d like something a little more than adhesive but they aren’t solid, so that’s going to be interesting.

I bought the wood for this box about a year ago. It’s been a long process but only weeks away from finishing touches.
 

Attachments

  • 8175D930-2AA0-4E14-9D41-B313683E7D1A.jpeg
    8175D930-2AA0-4E14-9D41-B313683E7D1A.jpeg
    3.5 MB · Views: 129
  • 37064C52-99A1-4E73-9993-637E00018C30.jpeg
    37064C52-99A1-4E73-9993-637E00018C30.jpeg
    1.2 MB · Views: 130
  • C8AAB0C0-4E6C-470B-BD2D-C7976DBB90C2.jpeg
    C8AAB0C0-4E6C-470B-BD2D-C7976DBB90C2.jpeg
    460.8 KB · Views: 140
Last edited:
Feet have arrived and look great. Still need to be painted but very happy with how tough these turned out.
 

Attachments

  • 6BD8D87F-2F68-4A9B-988D-27BF337C3D27.jpeg
    6BD8D87F-2F68-4A9B-988D-27BF337C3D27.jpeg
    703.6 KB · Views: 107
Feet painted. Fortunately the paint doesn’t crack when the “rubber” flexes. Letting the paint cure overnight before permanently attaching them, but I can already see they will be perfect.
 

Attachments

  • B56B37C8-68B7-4DCD-A937-0E607C01B1D2.jpeg
    B56B37C8-68B7-4DCD-A937-0E607C01B1D2.jpeg
    1.6 MB · Views: 103
  • 282C9C5C-C8BB-4B88-8AD2-FF3585730411.jpeg
    282C9C5C-C8BB-4B88-8AD2-FF3585730411.jpeg
    849 KB · Views: 115
Feet are attached. I'm glad I went with the flexible 80A resin print. My joinery along the underside isn't perfect, and the flexibility allows the feet to wrap around and compensate, keeping both the front side and the underside flat against the surface.

What's left:
- Side Bumpers, arriving Monday (thanks to Correlia Creations!)
- Rivets for S/N plates
- Final aluminum data plate for inside lid (thanks Feezlenuts!)

There's a few blemishes along the glossy top panel, but that doesn't matter as most of that will be covered with the bumpers.

I'm holding back a few details until it's all done (ETA ~1 week), but I think this is going to be a good one :) I've been trying to get my hands on this case since at least 2007, so it's really gratifying seeing it all come together. Although at this point, "crate" would be more accurate than "case."

Biggest question now is where am I going to put this thing? It's enormous.
 

Attachments

  • IMG_5791.jpeg
    IMG_5791.jpeg
    2.4 MB · Views: 109
  • IMG_5790.jpeg
    IMG_5790.jpeg
    581.3 KB · Views: 96
Last edited:
Brass rivets for the SN plates are in.

And bumpers are in hand. Man, I have never seen prints this high quality. Hats off the Correlia Creations for these, with fast international shipping and a great price too. I’ll have to think about the attachment method since there isn’t a huge amount of surface area along the back edge. Can’t wait to l get these painted tonight and mounted up later this week.
 

Attachments

  • 6BE7C177-3686-4047-991A-E6A7A7BEAE7C.jpeg
    6BE7C177-3686-4047-991A-E6A7A7BEAE7C.jpeg
    1.9 MB · Views: 134
  • D3E24A1B-B2D8-44AD-B416-F2EEF803480B.jpeg
    D3E24A1B-B2D8-44AD-B416-F2EEF803480B.jpeg
    1.5 MB · Views: 136
It’s done! I do have 2 small paint touchups to do before the final hero photo shoot. So the next update in a couple of days will be the finished reveal.

For now I’d like to show the underside of the lid, with all the aluminum data plates Feezlenuts printed for me. This isn’t a screen accurate detail, just something I like because I already had a couple of the plates for the Grapple and Belt and thought there should be a couple more. They are attached to acrylic blocks that are embedded into cutouts in the lid underside foam.
 

Attachments

  • 4CD5CEEB-D557-4F7B-ADDC-5B8C2D847DC5.jpeg
    4CD5CEEB-D557-4F7B-ADDC-5B8C2D847DC5.jpeg
    2.1 MB · Views: 129

Your message may be considered spam for the following reasons:

If you wish to reply despite these issues, check the box below before replying.
Be aware that malicious compliance may result in more severe penalties.
Back
Top