Grey Area
New Member
Most of the threads on this are very old so I'm starting a new one.
I saw a lot of comments that the decals were more of a problem than the construction, and with 3D printers getting better and better, it seemed to me there was scope to revisit this.
I'm not a professional or even much of an amateur prop builder...but I am a bit OCD. I look at the models from the movie and those that are available today, and get this itch behind my eyeballs. The multiple models used in filming are part of that; I get that they needed slightly different construction, but even back then continuity could have been better. Some boards have velcro, some clearly have fabric tape. I swear in one shot the much-vaunted ,"lenticular" appears to be nothing more than pink bubble wrap, and don't get me started on the Mattel-logo-that-isn't - and that's in the movie!
So I'm asking a question; would people prefer a movie-accurate hoverboard prop...or what the movies would call a "reboot"? Same basic layout, but built to look more like one might expect a hoverboard to appear...which might include the odd flashing light?
I'm already producing the "movie faithful" version for a friend's wedding, and as part of that I'll be putting up some files at some point. There will be a charge, but this will be more than the average download...multiple STL files allowing different construction options, lists of currently available materials and for the first time (I think) decal files in svg format that are grouped by material, so you can print (for example) all the white pieces from a single sheet, and apply them yourself to be as cost-efficient as possible...as well as supporting the further minimising of materials by using a version of the bottom decal that has a cutout so you're not sticking expensive vinyl down only to cover it up.
But, since it's simpler to decorate without that cutout, also a version that supports that too.
I'll be providing numbered drawings to show which decal goes where.
And for those of us who do NOT have the huge 350x350x350mm print volume of the Creality K2 plus, two versions, one with the board in three pieces instead of two.
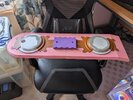
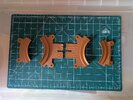
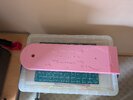
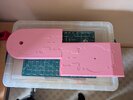
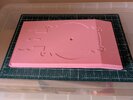
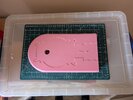
So yeah, grand designs, but, full disclosure, I may be biting off more than I can chew because of my Parkinson's disease. So far, I have version one of the physical board (image) confirming to the original 200mm width, 710mm length board with 75mm of that length being the kicked-up "tail" at a fifteen degrees angle. For most of the decoration I'm using tape, not vinyl, so some *ahem* adjustments *ahem* have been made to allow for 50mm (2") standard tape widths. But it annoys me every time I look at it, so at some point I'll try and get a more accurate "vinyl solution" uploaded as well.
So...that's the plan. Only time will tell if I can actually deliver.
I saw a lot of comments that the decals were more of a problem than the construction, and with 3D printers getting better and better, it seemed to me there was scope to revisit this.
I'm not a professional or even much of an amateur prop builder...but I am a bit OCD. I look at the models from the movie and those that are available today, and get this itch behind my eyeballs. The multiple models used in filming are part of that; I get that they needed slightly different construction, but even back then continuity could have been better. Some boards have velcro, some clearly have fabric tape. I swear in one shot the much-vaunted ,"lenticular" appears to be nothing more than pink bubble wrap, and don't get me started on the Mattel-logo-that-isn't - and that's in the movie!
So I'm asking a question; would people prefer a movie-accurate hoverboard prop...or what the movies would call a "reboot"? Same basic layout, but built to look more like one might expect a hoverboard to appear...which might include the odd flashing light?
I'm already producing the "movie faithful" version for a friend's wedding, and as part of that I'll be putting up some files at some point. There will be a charge, but this will be more than the average download...multiple STL files allowing different construction options, lists of currently available materials and for the first time (I think) decal files in svg format that are grouped by material, so you can print (for example) all the white pieces from a single sheet, and apply them yourself to be as cost-efficient as possible...as well as supporting the further minimising of materials by using a version of the bottom decal that has a cutout so you're not sticking expensive vinyl down only to cover it up.
But, since it's simpler to decorate without that cutout, also a version that supports that too.
I'll be providing numbered drawings to show which decal goes where.
And for those of us who do NOT have the huge 350x350x350mm print volume of the Creality K2 plus, two versions, one with the board in three pieces instead of two.
So yeah, grand designs, but, full disclosure, I may be biting off more than I can chew because of my Parkinson's disease. So far, I have version one of the physical board (image) confirming to the original 200mm width, 710mm length board with 75mm of that length being the kicked-up "tail" at a fifteen degrees angle. For most of the decoration I'm using tape, not vinyl, so some *ahem* adjustments *ahem* have been made to allow for 50mm (2") standard tape widths. But it annoys me every time I look at it, so at some point I'll try and get a more accurate "vinyl solution" uploaded as well.
So...that's the plan. Only time will tell if I can actually deliver.