Madhatter
Sr Member
Evening all
Thought I'd post a quick update of where I'm up to. Since Friday last week, I have been working on the top plate. I was asked elsewhere if I could elaborate a bit more on the process of detailing. I thought the top plate edging would be a good subject to show how I do things.
Quick disclaimer - I am not a professional modeller and my work is pretty average in terms of tidiness but I try. I have seen some seriously amazing scratch builders here and on other sites, with some actual skills they could teach which is why I feel like a little bit of a fraud doing this as what I do pales in comparison. But I said I would, so here goes.
First, I had to measure out how much over hang I wanted and then conform the back edge to the edge of the existing base plate:


Then I drew out a basic outline of the edges:

resulting in:

Using the waste material from the base layer cut, I then made a second layer. This was then flipped over and every edge lined with 0.20x0.20 strip plastic. I have run out of strip already - I used an entire pack on just 3 sides with the rear ones still to go. I'll be in the city on Friday so I'll pick some more up then


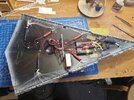
So that's 2 evenings worth of work. Now I have started to detail the lower ledges. Once they've been done, I'll permanently attach them and then blend in the upper surface to the plates. Then the detailing will be done and I can move onto painting and lighting it all.


As you can see, I've found a good use for all those left over PE radar bits I have lying around. They make for some great details
")
I hope I haven't insulted anyone's skill levels with my very basic and rudimentary attempts at scratch building - especially in the shadows of some very talented artists here on this site, but I'm hopeful it will help someone out with some ideas. Even if its picking up that old PE sheet with a different outlook
Anyways, as always, thanks for stopping in and having a look
Si
Thought I'd post a quick update of where I'm up to. Since Friday last week, I have been working on the top plate. I was asked elsewhere if I could elaborate a bit more on the process of detailing. I thought the top plate edging would be a good subject to show how I do things.
Quick disclaimer - I am not a professional modeller and my work is pretty average in terms of tidiness but I try. I have seen some seriously amazing scratch builders here and on other sites, with some actual skills they could teach which is why I feel like a little bit of a fraud doing this as what I do pales in comparison. But I said I would, so here goes.
First, I had to measure out how much over hang I wanted and then conform the back edge to the edge of the existing base plate:
Then I drew out a basic outline of the edges:
resulting in:
Using the waste material from the base layer cut, I then made a second layer. This was then flipped over and every edge lined with 0.20x0.20 strip plastic. I have run out of strip already - I used an entire pack on just 3 sides with the rear ones still to go. I'll be in the city on Friday so I'll pick some more up then
So that's 2 evenings worth of work. Now I have started to detail the lower ledges. Once they've been done, I'll permanently attach them and then blend in the upper surface to the plates. Then the detailing will be done and I can move onto painting and lighting it all.
As you can see, I've found a good use for all those left over PE radar bits I have lying around. They make for some great details
I hope I haven't insulted anyone's skill levels with my very basic and rudimentary attempts at scratch building - especially in the shadows of some very talented artists here on this site, but I'm hopeful it will help someone out with some ideas. Even if its picking up that old PE sheet with a different outlook
Anyways, as always, thanks for stopping in and having a look
Si
 You've got skills and it shows