Another Training Remote from kit bashing

kevin926

Master Member
RPF PREMIUM MEMBER
So I have all 3 models, scotch light and plastruct ball or hemispher.


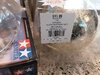
One little tidbit I found was using the ornament I bought from hobby lobby. I'm making 2. 1 for me and 1 for the boy. Actually, he's making his own. We are doing these together.

I bought 2 ornaments so I have the pieces for the outer skins for the accents.

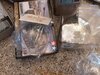
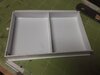
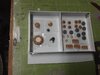
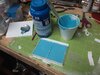
Getting parts together to make my dump molds.

20200523_120341.jpg
 

Attachments

  • 20200523_132531.jpg
    20200523_132531.jpg
    2.3 MB · Views: 196
  • 20200523_132546.jpg
    20200523_132546.jpg
    1.9 MB · Views: 179
  • 20200523_132553.jpg
    20200523_132553.jpg
    1.7 MB · Views: 180
I posted this because the others in kit form or 3d prints.

I looked all over and found only progress threads. We will post details and steps for those that want to follow along
 
Great vintage OT project and its awesome you can build with your boy, I have always wanted to do this, but for now I need to be happy with my MR, following... :cool:
 
I had to order the Airflix tank. Needed it for the other wheels. Should be in beginning of next week and then I will begin casting. I will be laying out my hemispheres and drilling for the chrome truck rims whilst I wait.
 
Any chance you're planning to make extra casts of the parts? I've been looking for a cheaper way to pick up these pieces without needing to buy an entire pre-made kit.
 
Any chance you're planning to make extra casts of the parts? I've been looking for a cheaper way to pick up these pieces without needing to buy an entire pre-made kit.
I can share pieces for someone to make casts for the group. Just need a willing party. More than willing to help out if I can.
 
My Airflex tank kit arrived. Luckily this was the cheapest from all the models. I'm ready to go and I just finished building my dump molds. I am making a 2 part mold for the rims. My kit only came with 4 chrome rims that are correct and the rest of the rims form the kit are different.

20200531_115041.jpg20200531_115041.jpg20200531_115050.jpg20200531_134359.jpg

Now, I did find an alternative for the muffler end cap that only comes with the Bandai Panther. It's a pulley on the fan belt set up from the Kenworth model. I matched it up with the 1 piece muffler .

20200531_122214.jpg

Also , my ornament from hobby lobby will work perfectly. Notice I matched up the rim with the part I need to cut away.

20200531_134838.jpg
 
What silicone are you using ?
Actually, I had an issue with the stuff I bought at hobby lobby. I went to the model section here and asked for help. I just ordered smooth on products. The mold makers swear by this so I will listen.

This is my first attempt using the hobby lobby stuff, so hide your laughter.

20200602_163003.jpg20200602_163011.jpg20200602_162956.jpg

This was my brand bought at hobby lobby

20200531_134359.jpg
 
After my mishap using a another product, I used smooth on for this round.

Finished a new mold, poured and waiting with crossed fingers.
 

Attachments

  • 20200606_124537.jpg
    20200606_124537.jpg
    1.9 MB · Views: 68
  • 20200606_124507.jpg
    20200606_124507.jpg
    1.8 MB · Views: 78
  • 20200606_163648.jpg
    20200606_163648.jpg
    2 MB · Views: 75
  • 20200606_171420.jpg
    20200606_171420.jpg
    1.9 MB · Views: 84
Ok, so I have a question. I see on the tutorial, you need to draw the 6 inch circle and use 45° angles for the lines. There is a circle drawn on the top however, no details on the measurements. Is this a 45 degree mark from the center and then finished with a compass or a number that was simply left out of the instructions?
 
This thread is more than 3 years old.

Your message may be considered spam for the following reasons:

  1. This thread hasn't been active in some time. A new post in this thread might not contribute constructively to this discussion after so long.
If you wish to reply despite these issues, check the box below before replying.
Be aware that malicious compliance may result in more severe penalties.
Back
Top