Another Escape Pod (Masterpiece Models Base)

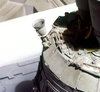
More work on the panelling. The look is coming along. The greeblies are tacked on to act as reference guides for where the panels need to be nibbled.

SAM_2702.JPG
SAM_2705.JPG
SAM_2708.JPG


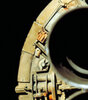
The semi circular panels are a work in progress. To look right they will need to have a curve to their section. There may be a couple of ways to go to achieve that.
 
Last edited:
The main engines have proven to take a lot of work.

Each pod main engine is a composite of several Airfix 1/144 scale Saturn V parts. The Lunar Module upper and lower (ring) shrouds are mated to the main F-1 engines.

When Airfix re released the Saturn V in 2009 they corrected an error with the original kit in that the Command module was way too small in diameter, and this affected the diameter of the top (Smaller end) of the LM shroud. Looks like my kit has the moulding of a 2009 shroud. Comparing with the original lower ring with the supplied shroud you can see the difference.

SAM_2762.JPG.jpg


Fortunately I have one vintage kit shroud and ring in my stash. (You need a lot of Saturn Vs for a Y Wing). So new engine parts have been moulded from the originals to replace the supplied parts.

SAM_2791.JPG.jpg
SAM_2794.JPG.jpg


SAM_2798.JPG.jpg
 
Last edited:
Good progress on the main engines.

Castings have cleaned up well, and have been shaved to ensure that the 5th ring on the Saturn V F-1 engine aligns to the base of the LM shroud as seen in the reference material. Note the use of the original styrene part from the vintage Airfix kit. The inner Phantom F4 turkey feathers are aligned at right depth.

SAM_2807.JPG
SAM_2808.JPG


Engines were then assembled taking care to follow the panel positions on the outside of the LM shroud as seen in the Chronicles book. The engines are numbered 1 to 4 and have their heat sinks added to match references. They've been airbrushed with a base coat before assembly, as access to the very bottom of the inside would be tricky.

SAM_2823.JPG
SAM_2838.JPG
 
The final element of panelling the replicating the 3 crescent shaped pieces around the equatorial ring. In the reference photos these seem to have a compound curve so a casting was taking of the end cap (AMT 1/25th Fruehauf Tanker) and then a section used to create a master crescent. These are then tailored in position to give a curve that corresponds to the reference materials. Note the chamfering to ensure the Sealab part sits correctly. The hole is the access to the side mount in the armature.

SAM_2806.jpg
SAM_2830.jpg

SAM_2837.jpg
 
Beautiful! Nice work on the engines - getting everything properly 'mis'aligned, casting seams-wise, is one of those fun details to get right. You're panel crescents look really good.

I'm enjoying watching your progress...

Dan
 
Applying the greeblies has now started. As expected the kit pod does have some discrepancies in dimensions which the use of the real donor parts highlights. Because of this aligning the panels with the greeblies takes a fair amount of study to find the necessary placement to make everything look ‘right’.

01.JPG
02a.JPG


Although the original intent was to build this pod pretty much out of the box, resisting the temptation to use real kit parts is pretty hard. I’ve limited myself to only sourcing stuff which is cheap and easy to find, but even so I've ended up spending more on donors than the model itself!

02b.jpg
04.jpg


Where donors were not available, the cast parts have been carefully cleaned up, and as some of them are tiny, any that have gone missing have also been recast. The original parts are clustered as far as possible around the ‘front’ section of the pod.

05.jpg
06.JPG
 
Last edited:
Alignment of the door mechanism greeblies is tricky. As the panels are cast from a kit part, they are straight whereas the door tapers towards the engines. On the studio model this discrepancy is very obvious on the central "horse shoe" details which are nowhere near in line with each other.

01.jpg
02.jpg


The resin was soaked in warm water to soften it and then coaxed it into a more "straight" look. The cast part was also recessed to overlap the central door detail.

03.jpg


The door mechanism greeblies were carefully checked against the reference images, testing the spacing before glue. Note that there are a few labelling errors on the part maps in this area.

05.jpg
06.jpg

08.JPG
 
Last edited:
The Kubelwagen based details are not the greatest castings, so were rebuilt as a hybrid. First a couple of vintage Tamiya Kubelwagen kits were found, and the four side parts isolated.

01.JPG

Two of the original cast parts were shaved down to reveal just the perforated section. The holes were drilled out as the castings were filled in with flash.

02.JPG


Moulds were made and several copies cast in case of any issues. Once thinned down and trimmed they were checked for fitment into the sections of the Kubelwagen.

03.JPG
04.JPG


The positions and sections of the Kubelwagen kit were matched with reference photos, and then carefully cut out. The newly fabricated perforated sections were then attached to the rear. The Tamiya parts were then shaved down to match the perforated piece. Finally, two of the hooks from the off cut sections were applied to the rear wheel arch panels from the Kubelwagen. They have the same differences seen in the reference images (one hook detail is much longer than the other) which makes it a bit more faithful to the original.

05.JPG
07.JPG


Fitted in place they have much better fidelity than the cast parts.

08.JPG
09.JPG
 
Last edited:
Looking REALLY nice! Great work on the Kubelwagen bits!

You're going to enjoy the heck out of the rear end around the main engines... ;-)

Dan
 
Checking the alignment of the unfitted lower surface panels reveals a problem. They are too short to have the correct overhang from the main greebly details.

01.JPG
Chronicles Pod 09 copy.jpeg
02 Analogue Pod 7.JPG

This highlights the issue that this section of the pod is not as long as the studio model. The gap from the Phantom Wing part to the next conical section is not long enough. You can also see this in the central strip which runs across the door. It is fractionally too low for the greeblies to align as seen on the studio model.

New longer panels have been cut to achieve a workable compromise.
 
Last edited:
One of the things that sells the original models to the viewer is the proliferation of very fine details. The pod has these rail details from the Nichimo 1/200th scale U Boat. The real thing looks a million times better than the casting (seen here tacked on for alignment testing). After some debate the damage to one of the rails you can see in the Chronicles images will be recreated.

SAM_3004.JPG
SAM_3005.JPG
Chronicles Pod 01 copy.jpeg
 
Last edited:
The base of the pod is now under construction (my favourite part!). This has thrown up a potentially missing part. Anybody know what this might be from?

SAM_3079.JPG.jpg

kg_escape-pod_studio_model-002 copy.jpg
 
Last edited:
There are also a couple of other parts that were probably a mid-filming repair, as the area is now a hole. But they were there on set.

The tread plastic is the same color as the sherman so it's almost certainly that donor.
 

Attachments

  • OnSet0001.jpg
    OnSet0001.jpg
    2.4 MB · Views: 309
  • escape_pod2.jpg
    escape_pod2.jpg
    1.3 MB · Views: 313
  • VEH_IA_11.jpg
    VEH_IA_11.jpg
    2 MB · Views: 366
  • IMG_6152 (1).jpg
    IMG_6152 (1).jpg
    7.7 MB · Views: 312

Your message may be considered spam for the following reasons:

If you wish to reply despite these issues, check the box below before replying.
Be aware that malicious compliance may result in more severe penalties.
Back
Top