YoungGrissom
New Member
Thanks! Your logo looks good. Nice and clean. The font may be a bit too seriffed for the 30s look you’re going for. Something like a Twentieth Century MT might look more the part - kind of an art deco look. I've attached a version of your text in my Steyr logo as an example. Just a thought.Absolutely fantastic! GREAT work sir!
YoungGrissom Do you mind if I ask you for some insight into your techniques? I am working on a similar project - even down to the old silverware box I purchased at Goodwill. The theme for my blaster display will be "retro" as I am building it as if Deckard was an LAPD Detective in the 1930s/1940s (think "retro-neo-noir"). I have the Illustrator skills and have knocked out a "vintage" Steyr logo along with some additional paperwork to go the with blaster, but my questions are:
Thanks for sharing your build, and thanks for any tips you are willing to provide.
- The foam and felt lining: What kind of foam did you use? What kind of glue did you use to adhere the foam to the felt? What kind of glue did you use to adhere the felt to the birch? Any tips you can share on the process would be greatly appreciated.
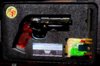
- The aluminum plates: What is the source of the aluminum discs? Are these off the shelf, or did you have to cut them? I assume the front data plate is custom (great touch by adding the coin!). What is the process for the rub on transfer? Is it correct to assume I just need to get some transfer paper for my ink-jet printer?
- Ammo box: What is the advantage of making the seal a rob on transfer with packing tape cover as opposed to just a regular printout with packing tape cover? Is it the transparency?
Here is the logo I have mocked up... not sure about the outter font choice, but again, I'm going for a 1930s look.
- J
For the foam I used a high density upholstery foam from Joanne's. Its the green stuff. The glue I use is a headliner contact glue from Permatex. Auto parts stores sell it (Oreilley's on the west coast). Its good for bonding fabric and foam to pretty much anything.
The inner tray is a buildup of 1/8 inch birch (I think I said 1/4 earlier, but its 18th). The felt is attached with Permatex. That's just a process of cutting the pieces and spraying both the felt and wood. If you've never done that its not too bad. The spray is pretty directional so you can control it. Spray both parts, let it dry about 5 minutes and then assemble. Once it's on it aint comin off so practice with scraps first. I did the sides as wraps - one piece covers the outside and wraps over the top to the inside. I do back and front first with the vertical edges wrapped around the sides to hide the seam when viewed from the front, then I do the sides, cut so they dont wrap around to front, if that makes sense. Do leave enough to wrap around to the bottom if you really want to minimize the seams. Then do the bottom inside and out. I did this mainly because I envisioned using the tray outside the box sometimes.
The discs I used are stainless sourced off ebay. I'm pretty sure they are cutoffs from some manufacturing process, so the sellers are making bank selling waste, but hey, suckers like me buy it so....The front data plate is just sheet aluminum.
The rub-on transfers are done using a product from a company called Sunnyscopa. Yeah, I know. Got it off Amazon:
The stuff works pretty well and I've used it for a few projects now. I like it because it's got a transparent background. Basically white prints clear, which means you can use it as an overlay. It is inkjet printed, which means you have to use a fixative on it afterwards to be waterproof, but for indoors it's fine. It will scratch, but for my purposes that's OK. Sometimes I will cover it with packing tape to protect it. Here's a DL-44 data plate done on brass and aluminum with the same process and a graphic I did for my truck (the bee in the center). Its a little fussy to work with but does the job.
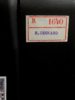
For the ammo box seal, you guessed it. I wanted it to be transparent. I wanted it to seem like a mylar security seal applied after the box was made, with the Weyland "W" transparent in some cases and slightly transparent as well, with the numbers and text sort of floating over it. Shows up best in the end view above. The packing tape gave it a plastic sheen and protects it from scratching off. I was going to use the same effect on the case but the orange and transparency sort of got lost.
Good luck with your build!

")