You are using an out of date browser. It may not display this or other websites correctly.
You should upgrade or use an alternative browser.
You should upgrade or use an alternative browser.
Andor - Aldhani Rebel Cell Old Navigation Tool identified - Spoiler Alert
- Thread starter the.rebel.agent
- Start date
The insane detail they added to this is actually discouraging. I was hoping one of our ace designers would do 3d add ons, or at least plans to buy. They design so much amazing stuff, but I guess there just is not the interest.
Example, they built an entire new pice over the top. It looks like an entire piece, top, front, sides, and bottom, built over the original.
Awesome prop. Very hard to replicate. At least for me.

Example, they built an entire new pice over the top. It looks like an entire piece, top, front, sides, and bottom, built over the original.
Awesome prop. Very hard to replicate. At least for me.
WhaleDaughter
New Member
Yeah, this prop has been a head scratcher for me as well, and I had to have a very serious heart to brain talk with myself about how I don't have Disney level budget or fabrication capabilities. And the great thing about old tech like this is that it gives very nicely to bespoke craftsmanship, plus due to their age in canon, it's not out of the likely that one might have been modified/updated/repaired over the years. So I'm going to do my best and that's all I can do. It's either that or give up on the prop (at least for me).
I haven't started my build yet, but I am considering hiring someone to do some 3D modeling of the Front and top of the piece. Or teach myself how to do it. That is really the only way, the front is completely custom, as well as the metal slide on the side. But being a machinist, I am going to try to make that myself. If so, I will probably offer up a small run of them.
This is the part I think I can figure out how to machine, once I get started on this project.
WhaleDaughter
New Member
If you can figure this out, I'd be interested if you plan to do a small run of them.This is the part I think I can figure out how to machine, once I get started on this project.
WhaleDaughter
New Member
As frustrating as this build has been, I kind of like the feeling that this is the kind of work they did on the original films in the 70s. Just a bunch of random parts and a "how can we make this work" attitude.
My current hurdle - how do I attach the scope (I'm using a vintage soviet dosimeter) and "sextant" to the camera body while still allowing them to be positionable? I spent several hours with random parts strewn out in front of my yesterday trying to figure out how to make it work, but I think I have a workable plan. I have to make a(nother) trip to the hardware store to do the final checks that everything will fit together the way I need it to. It doesn't really help that I kind of want the dosimeter to be removable in the future, and not have any visible screw heads.
For the screen, I know they scavenged an old cell phone with a tiny screen for the original, but the little screens made for the Raspberry Pi machines are the right size so I've ordered one of those. And since I don't have the Sonar model I'm going to see about mocking up that piece using an old flash bar as the base. I think my sextant might end up being a fixed shape for now, which is going to make carry this in a bag kind of a pain.
I have my cameral all taped up and ready for painting. Most of my remaining parts should be here on Wednesday (I want to knock out all the painting at once since it's going to be an awkward setup out on the sidewalk).
WhaleDaughter
New Member
I tell you what, it’s really hard for me to see my vision when I look at this blue tape job . But I don’t want any paint damaging the bellows or viewfinder shade.
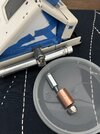
So, I still need to go get a 1/4” copper coupler, the one in the picture is 3/8”. The 1/4” coupler will be epoxied around the hose clamp screw head, then the #12 1-1/4” flat head machine bolt will be adhered to the end of the clamp screw inside the coupler, and the 1/4” coupling nut will also be inside the 1/4” copper coupler. The 1/4” locking nut will be secured with epoxy inside the end of the 3/8” copper coupler, which will in turn be adhered to the camera body. Then, to attach the scope to the body, I’ll slide the smaller copper coupler into the larger one and screw down the end of the machine screw into the locking nut. I’m going to carefully secure the 3/8” copper coupler to the body camera so that the scope is in the right position when fully screwed into the locking nut for safer storage.
This whole operation hinges on the 1/4” copper coupler being the actual measurements that Home Depot claims on their website .
If I’m very careful when adhering the hose clamp screw head to the smaller coupler and don’t glue it to the hose clamp body, I should still be able to remove the dosimeter from the hose clamp by using the whole coupler assembly to turn the clamp screw.
(The hose clamp is in backwards right now for this assembly, but I was trying different things last night and haven’t flipped it back around.)
The sextant attachment is still a little more hypothetical, involving 1/4” hex bolts and fender washers, but built on the same principle of nuts inside couplers for the actual attachments. I don’t have the sextant pieces till Wednesday so I can’t finalize the plans and buy the parts until next weekend. The screen and potentiometer are also arriving Wednesday. The flash bar has been ordered from eBay, should get here early next week. A sink strainer may be sacrificed for its mesh, I haven’t figured that part out yet.
I’ve toyed with using pinch clamps instead of the hose clamp, as it would look much, much sleeker. But I would also make the dosimeter permanently attached to the assembly, and I’d have to buy the special pinch tool. I don’t know, I’m still deciding. Nothings permanent until the epoxy comes out.
Attachments
WhaleDaughter
New Member
Oh, and of course all the attachment pieces will be painted black.
WhaleDaughter
New Member
Even with all my fussing and planning and thinking about the scope mount, I'm still having second (thirty-second) thoughts about my plans. It looks, to me at least, like the prop maker just drilled straight through the "scope" and mounted it to the body that way. There's no angle of this thing that I've seen where I can see any sort of actual 3D collar on the scope, the copper band looks like it's directly in line with the body of the scope. And I've got to admit, that would be the easiest way to mount this thing, just drill and hole and run a theaded strut through to a concealed bolt on the body, and then put the wheel nut thing on the outside. It's not like this actually had to function as a navigational tool, it just had to look cool for its 45 seconds of screen time.
But even if I could stomach the thought of drilling through my vintage dosimeter, I lack the fundamental capacity to do that.
The only other non-damaging option I can think of that I haven't tried is a hinged split ring pipe hanger (The Plumber's Choice 3/8 in. Hinged Split Ring Pipe Hanger in Uncoated Malleable Iron 38HSHB-N - The Home Depot).
WhaleDaughter
New Member
I found a smaller vintage hand level (middle) that I think is a much better fit than my Russian dossimeter (left). On the right is another level that is easier to find, but is too large. The large on is 6” long and 7/8” diameter, the middle level is 5” long and 5/8” diameter. The dosimeter is 5” long and 3/8” diameter.
Attachments
WhaleDaughter
New Member
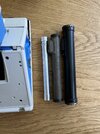
I finally spray painted the pieces for my navigational aid. I used Rustoleum flat protective enamel in black.
I think it’s going to be quite the adventure to get the tape and cardstock off once it’s completely dry.
WhaleDaughter
New Member
I think the piece used to attach the scope to the body is actually something like this little piece of camera mount equipment. It makes sense if the scope is, as I suspect, yoinked off of a vintage surveyors level so similar and has a built in standard tripod mount in that flush copper ring. And we know how much they like using bits of photography equipment in their builds ") . I don't think it's this exact one, because the photo shows knurling, but it's definitely close. The collar I'm using has a 3/8" thread, so I'm getting some 1/4"-3/8" male to male adaptors to make it work.
. I don't think it's this exact one, because the photo shows knurling, but it's definitely close. The collar I'm using has a 3/8" thread, so I'm getting some 1/4"-3/8" male to male adaptors to make it work.
. I don't think it's this exact one, because the photo shows knurling, but it's definitely close. The collar I'm using has a 3/8" thread, so I'm getting some 1/4"-3/8" male to male adaptors to make it work.Similar threads
- Replies
- 15
- Views
- 2,760
- Replies
- 8
- Views
- 672
- Replies
- 19
- Views
- 2,556
- Replies
- 62
- Views
- 9,257