Filandrius
Sr Member
To be absolutely clear, what I'm looking for is one of those knob, if anyone bought a set of 3 and has 2 spares: http://www.transcriptorslimited.com/...or-plate-nuts/
Should I be worried that I haven't received mine yet, have they all shipped?
To be absolutely clear, what I'm looking for is one of those knob, if anyone bought a set of 3 and has 2 spares: http://www.transcriptorslimited.com/...or-plate-nuts/
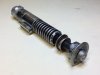
So I received my unibody last week and have had a go at reducing the shine and darkening the metal. I gave it a spin in the dish washer but like some more there here it only really had the effect of dulling the metal. This morning I let it sit in a mixture of caustic drain cleaner and hot water but, again, no real difference.
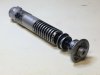
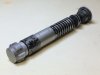
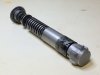
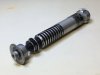
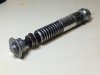
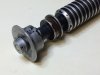
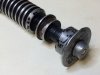
Instead I thought I'd try and make use what I had lying around so I used some artist's oils I had and rubbed the black into the pommel and emitter to see how it turned out. After lot of rubbing I'm pretty happy with the result but concerned that without being properly sealed this is only a topical treatment and might rub off. I'll let it dry a couple of days and see how it is.
Here are the results of the oil rub on the pommel and emitter. Hopefully you can see the difference but it looks better under natural light.
View attachment 708338
Onething
Dan's original run included a 1/4 20 tap because he made cone knobs with a threaded post. the original parts are nuts, which means they also have threaded holes and it's a different threading. If dan's drawings were the same you'll have to find a grub screw with two thread counts.
thats really coolAll the threads on my saber are metric, because the prop was UK made
")
All the threads on my saber are metric, because the prop was UK made
Smashy SmashyMine finally arrived the other day, it's so beautiful! I should have bought two, I don't want to beat it up!


What would be the threads for the cone knob? Thanks!
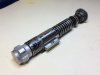
Impressive work.Managed to prep Trent's stencils and get painting at the weekend. I must say that they really are a work of art - particularly the intricacies on the booster and clamp band sections.
I sprayed matte black first and let it dry before removing the stencils and then doing some scraping here and there. Initially I tried to use some of the Celebration pictures as reference for the undersides of the emitter but eventually gave up and just started scraping and sanding randomly.
For the neck and wind vane I mixed copper, black and brown acrylics and then brushed it on. You can just about tell in the photos that it's not black, which I'm ok with since many thought it was black for so long. Again, it looks better in natural light. I might dry brush a couple of lighter flecks on top just to bring it out a little more. I painted the neck the same colour as I figured it would have been that way as the Obi-Wan stunt. I don't have any gaffer tape yet to cover it but can add that in due course.
After that I'll have to get a clamp from Roman, card from Slothfurnace and a lever from Roy. I'm not sure where I could source a mystery chunk though? Then a few more cosmetics - potentially adding the set screw in the side of the emitter and the notch in the bung. But that's for another weekend!View attachment 710514View attachment 710515View attachment 710513
Speaking of the emitter set screw, what's the right size for that one?Speaking of the emitter set screw, what's the right size for that one?
It's unknown at this point but a 4-40(M3) grub screw worked well on mine.
Exactly.I assume he meant the one beneath the emitter plate.
The nipple screws are included with the kit, so I'm not worried about those. Exactly.
EDIT: I've been working on my V2 for a few days now (mainly weathering the hell out of that blank) and I tackled the paint job last night. Had a few minor problems with the stencils, which were mostly my fault. Long story short, I ended up "customizing" them a lot by diluting the freshly applied paint with a Q-tip dipped in thinner; this created a lot of more intricate chips, which made the paint job more realistic, IMO (at least when I compare it to the most recent reference pictures) I also had to improvise some smaller chips because the paint fused with the stencils in some places, taking the paint with them when I removed them. Regardless I'm pretty satisfied with the end results. Let me know what you think.